Appearance
OpenUDS 3.6 Administration and User Guide
INTRODUCTION
OpenUDS is a VDI connection broker that manages user access to different services: virtual desktops, virtual application sessions, remote computer sessions, etc...
OpenUDS offers a set of software elements that make up a platform for managing. The life cycle, administration and deployment of desktop services
This document contains the basic instructions for installing the UDS Enterprise software elements on a virtual infrastructure and the procedures for proper administration and management of the different deployed services
Characteristics
Among the main characteristics of OpenUDS, it is worth highlighting:
Very easy deployment, installation, and administration
Automated deployment of virtual desktops and management of access to remote desktop sessions
Virtualization of Windows application sessions for users of Windows / Linux environments using Remote Desktop Services (RDS)
Virtualization of Linux application sessions for users of Windows / Linux environments using X2Go
Multi-hypervisor, being able to migrate the platform to more efficient solutions (currently it is compatible with KVM RHV/oVirt, Citrix XenServer, OpenNebula, OpenStack, Proxmox )
Multi-authenticator. It allows defining users and user groups from differen texternal sources and with virtually unlimited configurations
Authentication system using multiple connectors, e.g.: OpenLDAP, SAML, LDAP, CAS, Internal authentication system, Device authentication system, IP...
Generation of reports on the status and use of the platform
Tasks scheduling system (service deployment, user access control, etc ...) through calendars
Secure WAN access for desktops and virtual applications using an SSL Tunnel included in the subscription
Complete customization of the login portal and user services pages
Product roadmap based on customer and community requests
Subscription cost model that entitles support, new OpenUDS versions, updates, and patches
Subscription model not redistributable by number of users up to unlimited users
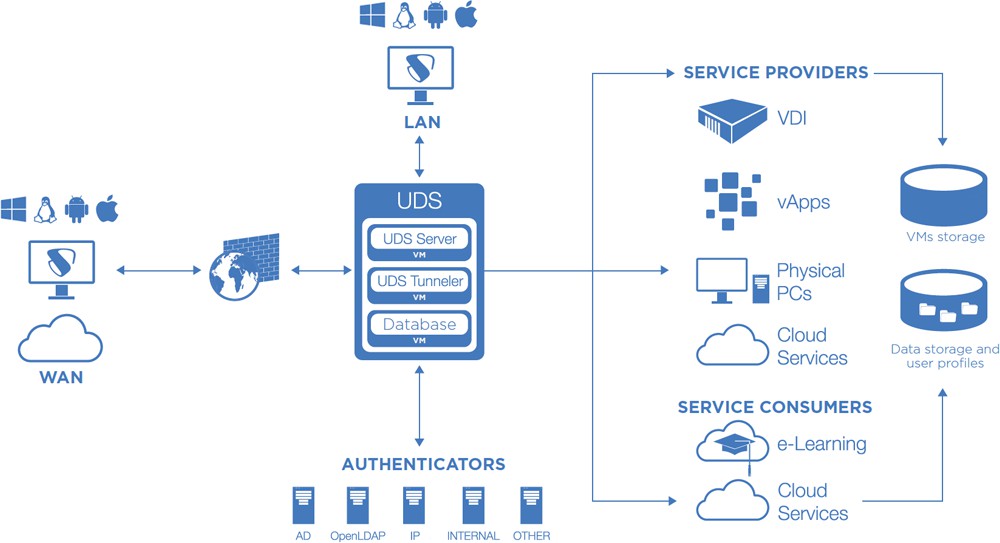
Platform architecture with OpenUDS
The optimal design of a desktop services platform is a critical part of achieving all the benefits that an architecture can provide. Each layer that makes up this architecture must be designed in such a way that it fulfils its function without penalizing the rest.
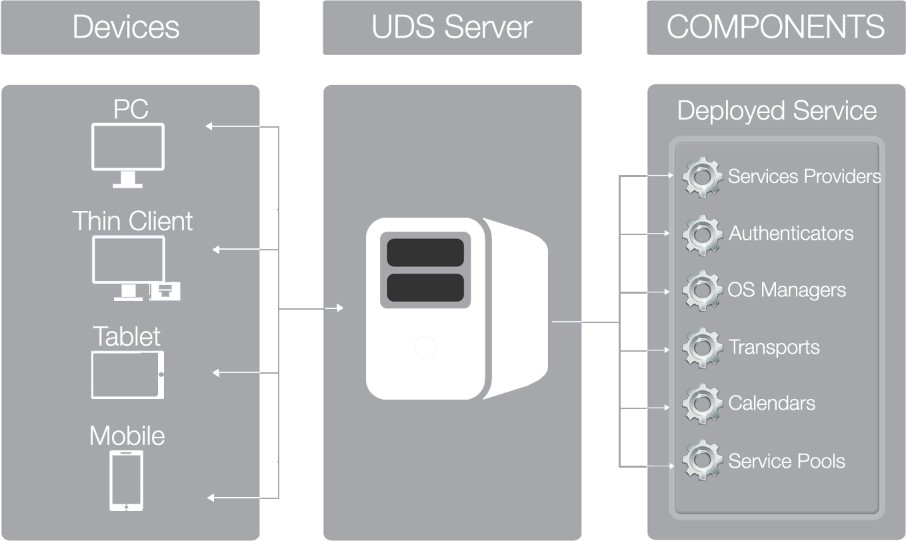
The main elements that make up an architecture with OpenUDS are:
Connection clients: These are devices for accessing virtual desktops and applications, such as thin clients, zero clients, PCs, etc... It is important to identify whether access to the desktops will be made from a LAN or from a WAN
UDS Servers: They consist of a Database to store all the data related to the environment, a connection broker that will manage the life cycle of desktop services and communication with hypervisors and other service providers; and a tunnel server to allow secure access from the outside. All these elements are served in virtual appliance format
Authenticator/s: OpenLDAP, etc... Through their integration with OpenUDS they will control user access to desktop services. Depending on the environment, you can have from one to an unlimited number of authenticators
####### Service Providers
Hypervisor Platform: : In charge of executing the tasks of creating, turning on and eliminating the virtual desktops managed by the broker. OpenUDS integrates with KVM (oVirt, RHV, Proxmox, OpenStack and OpenNebula), Citrix XenServer
Storage: They will host the servers, virtual and remote desktops, applicationsor/and other services of the platform. Choosing the type of storage is an important part of the design. Depending on the needs that users demand in desktop services, you must select the most appropriate type in terms of performance
When you have a clear idea of the architecture design, you can start scaling the platform, considering the number of users who will access it.
In the following image you can see an example of a VDI architecture with OpenUDS:
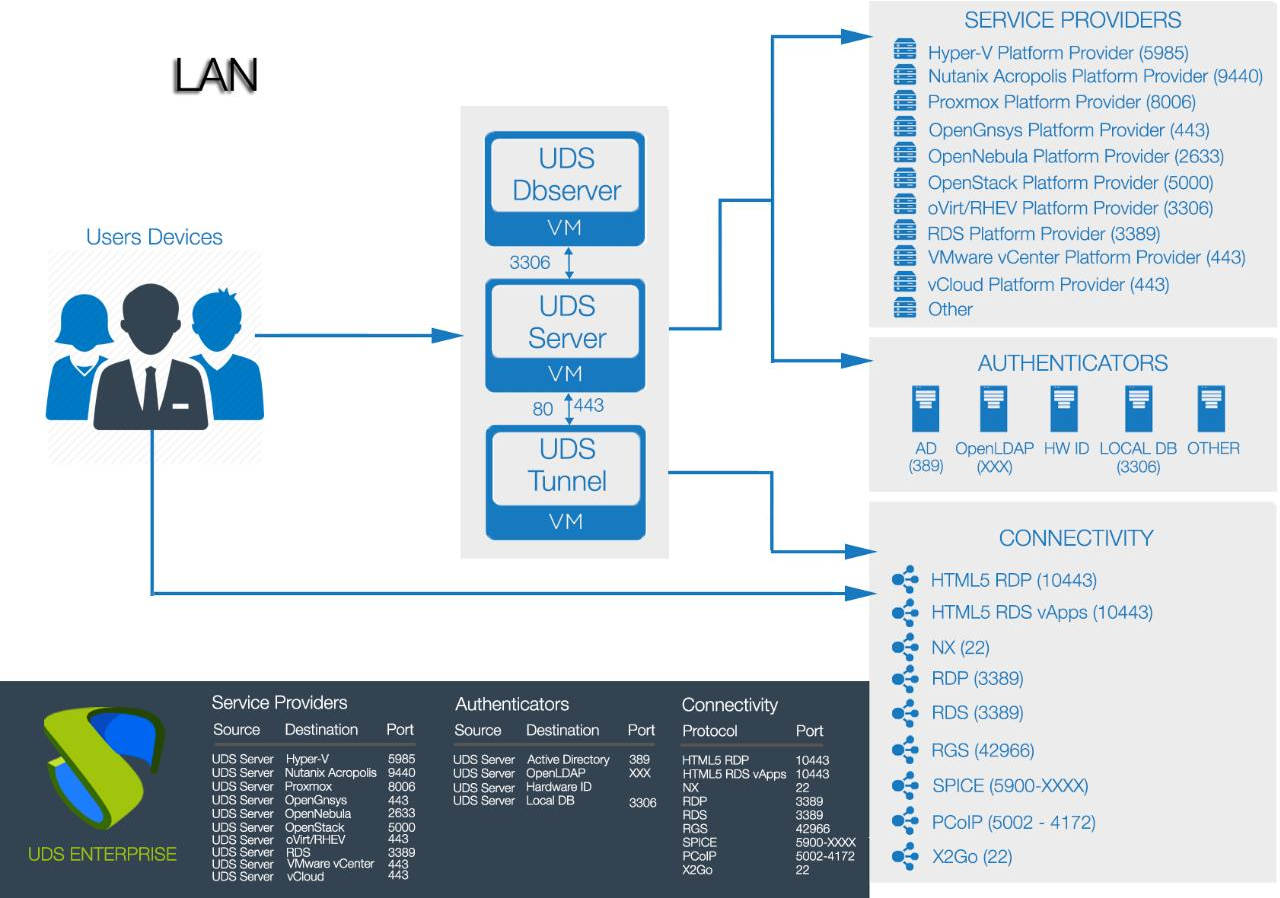
Architecture of the network
OpenUDS can be configured to be accessible by users located on a local network or users from a WAN (internet) without the need for VPN or LAN_extension.
Example of deployment of desktop services and virtual applications for user access through a LAN (drop-down to users who access from a VPN or LAN_extension):
Example of deployment of desktop services and virtual applications for user access through a WAN (internet).
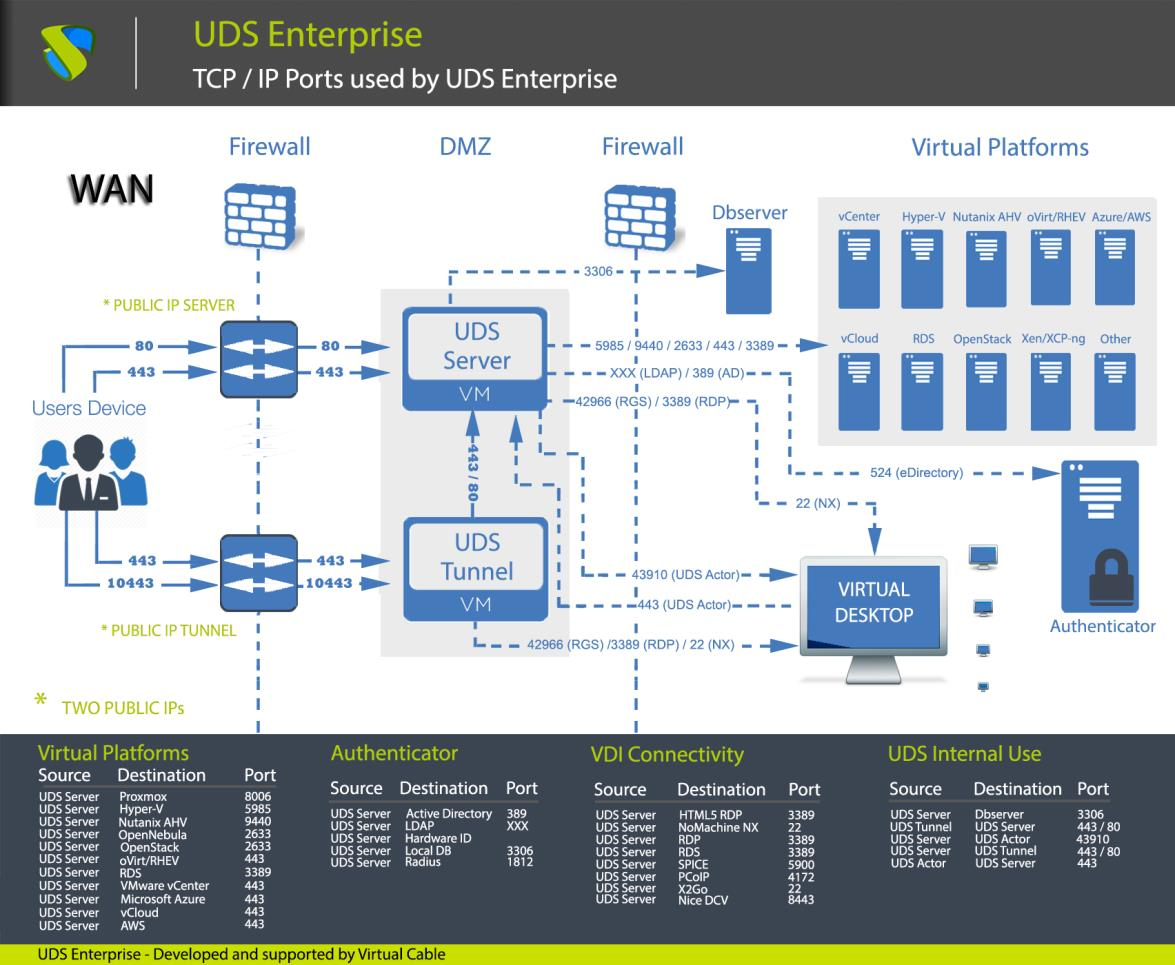
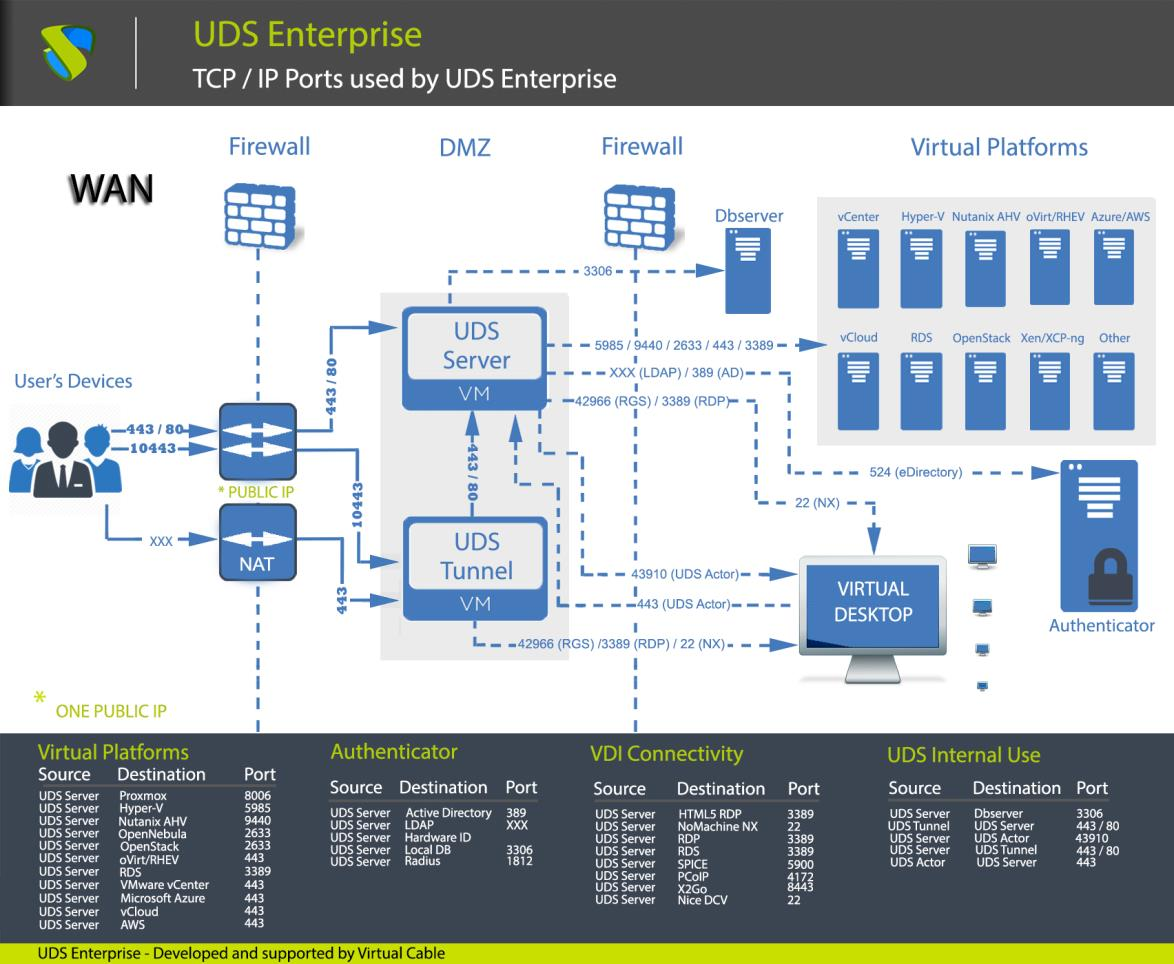
To publish UDS on the internet and for its services to be accessible by users, two public IP addresses will be needed, one for UDS server and one for UDS Tunnel (it is possible to carry out this process with a single public IP address by changing the default ports and configuring an internal NAT).
####### Safe Employment Procedure:
It is recommended to open only the ports that are strictly necessary for the correct functioning of OpenUDS in the communication between its components.
It is recommended to install UDS Server and UDS Tunnel in the DMZ and UDS DbServer should be in the server zone. All these zones must be delimited by firewalls.
In the case of access to the UDS Server from the WAN, the use of port 443 is recommended to force the use of HTTPS in the UDS web portal.
The use of HTTPS requires the use of valid web certificates, it is the responsibility of the client to provide and install said certificates.
Example with 1 unique public IP:
####### Safe Employment Procedure:
It is recommended to open only the ports that are strictly necessary for the correct functioning of OpenUDS in the communication between its components.
It is recommended to install UDS Server and UDS Tunnel in the DMZ and UDS DbServer should be in the server zone. All these zones must be delimited by firewalls.
In the case of access to the UDS Server from the WAN, the use of port 443 is recommended to force the use of HTTPS in the UDS web portal.
The use of HTTPS requires the use of valid web certificates, it is the responsibility of the client to provide and install said certificates.
OpenUDS components
OpenUDS is made up of 5 elements that interact with each other.
UDS Server: It is installed as a virtual machine (VM) and is provided in virtual appliance format
UDS Tunnel: It is installed as a VM and it is provided in virtual appliance format
UDS Dbserver: It is installed as a VM and is provided in virtual appliance format (Optional for UDS Free & Evaluation Edition)
UDS Actor: It is installed as a service in the VM that will be used as a template for the deployment of the desktop groups and in the RDS application servers to provide virtualized applications
UDS Client: It is installed on the client computer to be able to connect with desktop services (with the HTML5 connection type it is not necessary)

The features and technical requirements of each of them are defined below:
UDS Server
It is the software that mediates between connection clients and service providers. It is the essential piece of UDS, it performs the functions of connection broker to the desktop services allowing the administration and management of the platforms defined as implemented services.
####### Virtual Appliance with the following features:
Virtual Hard drivel: 8 GB
Memory: 2 GB
CPU: 2 vCPU
Network: 1 vNIC
####### Requirements:
1 IP Address
IP DNS
Network Mask
IP Gateway
Domain name
Database IP
DATABASE port and instance name
User and password of DATABASE user
Activation code (Enterprise, Free o Evaluation)
Secure use procedure: Passwords must be of sufficient length and include uppercase, lowercase, numbers, and special characters.
UDS Tunnel
This software is responsible for making secure connections to desktop services through the WAN and providing HTML5 access to virtual desktops.
The UDS tunnel allows you to connect from any device/browser/client to desktop services through an SSH tunnel without having previously installed any type of software.
Additionally, it enables RDP access to desktop services through HTML5.
####### Virtual Appliance with the following features:
Hard drive: 14 GB
Memory: 2 GB
CPU: 2 vCPU
Network: 1 vNIC
####### Requirements:
1 IP Direction
IP DNS
Network Mask
IP Gateway
Domanin Name
IP UDS Server
UDS Dbserver
It is the component responsible for storing all the data of the UDS system: service providers, authenticators, connectivity, etc... and all the information that will make it possible to generate statistics and reports
The MySQL Database manager is supported as of version 5.7 and MariaDB 10.5.
It is necessary to have a MySQL Database at the time of installation properly configured with a valid instance and a user..
IMPORTANT!
If you do not have such a Database manager, Virtual Cable can provide this component as a virtual appliance. This component is not supported by the OpenUDS team.
####### Virtual Appliance with the following features:
Hard Drive: 10 GB
Memory: 1 GB
CPU: 2 vCPU
Network: 1 vNIC
####### Requirements:
1 IP address
DNS IP
Network mask
IP Gateway
Domain name
Database instance name
User with instance permission
UDS Actor
It is the software that performs the communication and interface function for the transmission of data (virtual desktop status, machine name...) and commands between UDS Server and the desktop services managed by UDS.
It is installed as a service on the virtual machine to be used as a template (gold image) to generate groups of desktop services based on Linked Clones and on the Remote Desktop Services (RDS) servers to provide virtualized application sessions.
####### The supported operating systems to generate virtual desktops are:
Windows 11
Windows 10
Windows 8.1
Windows 8
Windows 7
Windows Server 2022
Windows Server 2019
Windows Server 2016
Windows Server 2012 R2
Linux (Debian, Ubuntu, CentOS, Fedora, OpenSuse, etc...)
####### Supported operating systems to generate virtual aplications are:
Windows Server 2012 R2
Windows Server 2016
Windows Server 2019
Windows Server 2022
####### Supported OS to generate Linux are:
- Ubuntu / Debian
####### Requirements:
.Net Framework 3.5 SP1 (Windows Machines)
Python 3.6 (Linux Machines)
UDS Server IP
UDS Client
It is the software that makes the call to the connection protocol to connect with virtual desktops and applications
It is installed on the client computer from which the connection to desktop services is to be made.
####### The supported operating systems are:
Windows 11
Windows 10
Windows 8.1
Windows 8
Windows 7
Windows Server 2022
Windows Server 2019
Windows Server 2016
Windows Server 2012 R2
Linux (Debian, Ubuntu, CentOS, Fedora, OpenSuse, etc...)
MAC OS (Versions 12 and 13)
MANAGING OpenUDS
Once the UDS platform components are installed, the system is ready to start its configuration. Enter the IP address or UDS Server name (Broker) through http or https access.
The first time you enter UDS administration dashboard, you must enter using the administrator user and the password indicated in the UDS Broker virtual appliance configuration script.
Once you access the administration dashboard, you will be able to change the password and create or select new users to enter the administration dashboard.
In the case that you already have a user with administration permissions in the UDS platform, indicate the user, the password, and select the authenticator that the user will validate with (only in case of having more than one authenticator).
If more than one authenticator is connected to UDS platform and you would like to access the administration dashboard with the administrator user and the password indicated in the configuration script of the UDS Broker virtual appliance the selected authenticator won't be used, because this user won't be validated against any authenticator.
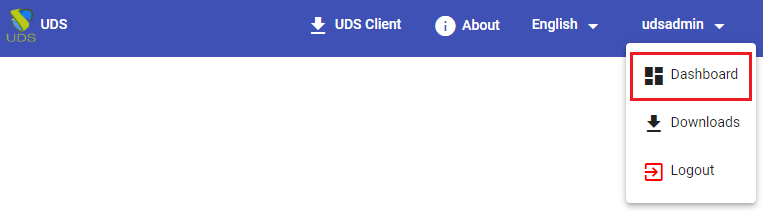
In the user menu, select "Dashboard" to enter UDS administration:
Once inside the UDS administration, the initial configuration of the components that will form a "Service Pool", is carried out. It will allow the deployment and connection of the different services supported by UDS (virtual desktops, virtual application sessions, etc...)
The configuration of each "Services Pool" " must be approached like the building of a puzzle:
Each "Services Pool" is made up of different elements or pieces: "Base Services", "OS Managers", "Transports" y "Authenticators"
Once the elements of the first "Services Pool" have been configured, the creation thereof will begin, repeating the process with the next "Services Pool" if there is one
The sum of the "Services Pool already configured will make up the type of deployment of the desktops and virtual applications managed by the UDS platform
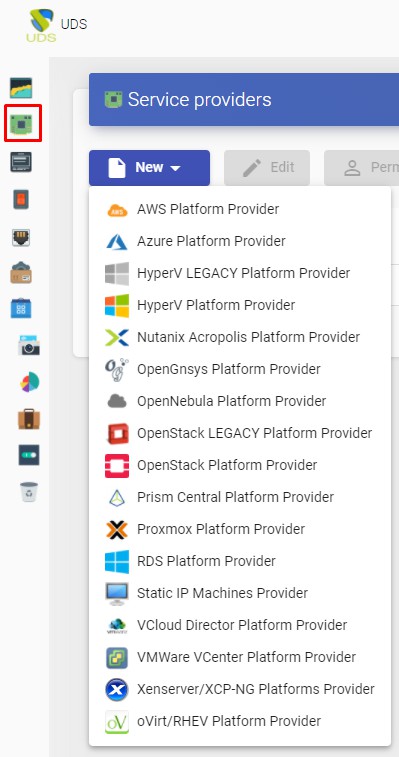
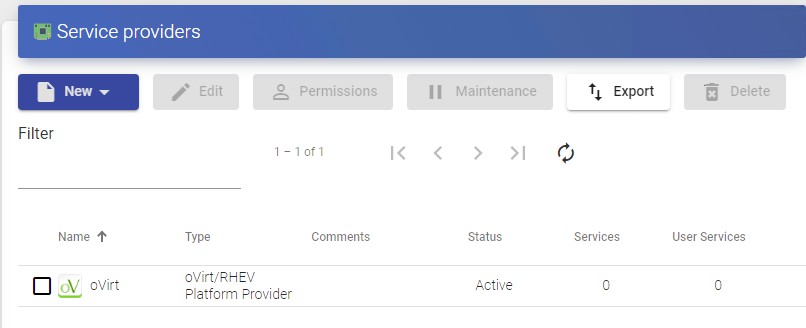
Service Providers
A "Service Providers" is responsible for providing IP services.
The services offered by UDS will be on-demand virtual desktops or applications provided by a virtualization platform or persistent physical/virtual desktops assigned to specific users via IPs assignment.
In order to build a "Service Pool" and publish virtual desktops and applications, it is necessary to have created at least one "Service Providers", UDS supports multiple "Service Providers" " to run simultaneously.
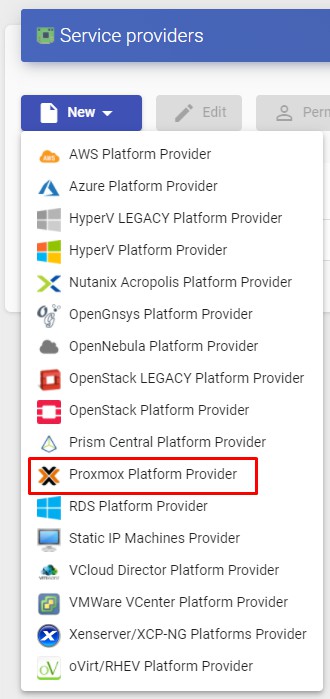
Currently, UDS supports the following "Service Providers":
VDI Platform with Citrix XenServer / XCP-ng
Deploy and connect to virtual desktops on a Citrix XenServer or XCP-ng virtualization infrastructure.
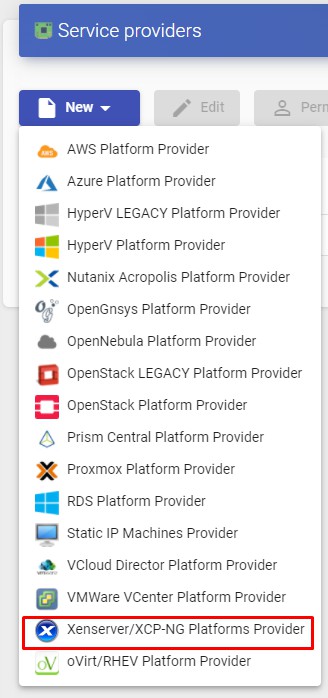
Register a service provider "XenServer / XCP-NG Platform Provider"
Click on "New" and select "Xenserver / XCP-NG Platform Provider".
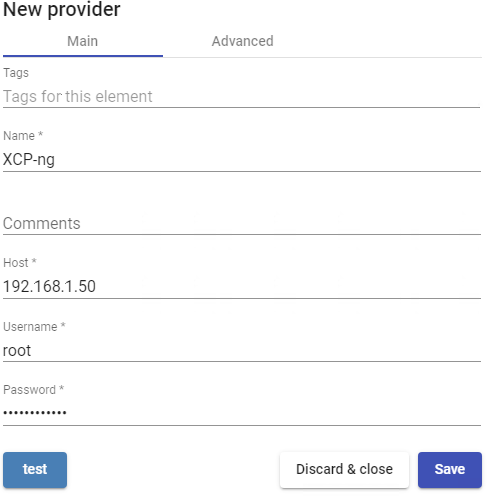
In a "Xenserver / XCP-NG Platform Provider" the minimum parameters to configure are:
- Main:
Service provider name, IP or XenServer/XCP-ng server name. In case you want to connect a cluster (Pool), enter the Master server "Host field"), username and password with administration rights over XenServer/XCP-ng.
- Advanced:
Creation concurrency: Number of simultaneous desktop creation tasks.
Removal concurrency: Number of simultaneous desktop deletion tasks.
Macs range: Range of MAC addresses used by UDS to create virtual desktops.
Verify Certificate: Virtualization Host Certificate Verification.
Backup Host: Backup server that will be used when there is no communication with the main server indicated in the "Host" field of the "Main" tab.
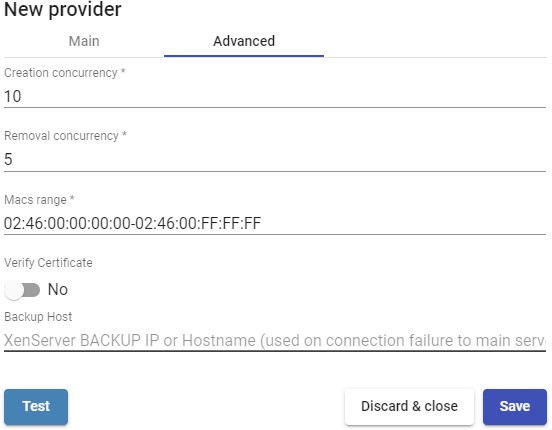
With the "Test" you can verify that the conection is made correctly.
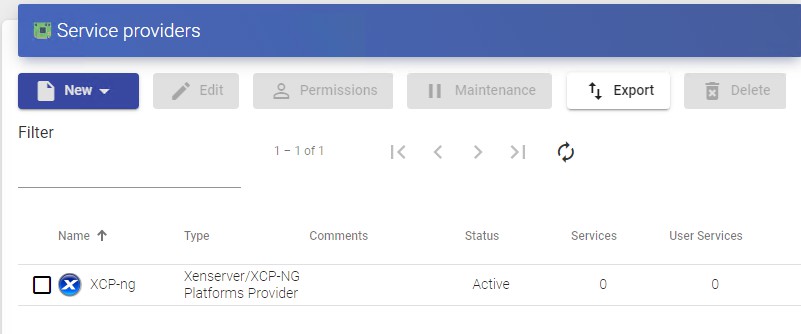
Save the configuration and you will have a valid "Service Providers" to start registering base services on the Citrix XenServer or XCP-ng platform.
NOTE:
If you have several Citrix XenServer or XCP-ng platforms, you can register all the"Service Providers" of the type "Xenserver / XCP-NG Platform Provider" that you
need.
To modify any parameter in an existing "Service Providers you will select it and click on "Edit".
Using the button "Enter Maintenance Mode" " you can pause all operations produced by the UDS Server on a service provider. It is recommended that a service provider is brought into maintenance mode in cases where communication with that service provider has been lost or a maintenance outage is planned
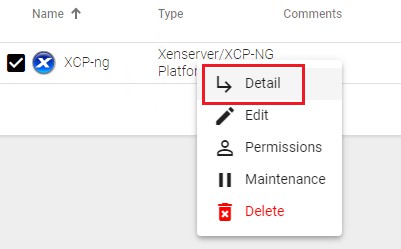
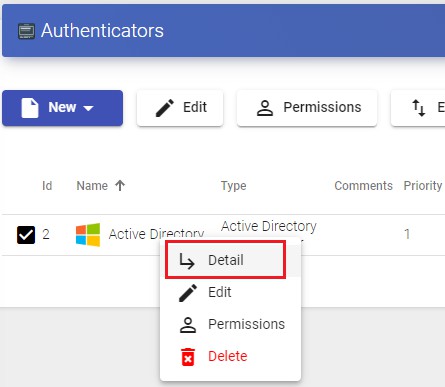
Once the Citrix XenServer or XCP-ng platform is integrated into UDS, base services can be created. To do this, double click on the service provider created or in the provider menu select "Detail":
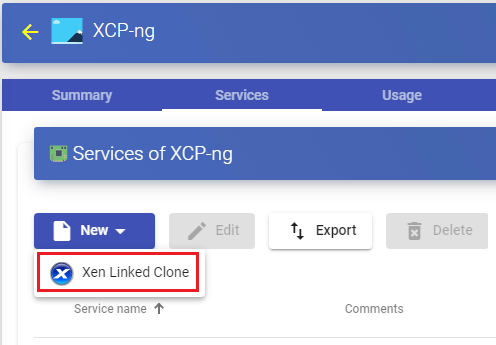
Configure a service based on "Xen Linked Clone"
This type of service will create, within the virtual infrastructure, virtual desktops dependent on the active publication.
To create base services of type "Xen Linked Clone" access the "Service Providers", select the "Services" tab, click on "New" and select "Xen Linked Clone".
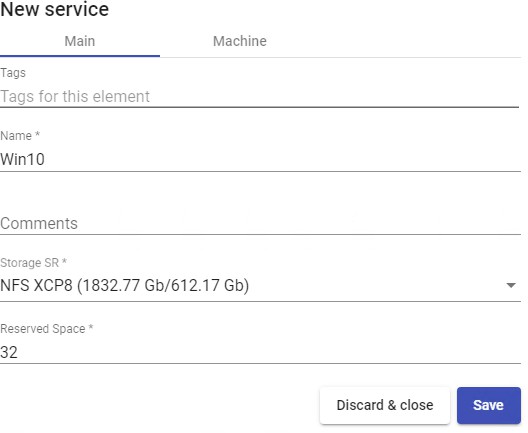
The minimum parameters to configure in this type of service are:
- Main:
Name: Service name.
Storage SR: Location where the generated virtual desktops and publications will be stored. Only shared storages are supported (If you are connecting to a single Host and you want to use its local storage, you can manually modify it from the host console and convert it to SR storage so that you can use it with UDS)
Reserved Space: When there is less free space on a storage than indicated in this parameter (in GB), UDS will not use it to host publications or virtual desktops.
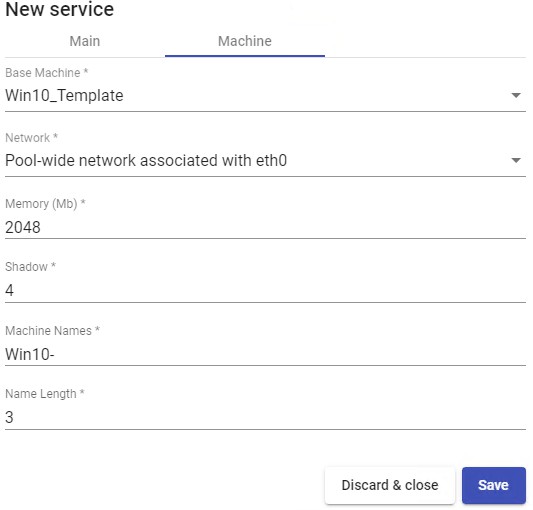
- Machine:
Base Machine: Template virtual machine (Gold Image) used by the UDS system for the deployment of virtual desktops.
Network: Network where the virtual desktops will be connected.
Memory: Amount of memory in Mb that will be assigned to the generated Linked Clones virtual desktops.
Shadow: Memory multiplier.
Machine Names: Root of the name of all Linked Clones virtual desktops to be deployed in this service. (e.g.: Machine Names= Win10-)
Name Length: Number of digits of the counter attached to the root of the name of the desktops (ex: Name Length= 3. The final name of the desktops generated would be: Win10-000, Win10-001... Win10-999).
Save the configuration and you will have a valid " Xen Linked Clone " on the XenServer or XCP-ng platform. You can register all the services of the type " Xen Linked Clone " that you need.
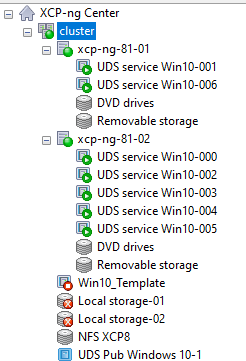
Once you have all the UDS environment configured (Services, Authenticators, OS Managers and Transports) and created the first "Service Pool", you will be able to observe in the XenCenter or XCP-ng Center how the desktop deployments are carried out.
The first task that will be carried out will be to create a publication of the template (this machine will be generated every time we make a publication of a service), which will be a clone of the template chosen at service registration, with a disk size and characteristics equal to said template.
Once the publication creation process is finished (the system will name it as: "UDS Pub name_pool- númber_publication") the desktops are automatically created (the
system names them as: "UDS service Machine_Name-Name_Length") based on the cache parameters configured in the "Service Pools".
Summary of Service usage and error logs
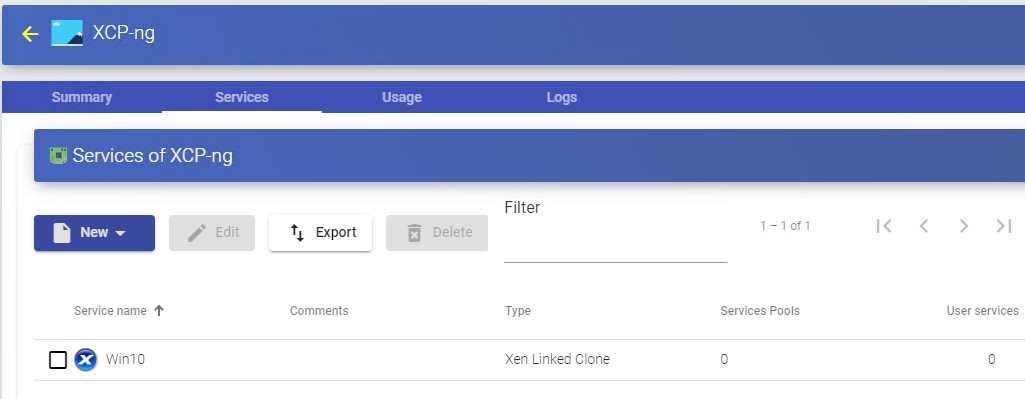
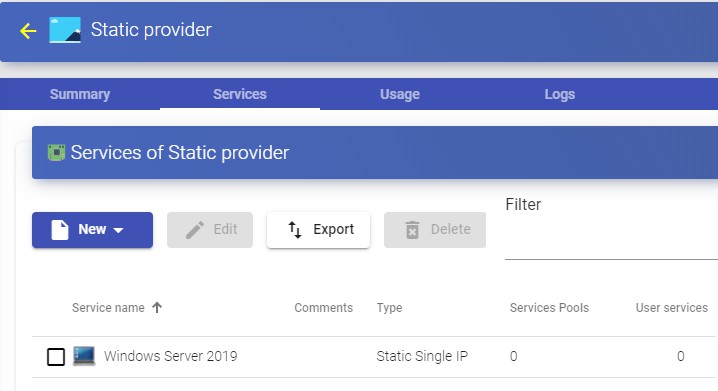
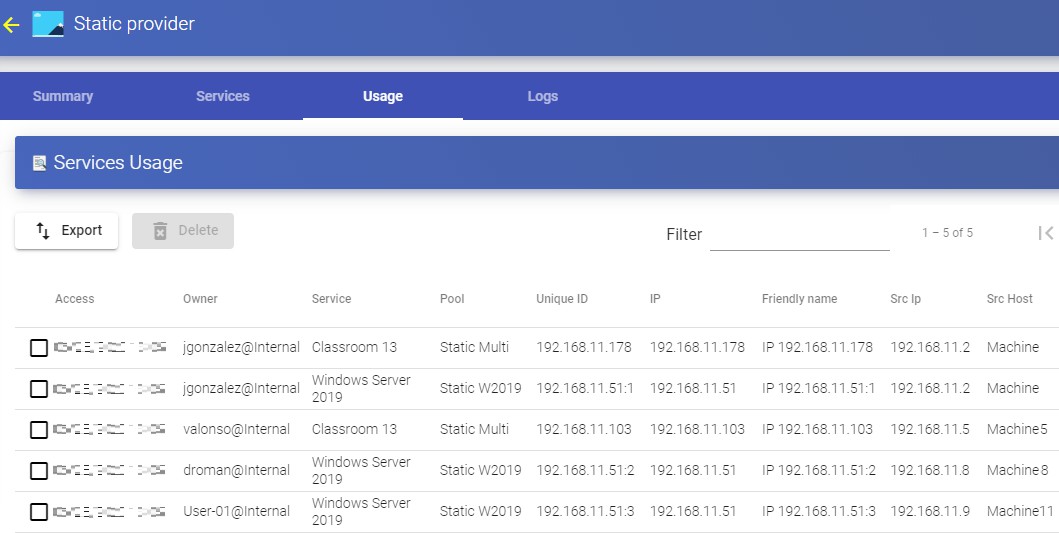
Within a "Service Provider" you will have a tab called "Usage that will allow you to have a quick view with detailed information and perform basic actions with the services displayed in this "Service Provider".
To access this information on the use of services you access the "Service Providers" and select the "Usage" tab:
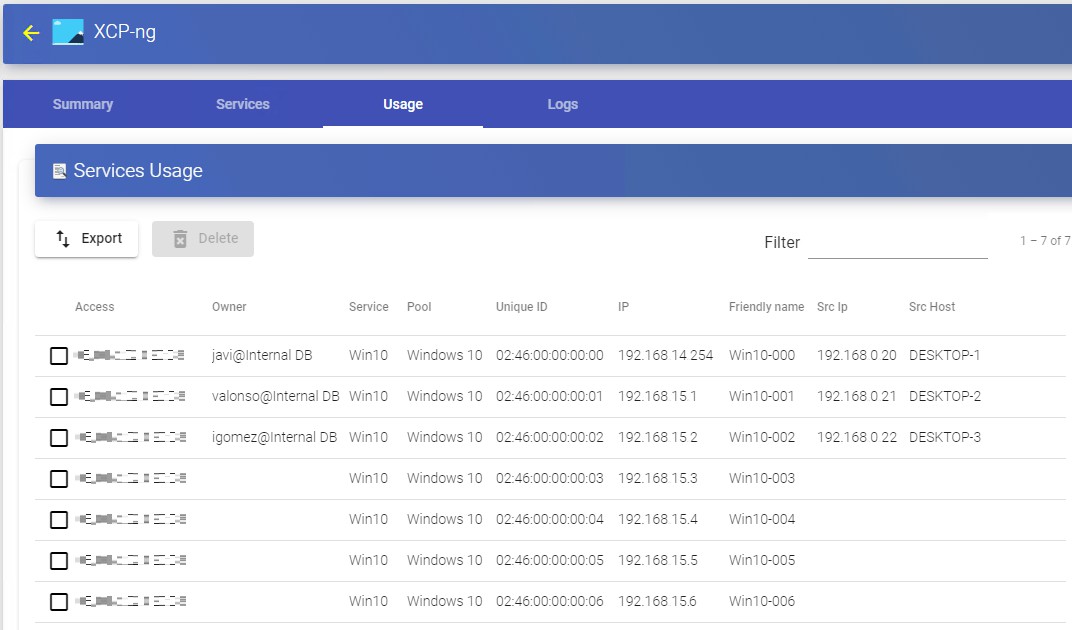
You will see:
Access: Date and time when the service was accessed.
Owner: User and authenticator assigned to the service in format user@authenticator. If it appears empty, it means that the service has not been assigned to any user and is available in the cache.
Service: Name of the base service belonging to the "Service Provider" from which the service was generated.
Pool: Name of the "Service Pools" to which the service belongs.
Unique ID: MAC address of the service.
IP: IP address of the service.
Friendly name: Name of the service. It will also be the DNS name of the UDS selfgenerated virtual machine.
Src Ip: IP address of the connection client accessing the service.
Src Host: DNS name of the connection client that accesses the service. If you cannot access this name, the IP address will be indicated.
It will also be possible to select one or several services to proceed with their elimination.
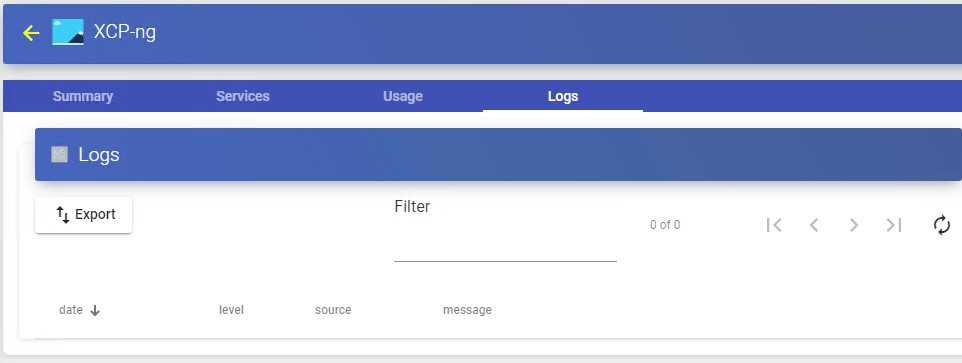
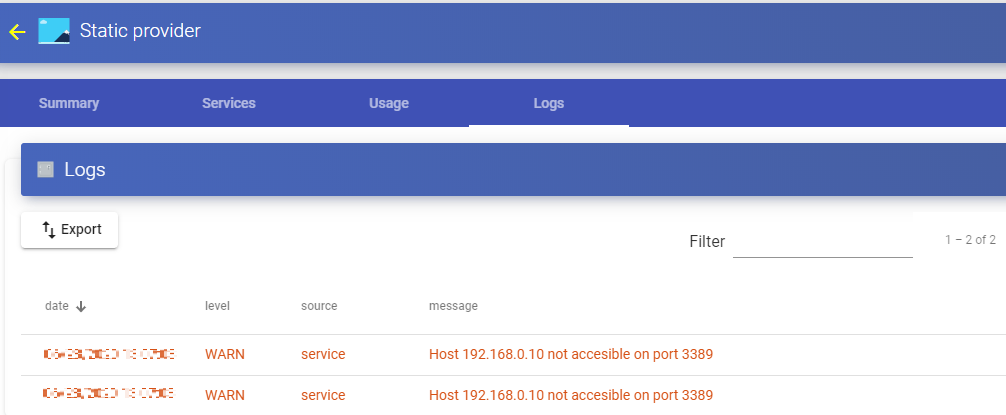
The "Logs" tab will show information about a possible issue that occurred in the "Service Provider":
VDI Platform with oVirt / RHV
Deployment and connection to virtual desktops on an oVirt or Red Hat Enterprise Virtualization (RHV) infrastructure.
Register a Service provider "oVirt Platform Provider"
Click on "New" and select "oVirt / RHV Platform Provider".

In an "oVirt / RHV Platform Provider" minimal parameters to be configured are:
- Main:
Service provider name, oVirt-engine or RHV-Manager server IP (field "Host a username (in the format user@domain) and password with administration rights on oVirt-engine or RHV-Manager.
- Advanced:
Creation concurrency: Number of simultaneous desktop creation tasks. Removal concurrency: Number of simultaneous desktop deletion tasks. Timeout: "Timeout" for connection with oVirt-engine or RHV-Manager.
Macs range: Range of MAC addresses used by UDS to create virtual desktops.
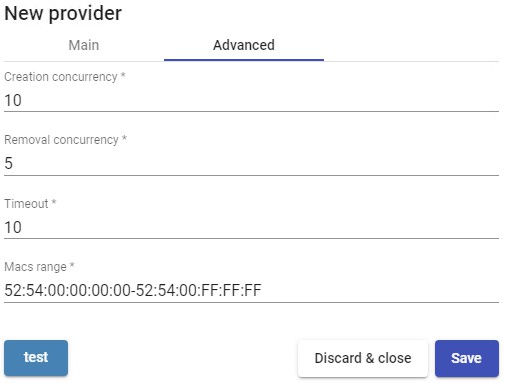
Using the "Test" button you will check that the connection is made correctly.
Save the configuration and you will have a valid "Service Providers" to start registeringbase services on the oVirt or RHV platform.
NOTE:
If you have several ovirt or RHV platforms, you will be able to register all the "Service Providers" of the type "oVirt / RHV Platform Provider" that we need.
To modify any parameter in an existing "Service Providers" you will select it and click on "Edit".
Using the button "Enter Maintenance Mode you can pause all operations produced by the UDS Server on a service provider. It is recommended that a service provider is brought into maintenance mode in cases where communication with that service provider has been lost or a maintenance outage is planned
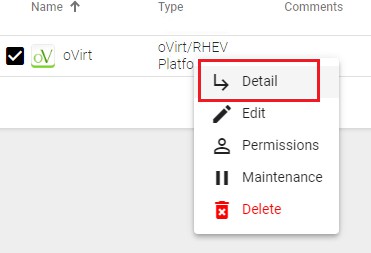
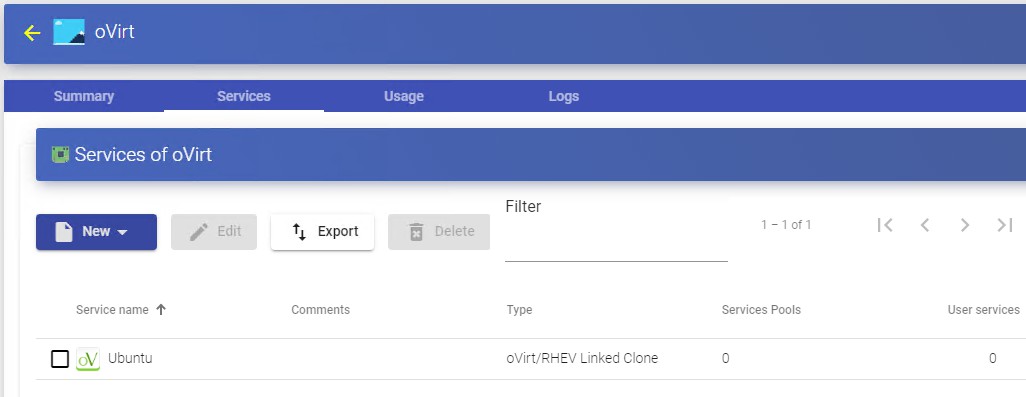
Once the oVirt or RHV platform is integrated into UDS, base services can be created.
To do this, double click on the service provider created or in the provider menu select "Detail":
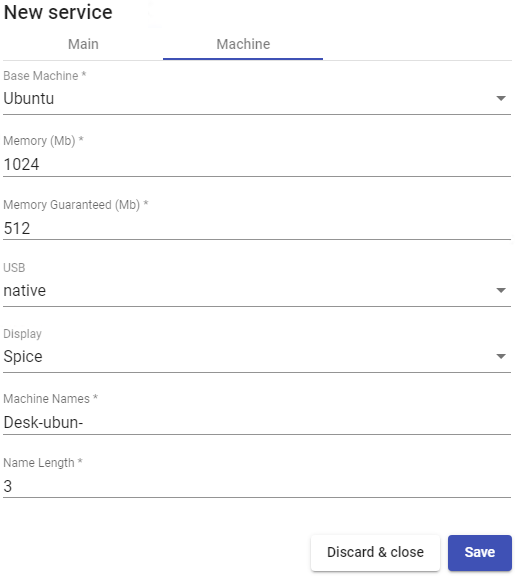
Configure a Service based on "oVirt/RHV Linked Clone"
This type of service will create, within the virtual infrastructure, virtual desktops dependent on the active publication
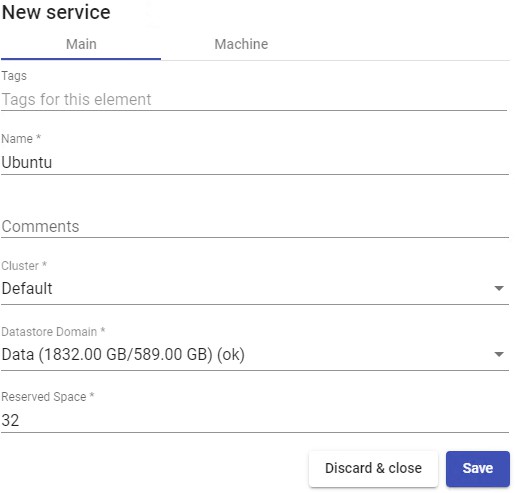
To create base services of type "oVirt/RHV Linked Clone" access the "Service Providers", select the "Services" tab,click on "New" and select "oVirt/RHV Linked Clone".

The minimum parameters to configure in this type of service are:
- Main:
Name: Service name.
Cluster: oVirt/RHV node cluster that will host the generated virtual desktops.
Datastore Domain: Location where the generated virtual desktops and publications will be stored.
Reserved Space: When there is less free space on a storage than indicated in this parameter (in GB), UDS will not use it to host publications or virtual desktops.
- Machine:
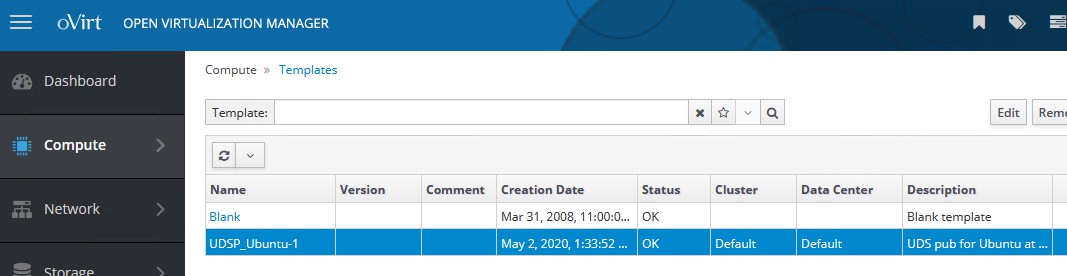
Base Machine Virtual machine template (Gold Image) used by the UDS system for the deployment of virtual desktops.
Memory: Amount of memory in Mb that will be assigned to the Linked Clones virtual desktops.
Memory Guaranteed: : Amount of memory that will be guaranteed to the Linked Clones.
USB: If selected, virtual desktops will support USB redirection.
Display: Connection mode from oVirt-Manager or RHV-Manager that the generated virtual desktops will have configured.
Machine Names: Root name of all of the Linked Clones to be deployed in this service (ex: Machine Names= Desk-ubun-).
Name Length: Number of counter digits attached to the root name of the desktops
(e.g.: Name Length= 3, The final name of the generated desktops would be: Deskubun-000, Desk- ubun-001... Desk-ubun-999).
After saving this configuration, you will already have a valid "oVirt/RHV Linked Clone" in the oVirt or RHV platform. You can register all "oVirt/RHV Linked Clone" that you need.
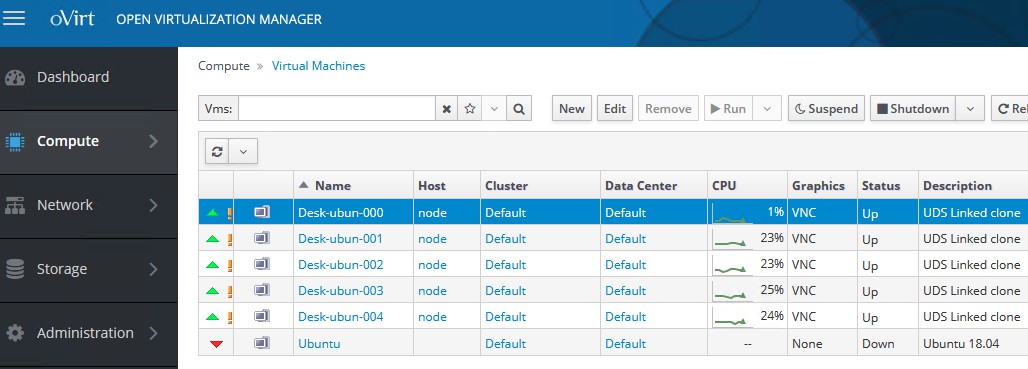
Once you have all the UDS environment configured (Services, Authenticators, OS Managers and Transports) and created the first "Service Pool", you will be able to observe in oVirt-engine or RHV-Manager how the desktops deployments are carried out.
The first task that will be performed will be to create a publication of the template (this machine will be generated every time you make a publication of a service). It will be a clone of the template chosen at service registration, with a disk size and characteristics equal to that template.
Once the publication creation process is finished (the system will name it as: "UDSP_name_pool-number_publication") he desktops will be automatically created (the system names them as: "Machine_Name-Name_Length") based on the parameters of cache configured in the "Service Pools".
Summary of Service usage and errors
Within a "Service Provider" there's a tab called "Usage" that will allow you to have a quick view with detailed information and perform basic actions with the services displayed in this "Service Provider".
To access this information on the use of services, access the "Service Providers" and select the "Usage" tab:
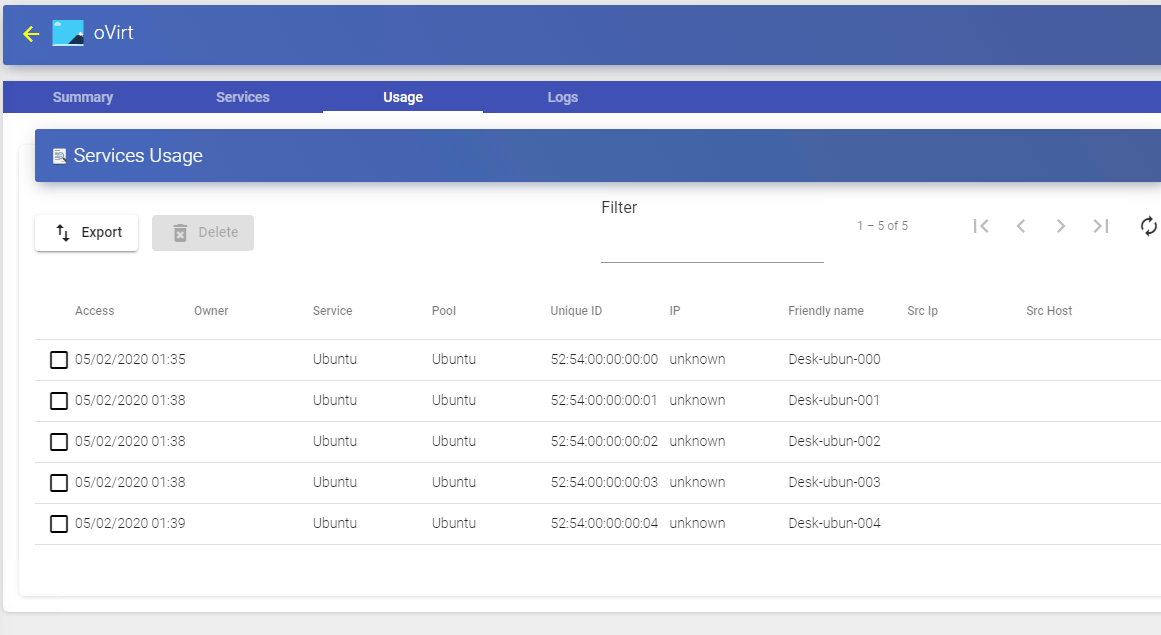
You will see
Access: Date and time when the service was accessed.
Owner: User and authenticator assigned to the service in format user@authenticator. If it appears empty, it means that the service has not been assigned to any user and is available in the cache
Service: Name of the base service belonging to the "Service Provider" from which the service was generated.
Pool: Name of the "Service Pools" to which the service belongs.
Unique ID: MAC address of the service.
IP: P address of the service.
Friendly name: Name of the service. It will also be the DNS name of the UDS selfgenerated virtual machine.
Src Ip: IP address of the connection client accessing the service.
.
Src Host: DNS name of the connection client that accesses the service. If you cannot access this name, the IP address will be indicated.
It will also be possible to select one or several services to proceed with their elimination.
The "Logs" tab show information about a possible issue that occurred in the "Service Provider":

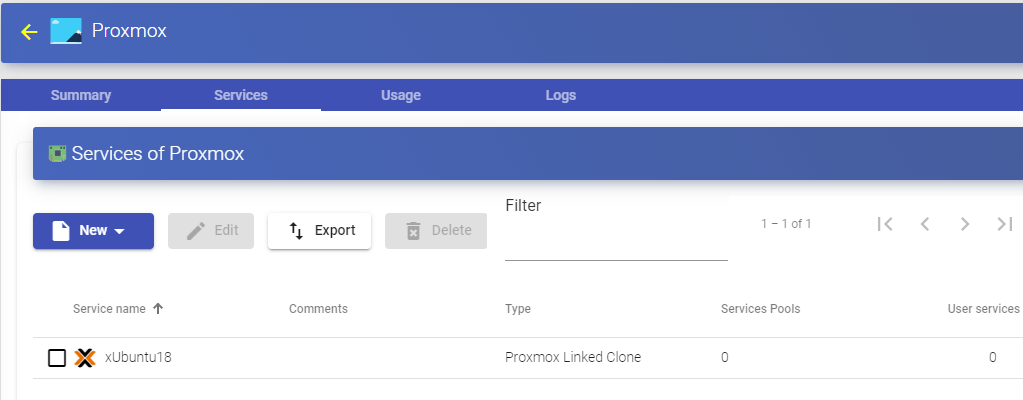
VDI platform with Proxmox
Deployment and connection to virtual desktops in a Proxmox infrastructure.
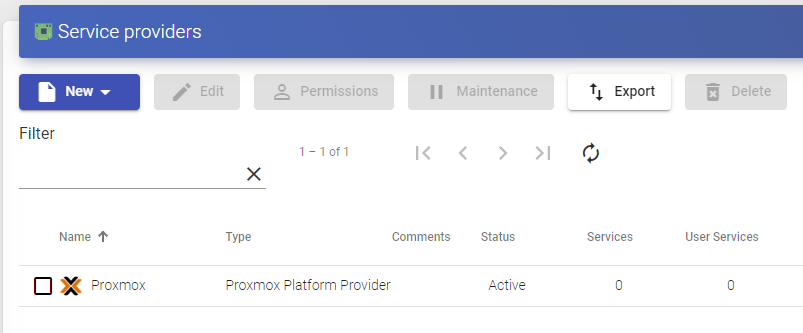
Register a Service provider "Proxmox Platform Provider"
Click on "New" and select "Proxmox Platform Provider".
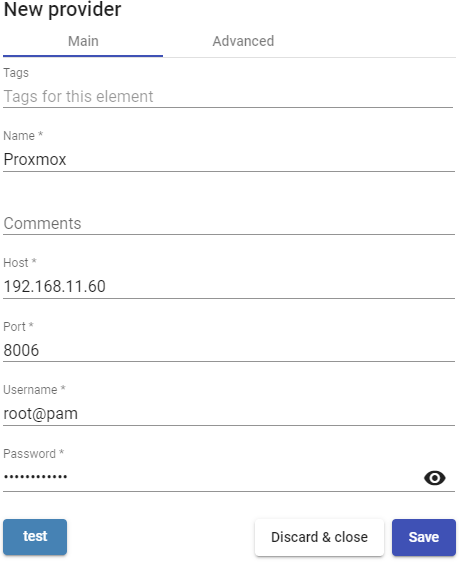
In a "Proxmox Platform Provider" the minimum parameters to configure are:
- Main:
Name of the service provider, IP or name of the Proxmox server or cluster ("Host" field), the connection port, the user namew (with user@authenticator format) and
password with administrative rights.
- Advanced:
Creation concurrency: Number of concurrent desktop creation tasks. Removal concurrency: Number of concurrent desktop deletion tasks. Timeout: "Timeout" for connection with Proxmox.
Starting Vmid: Machine ID with which UDS will start generating machines.
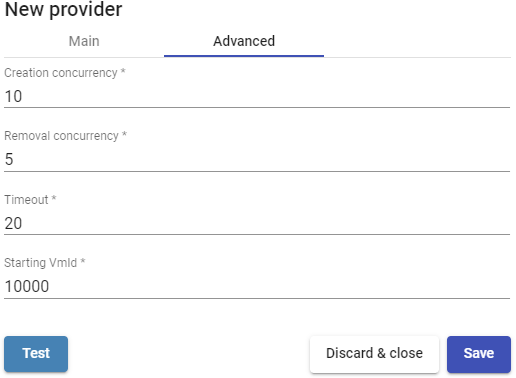
With "Test" button you will check that the connection is made correctly.
Save the configuration and you will have a valid "Service Providers" to start registering base services on the Proxmox platform.
NOTE:
If you have several Proxmox platforms (both independent servers and clusters), you
can register all the "Service Providers" of the type "Proxmox Platform Provider" thet we need.
To modify any parameter in an existing "Service Providers" existente, you will select it and click on "Edit".
Using the "Enter Maintenance Mode" you can pause all operations performed
by the UDS Server on a service provider. It is recommended to put a service provider into maintenance mode in cases where communication with that service provider has been lost or a maintenance outage is planned
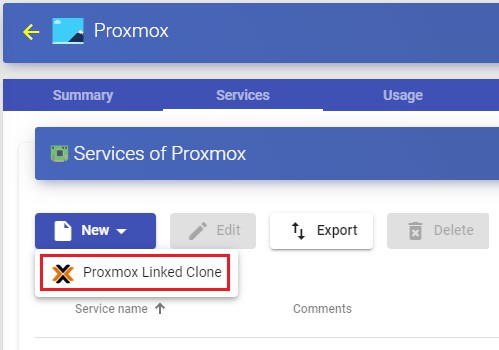
Once the Proxmox platform is integrated into UDS, base services can be created. To do this, double click on the service provider created or on the provider's menu and selec "Detail":

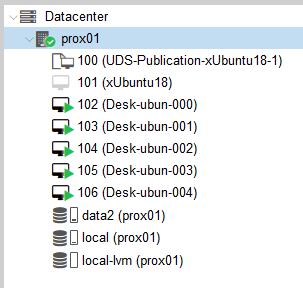
Configure a service based on "Proxmox Linked Clone"
This type of service will create, within the virtual infrastructure, virtual desktops dependent on the active publication.
To create base services of the "Proxmox Linked Clone" type, access the "Service Providers", select the "Services", click on "New" and select "Proxmox Linked Clone".
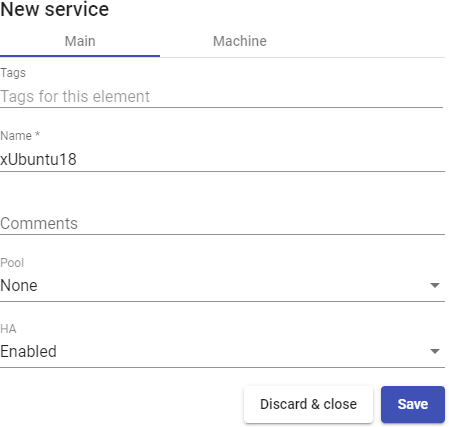
The minimum parameters to configure in this type of service are:
- Main:
Name: Service name.
Pool: Pool that will contain the machines created by UDS.
HA: It allows enabling the generated machines to use "HA Group".
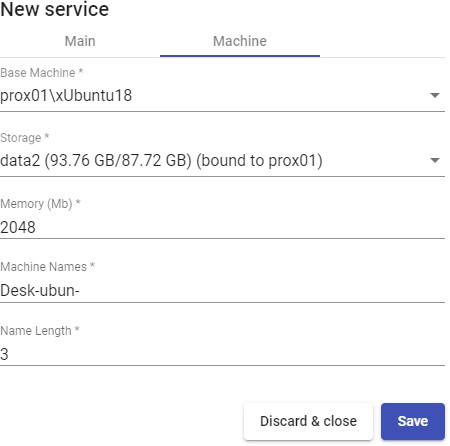
- Machine:
Base Machine: Virtual machine template (Gold Image) used by the UDS system for the deployment of virtual desktops.
Storage: Location where the generated virtual desktops and publications will be
stored. Storages that allow the creation of "Snapshots". For more information visit the following URL: [https://pve.proxmox.com/wiki/Storage]{.underline}.
Memory: Amount of memory in Mb to be allocated to the generated virtual desktops
Machine Names: Root of the name of all virtual desktops to be deployed in this service. (e.g.: Machine Names= Desk-ubun-).
Name Length: Number of digits of the counter attached to the root of the name of the desktops (ex: Name Length= 3. The final name of the generated desktops would be: Desk-ubun-000, Desk-ubun-001... Desk-ubun-999).
Save the configuration and you will have a valid "Proxmox Linked Clone" on the
Proxmox platform. You can register all the services of the "Proxmox Linked Clone" that you need.
Once you have the full UDS environment configured (Services, Authenticators, OS Managers and Transports) and created the first "Service Pool", you can observe in the Proxmox environment how the desktops are deployed.
The first task that will be performed will be to generate a publication of the template (This machine will be generated every time you publish a service). It will be a clone of the template chosen when registering the service, with a disk size and characteristics equal to that template.
Once the publication creation process is finished (the system will name it as: "UDSPublication - name_pool-number-publication") the desktops are automatically created (the system will name them as: "Machine_Name-Name_Length") based on the cache parameters configured in the "Service Pools".
Summary of Service usage and error logs
Within a "Service Provider" you will have a tab called "Usage" that will allow you to have a quick view with detailed information and perform basic actions with the services displayed in this "Service Provider".
To access this information on the use of services, access the "Service Providers" and select the "Usage" tab:
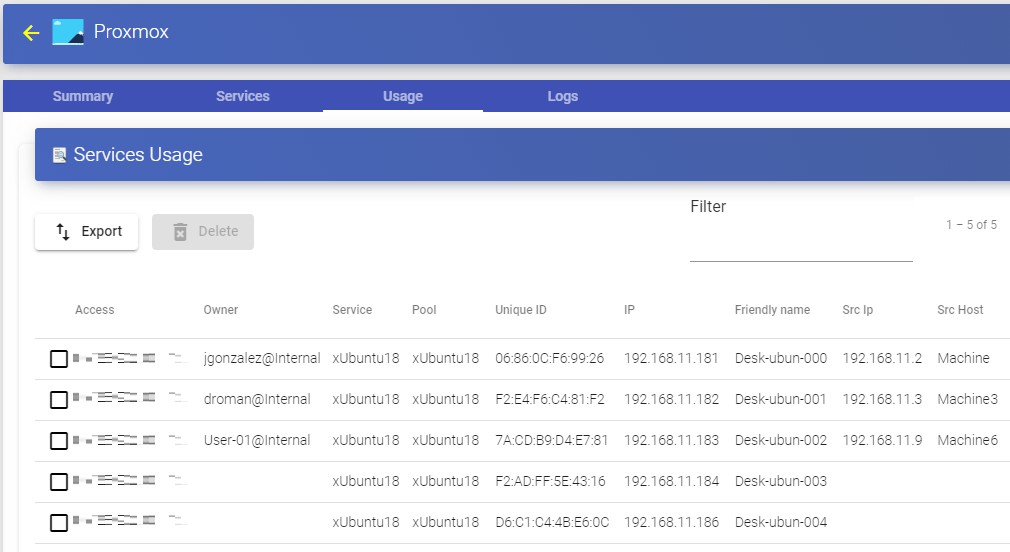
You will see:
Access: Date and time when the service was accessed.
Owner: User and authenticator assigned to the service in format user@authenticator. If it appears empty, it means that the service has not been assigned to any user and is available in the cache.
Service: Name of the base service belonging to the "Service Provider" from which the service was generated.
Pool: Name of the "Service Pools" to which the service belongs.
Unique ID: MAC address of the service.
IP: IP address of the service.
Friendly name: Name of the service. It will also be the DNS name of the UDS selfgenerated virtual machine.
Src Ip: IP address of the connection client accessing the service.
.
Src Host: DNS name of the connection client that accesses the service. If you cannot access this name, the IP address will be indicated.
It will also be possible to select one or several services to proceed with their elimination.
The "Logs" tab will show information about a possible issue that occurred in the "Service Provider":
Direct Connection to Persistent Devices
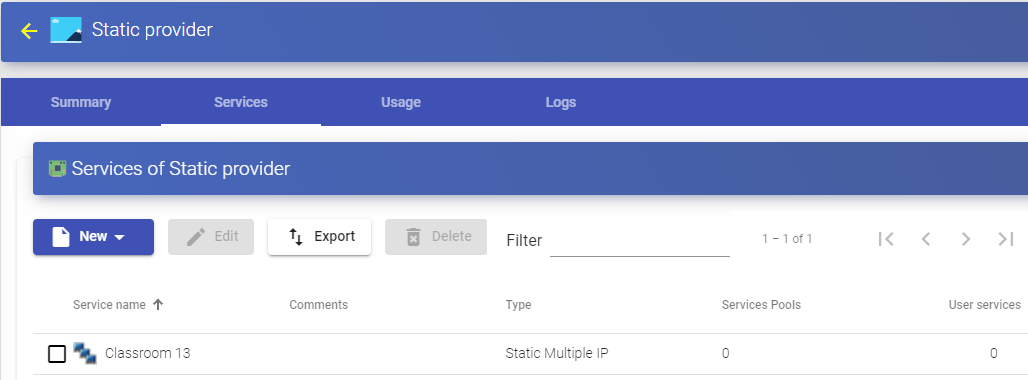
This type of "Service provider" allows the assignment of users to persistent or static computers, whether they are physical machines or virtual machines.
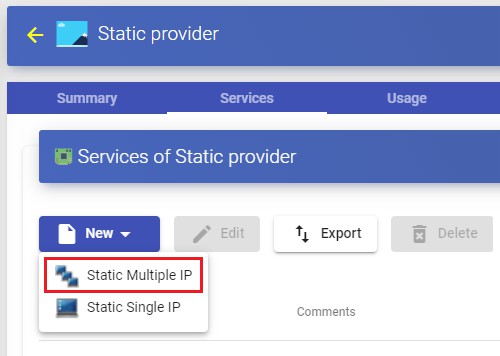
You will have two types of services:
- "Static Multiple IP", It will allow you to create a base service to connect a single user with a computer (IP address). You may indicate one or more IP addresses so that the system can enable user access to said IPs.
The assignment will be made in order of access, that is, the first user to access this service will be assigned the first IP address in the list, although it is also possible to make a selective assignment (an existing user in an authenticator to an-IP address).
- "Static Single IP", which will allow you to create a base service to connect several users with a single computer. If the device allows multiple sessions, each user who accesses will start a new session.
NOTE:
For users to be able to make a successful connection, it is necessary that the
machines indicated by their IP address (either in the "Static Multiple IP" o "Static Single IP") are previously turned on and have the connection protocol assigned to
access installed and enabled.
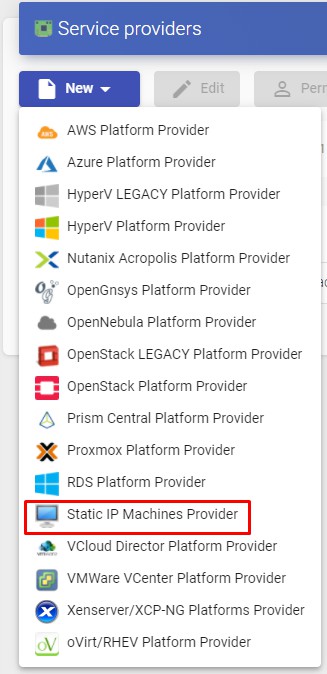
Register a Service provider "Static IP Machines Provider"
Click on "New" and select "Static IP Machines Provider".
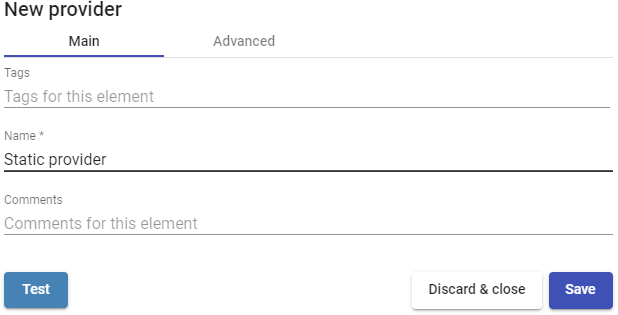
In a "Static IP Machines Provider" the minimum parameters to configure are:
- Main:
Descriptive name for the service provider.
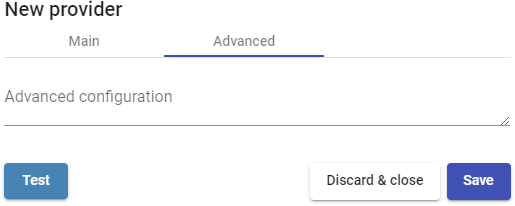
- Advanced:
Advanced configuración: You can indicate the [wol] option and enable "Wake on LAN" on physical machines.
NOTE:
If you want to use the "Advanced configuration" section to enable WoL on physical computers, we recommend that you consult the manual: "Wake on LAN on physical machines with OpenUDS" located in the section [documentation]{.underline} from the UDSEnteprise website.
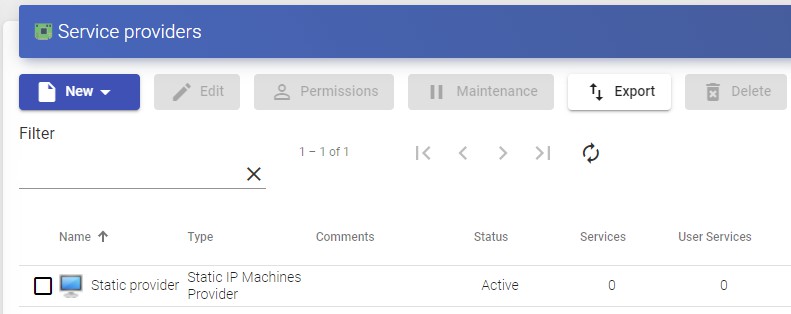
Save the configuration and you will have a valid "Service Providers" to start registering basic services in a provider of the "Static IP Machines Provider" type.
NOTE:
You can register all the "Service Providers" of the type "Static IP Machines Provider" that you need.
To modify any parameter in an existing "Service Providers" select it and click on "Edit".
Using the "Enter Maintenance Mode" button, you can pause all operations performed by the UDS Server on a service provider.
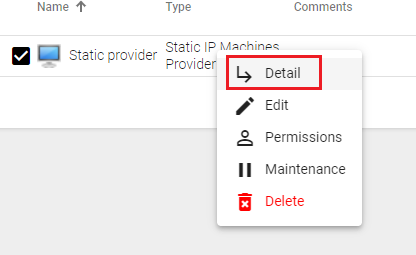
Once created, base services can be created. To do this, double-click on the service provider or select "Detail"in the provider's menu:
Configure a service based on "Static Multiple IP"
Este tipo de servicio permitirá al acceso de usuarios a diferentes equipos (físicos o virtuales). La conexión siempre se realizará uno a uno, es decir, un usuario a un equipo.
Para crear servicios base de tipo "Static Multiple IP" accedemos al "Service Providers", seleccionamos la pestaña "Services", pulsamos sobre "New" y seleccionamos "Static Multiple IP".
The minimum parameters to configure in this type of service are:
- Main:
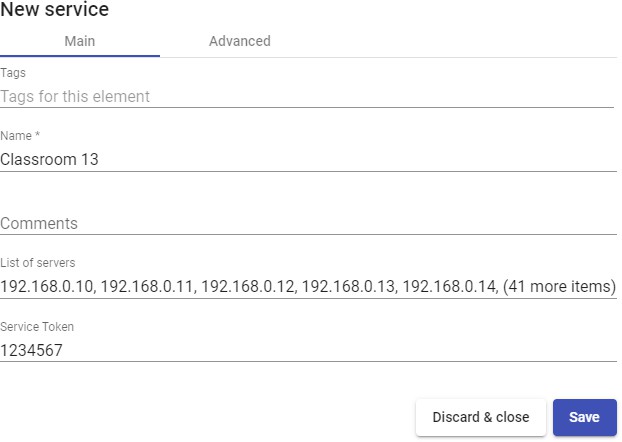
Name: Name of the service.
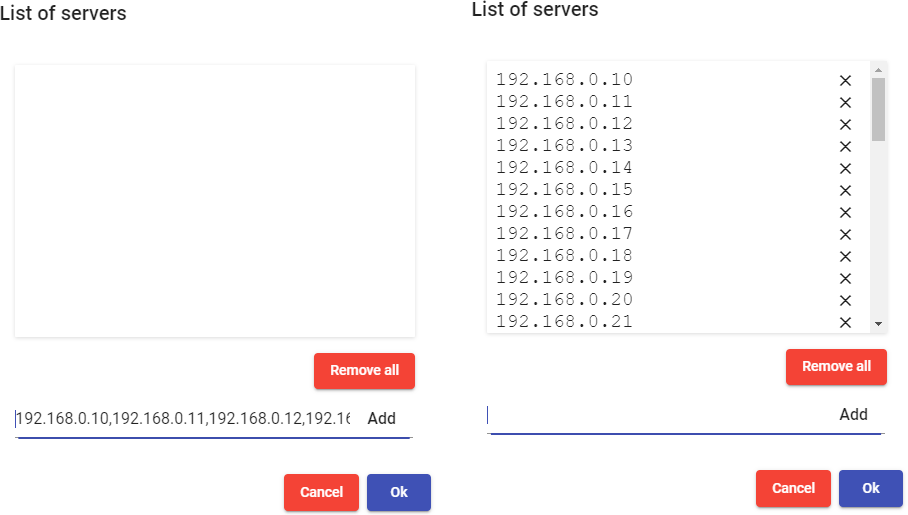 List of servers: IP addresses of the computers to which users will connect Enter the different IP addresses separated by commas, and click on e "Add":
Service Token: If there is no token indicated in this field (empty), the system will not control the sessions of the users in the computers. Therefore, when a computer is assigned to a user, this assignment will be maintained until it will be manually deleted by an administrator. If there is a token, the sessions of the users will be controlled.
When they log out of the computers, they will be released to be available again for other users to access.
f you indicate a token, it will be necessary for the indicated computers (by means of
their IP address) to have installed the UDS Actor that manages static machines ("UDSActorUnmanagedSetup-....").
- Advanced:
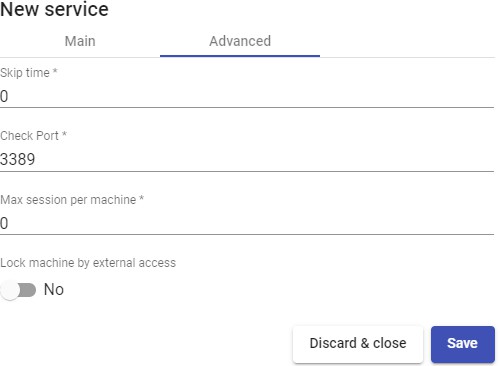
Skip time: If a port is indicated in the "Check Port" field and a machine is not available, you can indicate a time that will prevent a new check of that machine. If you indicate 0, the machines will always be checked. By default, 15 is indicated (this parameter is indicated in minutes).
Check Port: If you indicate a port, before assigning a service to a user, the system checks that the machine is accessible. In case it is not available through the indicated port, the system assigns the next available machine in the list. If no port is indicated, access to the machines will not be verified and will be assigned regardless of their state.
Max sesión per machine: If the "Lock machine by external Access", parameter is enabled, a maximum time can be indicated for UDS to consider the equipment usable again even if access (from outside UDS) of a user has been detected.
Lock machine by external access: If it is enabled and the UDS "unmanage" actor is installed on the computer, UDS will prevent access to the service if there is already a user logged in. For example, a physical machine to which a user has accessed locally (not from UDS).
Save the configuration and you will have a valid "Static Multiple IP" You can register all the services of the "Static Multiple IP" type that you need.
Once you have the full UDS environment configured (Services, Authenticators and
Transports) and the first "Service Pool", has been created, users will access the IPs of the different computers registered in the service.
From a "Service Pool" it will also be possible to make a selective assignment, indicating which device is assigned to each user.
Configure a Service based on "Static Single IP"
This type of service will allow different users to access the same computer (physical or virtual). Each user will start a new session on the computer, as long as it is configured for this purpose
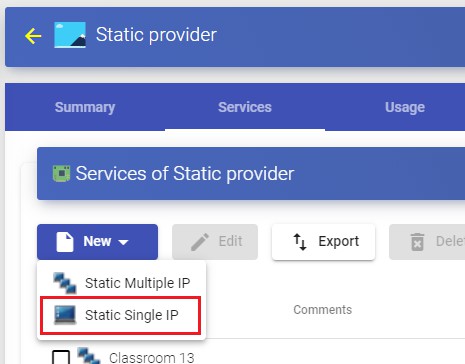
To create a "Static Single IP" type base service, access "Service Providers", select the tab "Services", click on "New" and select "Static Single IP".
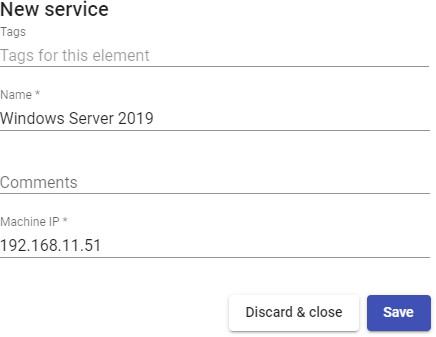
The minimum parameters to configure in this type of service are:
Name: Name of the service.
Machine IP: IP address of the computer to which the users will connect. The machine must allow access through different user sessions.
Save the configuration and you will have a valid "Static Single IP" You will be able to register all the services of the "Static Single IP" type that you need.
Once you have the full UDS environment configured (Services, Authenticators and Transports) and the first "Service Pool", has been created, users will access the IP of the indicated device by starting a new session.
Service Usage Summary and Error Logs
Within a "Service Provider" you will have a tab called "Usage" that will allow you to have a quick view with detailed information and perform basic actions with the services displayed in this "Service Provider".
To access this information on the use of services, access the "Service Providers" and select the "Usage" tab:
You will see:
Access: Date and time when the service was accessed.
Owner: User and authenticator assigned to the service in format user@authenticator.
Service: Name of the base service belonging to the "Service Provider from which the service was generated.
Pool: Name of the "Service Pools" to which the service belongs.
Unique ID: MAC address of the service.
IP: IP address of the service
Friendly name: Name of the service. It will also be the DNS name of the UDS selfgenerated virtual machine.
Src Ip: IP address of the connection client accessing the service.
Src Host: DNS name of the connection client that accesses the service. If you cannot access this name, the IP address will be indicated.
It will also be possible to select one or several services to proceed with their elimination.
The "Logs" tab will show information about a possible issue that occurred in the "Service Provider":
Authenticators
An "Authenticator" is an essential component within a UDS platform. It validates users in the login portal and provide users and user groups permissions to connect to the different virtual desktops and application services.
An "Authenticator" is not a necessary component for the creation of a "Service Pool", but if at least one is not assigned, there will be no users that can make connections
with the services in the UDS platform.
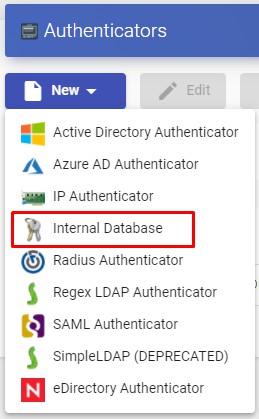
You can choose between many types of "Authenticators," either external (Active Directory, eDirectory, OpenLDAP, etc...) or internal (Internal Database and IP Authentication).
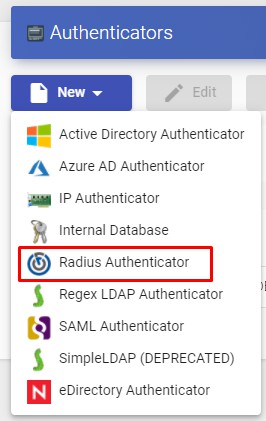
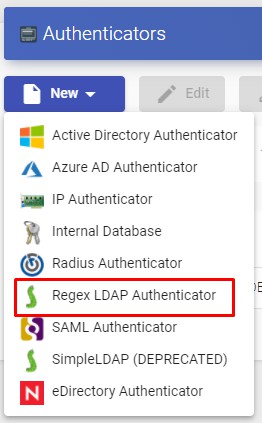
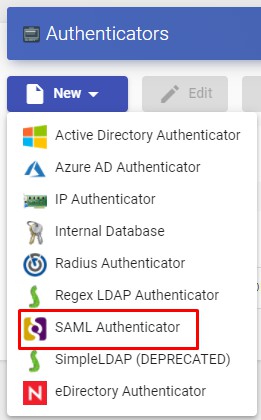
UDS currently supports the following "Authenticators":
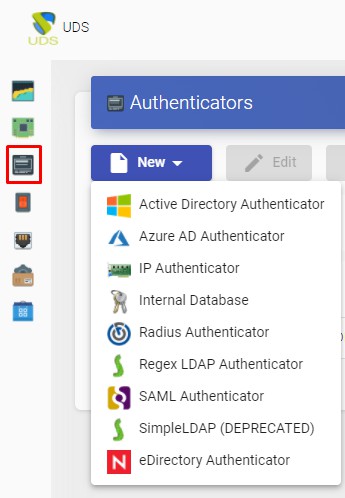
NOTE:
You will be able to register all the authenticators, of the same type or different, that you
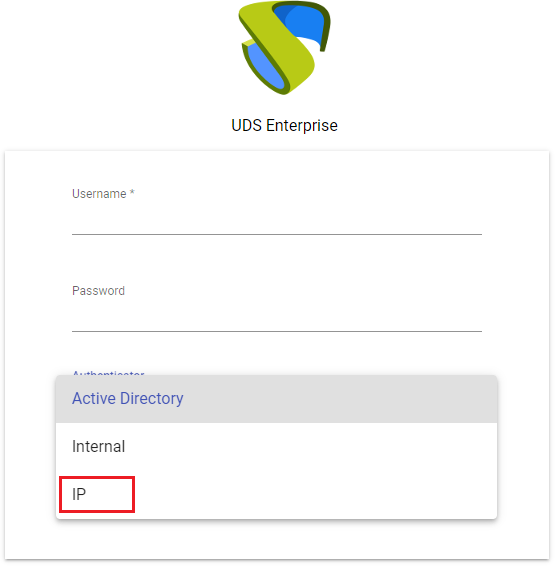
need. If you have more than one authenticator and they are in a visible state, a dropdown menu will be enabled in the login portal to select on which of them the system must validate the user.
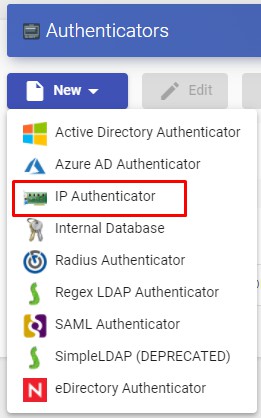
IP
This internal Authenticator allows direct access to connection clients (Single Sign-On), through their IP address, to desktops and virtual applications.
The IP addresses works as the users of other authenticators, allowing the direct
validation of the connection clients in the UDS login portal. User groups on an "IP Authenticator" can be from specific network ranges to full subnets or specific IPs
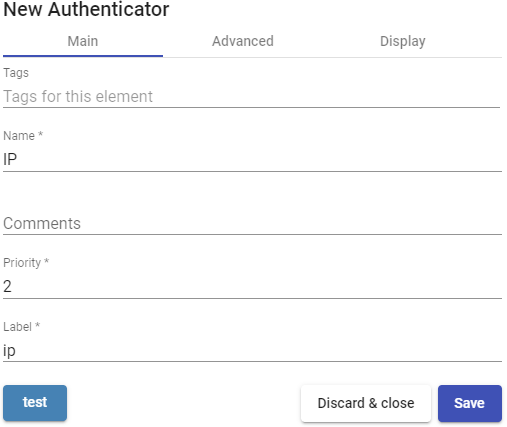
In an "IP Authenticator" the minimal parameters to be configured are:
- Main:
Name: Authenticator name.
Priority: The priority of this authenticator. The lower that priority is, the higher it will appear on the list of authenticators available in the user access window. This field admits negative values.
Label: Enables direct validation in the authenticator. It allows to validate this latter in the login page URL without going through the whole dashboard interface using this format: UDSServer/uds/page/login/label (For example: https://UDSServer/uds/page/login/IP).
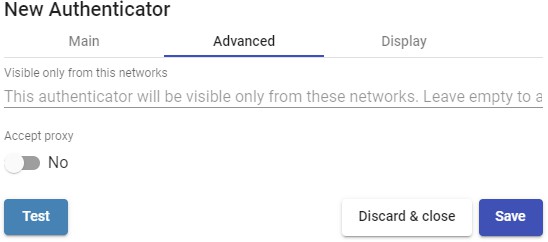
- Advanced:
Visible only from these networks: Allows you to filter the networks from which the authenticator will be visible.
Accept proxy: You need to enable this option when there is a previous component to the access of UDS server, such as a load balancer.
UDS automatically detects the IP address of the connection client. In environments where there are load balancers configured, this detection is not successful since the IP address corresponds to the detected balancers. Enabling this option will get correct IP detection.
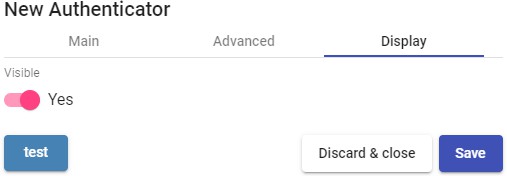
- Display:
Visible: If disabled, the authenticator will not be shown as available on the UDS login page.
Internal Database
In environments where no external authenticator is available, it is possible to use the "Internal Database". authenticator. This authenticator allows the creation of users and groups manually to access the different desktop services and virtual applications
provided by the UDS platform.
All user and group data are stored in the Database to which the UDS Server is connected.
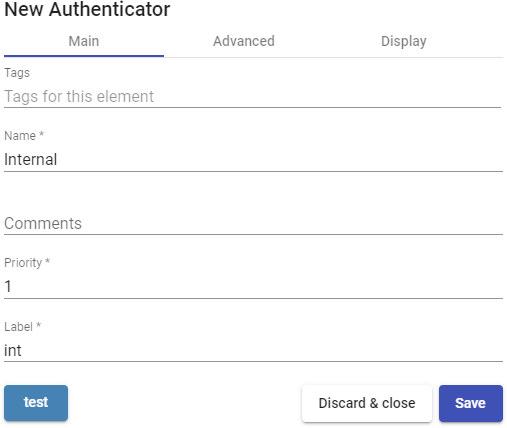
In "Internal Database" minimal parameters to be configured are
- Main:
Name: Authenticator name.
Priority: Priority that this authenticator will have. The lower that priority, the higher it will appear on the list of authenticators available in the user access window. This field admits negative values.
Label: Enables direct validation in this authenticator. It allows the user to validate with said authenticator, although the UDS environment has more authenticators. To do this, you will have to access the UDS "login" screen with the following format: UDSServer/uds/page/login/label (For example: https://UDSServer/uds/page/login/int1).
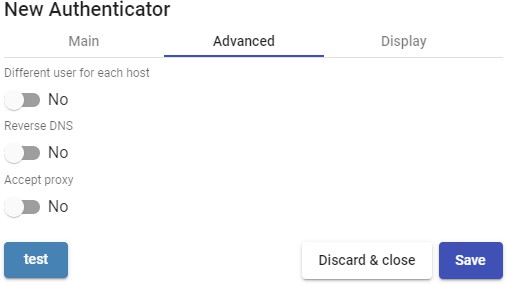
- Advanced:
Different user for each host: This option allows connections to virtual desktops using a single connection user, adding a root to the name of an existing user at the time of connection to the virtual desktop. This root is the IP address of the connection client or its DNS name.
The new created username has the following structure:
######## IP of the client -generic _cenection user
Reverse DNS: It behaves exactly the same as the "Different user for each host", option, but the root added to the user is the DNS name of the connection client. A
correct DNS resolution is required. Otherwise, the IP address will be used. The new user created has the following structure:
######## Generic_user-connection_client_name
Accept proxy: This option must be enabled when there is a component prior to the access of the UDS Server, such as a load balancer.
By default, UDS automatically detects the IP address of the connection client. In environments where load balancers or other similar elements are configured, this detection is not performed correctly, since the detected IP address corresponds to these balancers. By enabling this option, you will get a correct IP detection.
In environments where the "Different user for each host" option is used and there are load balancers, it is necessary to enable this option.
- Display:
Visible: If disabled, the authenticator will not be shown as available on the UDS login page.

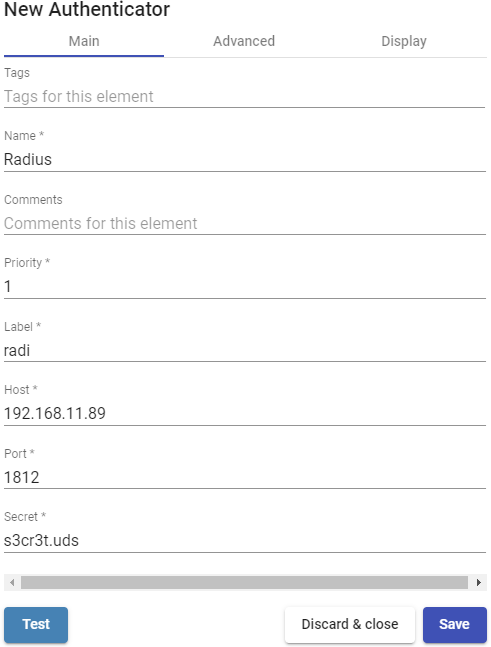
Radius Authenticator
This External Authenticator allows giving access to virtual desktops and applications to users and user groups belonging to a RADIUS-based authenticator.
In an "Radius Authenticator" minimal parameters to be configured are:
- Main:
Name: Authenticator name.
Priority: Priority that this authenticator will have. If there are several authenticators, the lower its priority, the higher it will appear in the list of available authenticators in the UDS login portal. This field admits negative values.
Label: Enables direct validation in this authenticator. It allows the user to validate with said authenticator, although the UDS environment has more authenticators. To do this,
you will have to access the login screen of UDS with the following format:
UDSServer/uds/page/login/label (For example: https://UDSServer/uds/page/login/Radi).
Host: IP address or RADIUS server name.
Port: Communication port with the RADIUS server.
Secret: Validation string against the RADIUS server (defined on the RADIUS server itself).
- Advanced:
NAS Identified: Identifies UDS within the RADIUS server, allowing you to filter if necessary.
App Prefix for Class Attributes: Allows filtering which groups we obtain from the "class" attribute of the RADIUS server.
Global group: Allows you to force all users to belong to a group. This allows a RADIUS server (which is still a "simple" authenticator) that does not contain groups, to be able to assign ALL users to a group (even if it also contains groups).
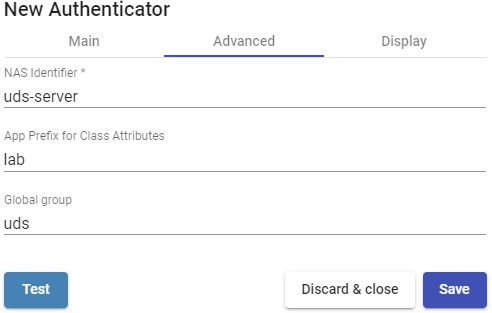
NOTE:
By default, UDS will extract from the Radius "Class" Attribute the elements that have the form "group=..."
If we define in "App Prefix for Class Attributes", for example, "lab", UDS will search only for "class" attributes that have the form "labgroup=..."
- Display:
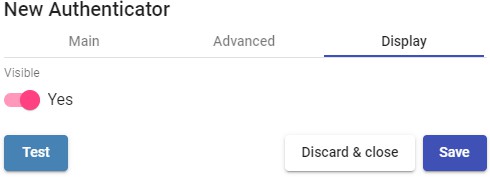
Visible: If disabled, the authenticator will not be shown as available on the UDS login page.
With the "Test" button you can check that the connection is successful.
Regex LDAP
This Authenticator allows users and groups of users, belonging to almost any LDAPbased authenticator, to access virtual desktops and applications.
In a "Regex LDAP Authenticator" the minimun parameters to configure are:
- Main:
Name: Name of the authenticator.
Priority: Priority that this authenticator will have. The lower that priority, the higher it will appear in the list of authenticators available in the user access window. This field admits negative values.
Label: Enables direct validation in this authenticator. It allows the user to validate in the login window with said authenticator even if the UDS environment has more authenticators. To this end, is we will have to access the "login" screen of UDS with the following format: UDSServer/uds/page/login/label (For example: https://UDSServer/uds/page/login/LDAP).
Host: IP address or LDAP server name.
Use SSL: If enabled, SSL connection will be used against the authenticator.
Timeout: "Timeout" for the connection to the authenticator.
- Credentials:
User: User with reading permissions on the authenticator. Format: uid=...,ou=....,dc=...,dc=...
Password: User password.

- Ldap info:
Base: Search directory where the system will locate groups and users to validate in the system.
User class: Common class that all users must have.
User Id Attr: LDAP attribute that will define the name of the user to log in to the UDS access portal.
User Name Attr: LDAP attribute that will define the name of the user to login the UDS
access portal. It also allows the use of regular expressions to extract or compose specific values.
Group Name Attr: LDAP attribute that will define a user's membership in a group. Different attributes can be indicated to define different group attributes (one on each line). It also allows the use of regular expressions to extract or compose specific values.
- Advanced:
Alt. class: You can indicate more kinds of objects to search for users and user groups.
- Display:
Visible: If disabled, the authenticator will not be shown as available on the UDS login page.
With the "Test" button you can check that the connection is successful.
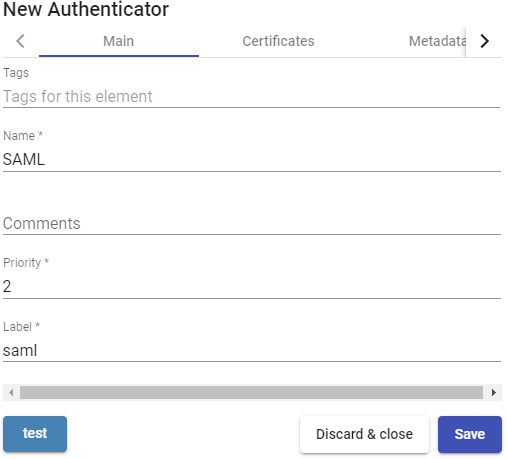
SAML
This external Authenticator allows users and groups of users belonging to an identity provider with SAML 2.0 support to access virtual desktops and applications.
SAML is used for the exchange of authentication and authorization data between security domains, that is, between an identity provider (a claim producer) and a service provider (a claim consumer).
In a "SAML Authenticator" minimal parameters to be configured are:
- Main:
Name: Authenticator name (Can't contain spaces).
Priority: Priority that this authenticator will have. The lower that priority, the higher it will appear in the list of authenticators available in the user access window. This field admits negative values.
Label: Enables direct validation in this authenticator. It allows the user to validate in the login window with said authenticator, although the UDS environment has more authenticators. To do this, you will have to access the UDS login screen with the following format: UDSServer/uds/page/login/label (For example: https://UDSServer/uds/page/login/SAML).
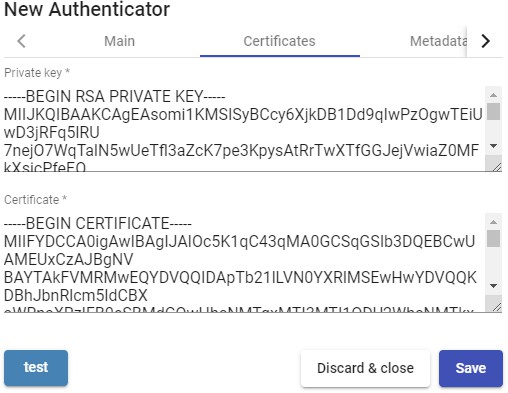
- Certificates:
Private key: Private RSA key that is used for signatures and encryptions.
Certificate: Public key that is used by SSL sessions.
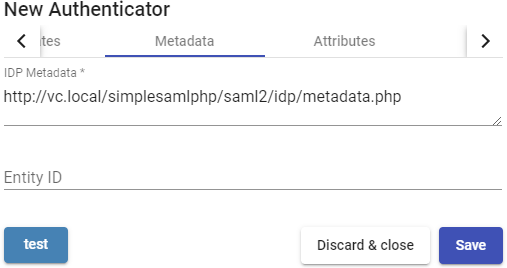
- Metadata:
IDP Metadata: You can indicate a URL or file in XML format.
Entity ID: This field must initially be empty. The URL will be automatically generated when saving the authenticator. The URL generated in this field usually needs to be used to register UDS as SP (service provider) on the SAML server).
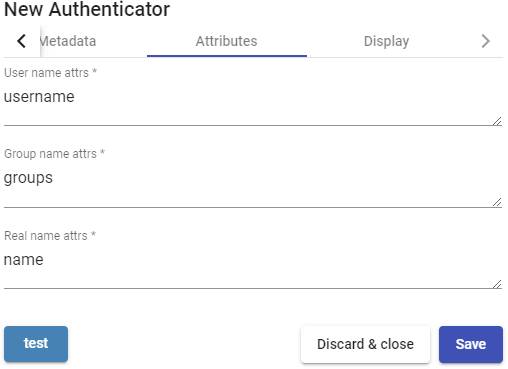
- Attributes:
User name attrs: Attribute that will define the name of the user to perform the login in the UDS access porta.
Group name attrs: Attribute that will define a user's membership in a group. Different attributes can be indicated to define different group attributes (one on each line) and it also allows the use of regular expressions to extract or compose specific values.
Real name attrs: Attribute that defines the username information. It does not affect the UDS login portal.
- Display:
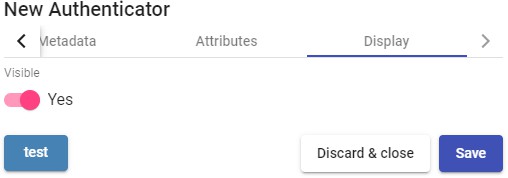
Visible: If disabled, the authenticator will not be shown as available on the UDS login page
Multifactor
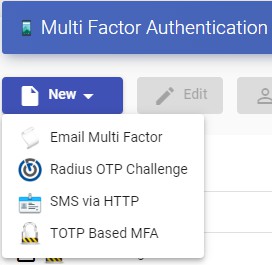
Multi-factor authentication (MFA) adds a layer of protection to the sign-in process.
When an account or app is accessed, users must go through additional identity verification. UDS natively supports several multi-factor authentication systems natively:
Email Multi Factor
Radius OTP Challenge
SMS via HTTP
TOTP Based MFA
And it also supports other MFAs integrated into the authenticator itself, so that when the authenticator is incorporated into UDS Enterprise, the MFA is automatically incorporated.
In OpenUDS you can perform a double authentication of users natively, through the use of different methods explained below.

A "Multifactor" configuration is not a necessary component for the creation of a "Service Pool"
####### Safe Employment Procedure:
It is recommended to use any system, at least one, of multi-factor authentication.
Email Multi Factor
Through this method, the user will first authenticate with his username and password and then be redirected to a second authentication process where he will receive an email with the necessary code to finally authenticate on his OpenUDS platform.
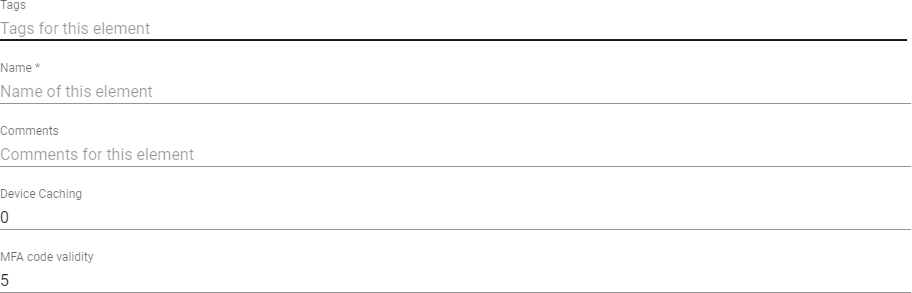
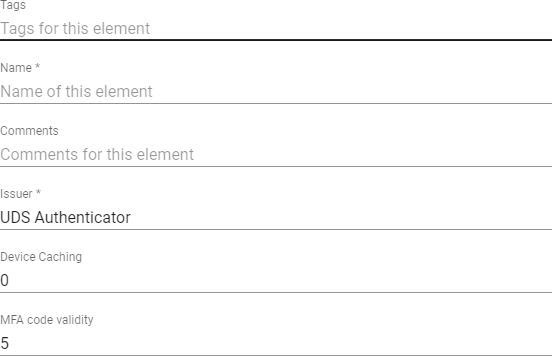
In a "Multi factor Email" The minimum parameters to configure are:
- Main:
Name: Name that the item will be indicated.
Device Caching: Time in hours to cache the device so that MFA is not needed again.
MFA code validity: Time in minutes to allow MFA code use.
- SMTP Server:
SMTP Host: Host name or IP address of the SMTP server.
Security: Security protocol to be used.
Username: Time in minutes to allow the use of MFA code.
Password: Password of the user with access to the SMTP server
Safe use procedure: Passwords must be of sufficient length and include uppercase, lowercase, numbers and special characters.

- Config:
Subject: Subject of the email to be sent to users.
From Email: Email address that will be used as a sender.
####### Policy for users without MFA Support: Policy to be used with those users without MFA configured.
Mail Text: Text that will be displayed in the sent mail.
Radius OTP Challenge
Through this method, the user will first authenticate with his username and password and then be redirected to a second authentication process where he must enter the corresponding code provided by his radius server in order to finally authenticate on his OpenUDS platform.
Through this method, the user will first authenticate with his username and password and then be redirected to a second authentication process where he must enter the corresponding code provided by his radius server in order to finally authenticate on his OpenUDS platform.
o Main:
Name: Name that will be indicated to the element.
Host: Host name or IP of the Radius server
Port: Radius authentication port.
**Secret: "**Secret" of the Radius client.
NAS Identifier: NAS identifier for Radius Server.
Device Caching: Time in hours to cache the device so that MFA is not needed again.
MFA code validity: Time in minutes to allow the use of the MFA code.
o Config:
Radius OTP communication error action: Action to be performed by the Radius server in the event of an error.
####### Radius OTP Networks: Networks for Radius OTP authentication
Users without defined OTP in server: Policy that will be used with those users without MFA configured.
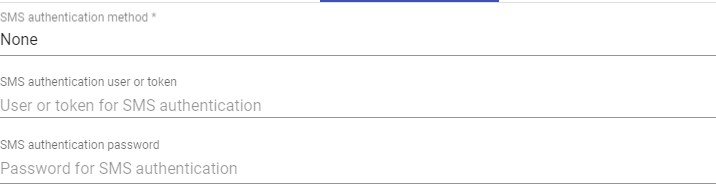
SMS via HTTP
Through this method, the user will first authenticate with his username and password and then be redirected to a second authentication process where he will receive an SMS with the necessary code to finally authenticate on his OpenUDS platform.
In an "SMS Via HTTP" The minimum parameters to configure are o Main:
Name: Name that the item will be indicated.
Device Caching: Time in hours to cache the device so that MFA is not needed again.
MFA code validity: Time in minutes to allow MFA code use.

- HTTP Server:
URL pattern for SMS Sending: URL pattern for sending SMS. It can contain the following variables:
{code} - the code to send
{phone/+phone} - the phone number
{username} - the username
{justUsername} - the username without @.
SMS Sending method: Method that will be used to send SMS.
SMS Enccoding: Encryption to be used for sending SMS.
- HTTP Authentication:
SMS Authentication Method: SMS authentication method
SMS Authentication user or Token: User or token for SMS authentication
SMS Authentication paswword: Password for SMS authentication
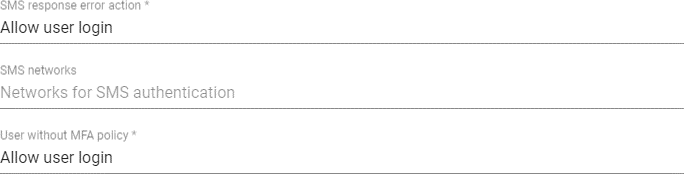
- Config:
SMS response error action: Action to be taken by the server in case of error.
User without MFA policy: Action to be performed on users without an MFA policy configured.
TOTP Based MFA
Through this method, the user will first authenticate with his username and password and then be redirected to a second authentication process where he must enter the TOTP code generated from time to time in our application such as Google authenticator, Microsoft, etc. to be able to authenticate finally in your UDS Enterprise platform..
Through this method, the user will first authenticate with his username and password and then be redirected to a second authentication process where he must enter the TOTP code generated from time to time in our application such as Google authenticator, Microsoft, etc. to be able to authenticate finally in your UDS Enterprise platform.
o Main:
Name: Name that the item will be indicated.
Issuer: OTP issuer, once created it cannot be changed
Device Caching: Time in hours to cache the device so that MFA is not needed again.
MFA code validity: Time in minutes to allow MFA code use.
o Config:
Valid Window: Number of codes that will be valid before and after the current one.
TOTP networks: The user who is added in these networks will not be asked for OTP.

Configure users, groups, and user metegtoups
Once the authenticator or authenticators have been configured, you must configure the user groups that contain the users to which access to the desktop services is to be granted. It is also possible to create metagroups, which will be used to combine several groups.
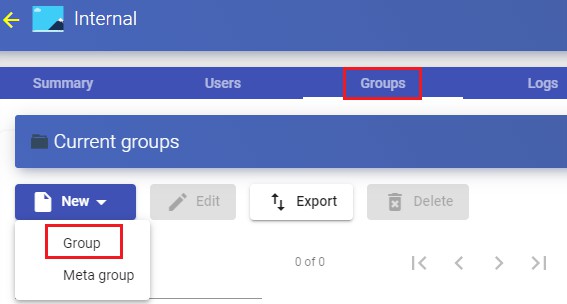
To add groups or metagroups to an authenticator, select it and double click on it, or select "Detail" in the provider's menu:
Once inside the authenticator, select the "Groups" tab, and in "New" sselect "Group":
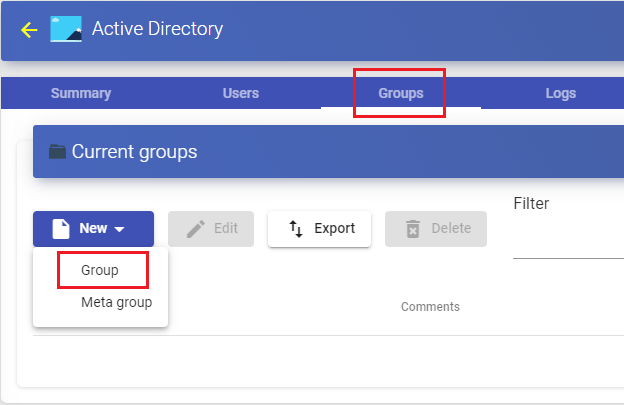
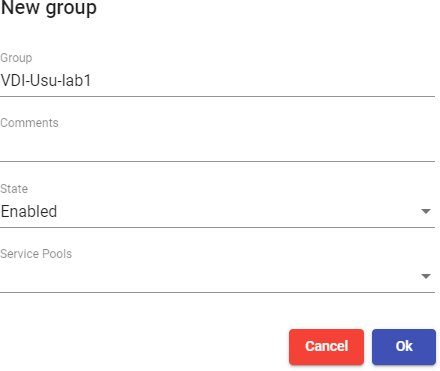
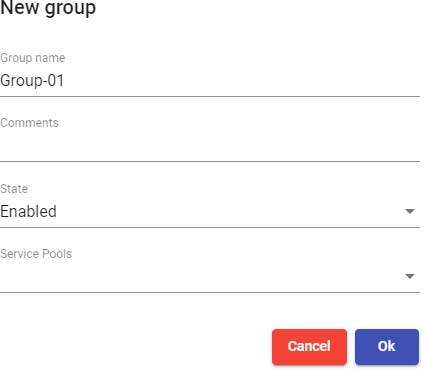
You will indicate the name of the group through the "Group", with its status (enabled or disabled) In addition, you can directly assign it to one or more "Service Pools".
In some authenticators such as "Active Directory", an automatic search will be performed:
In others, such as "Regex LDAP", "SAML", "eDirectory"... it will be necessary to indicate it manually.
NOTE:
For internal type authenticators such as "Internal Database" and "IP Authenticator", it will be necessary to create groups manually, since they do not connect to any external authentication system.
Access to the UDS login portal will be granted to all users belonging to a group (of a specific authenticator).
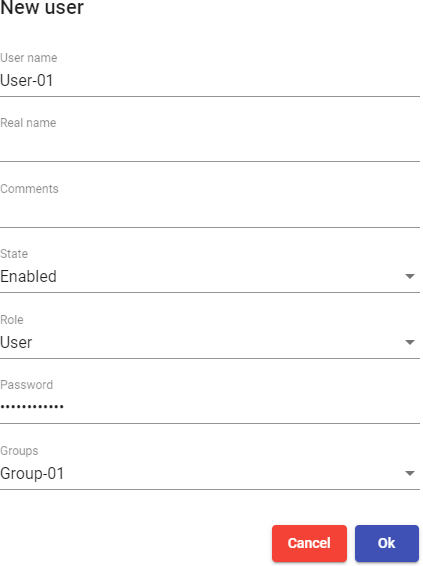
To create a metagroup (group made up of several groups), select the "Groups" tab and select "Meta group" in "New"
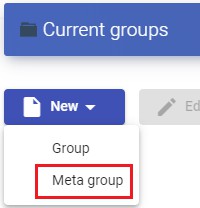
You will indicate the name of the metagroup in the "Meta group name", field, its status (Enabled or disabled), the operating mode through the "Match mode" field and you will also select the groups that will be part of the metagroup.

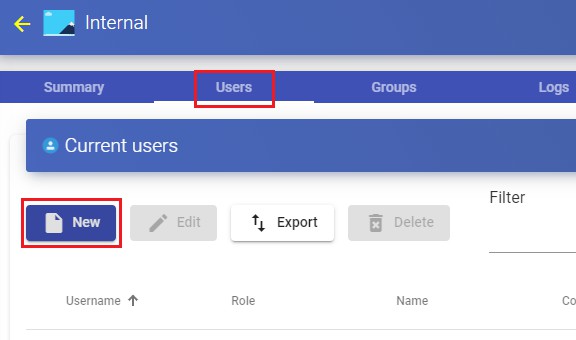
In the "Users" tab of an authenticator, users will be added automatically when they are validated in the UDS login portal, provided that these users belong to existing groups in the authenticator:
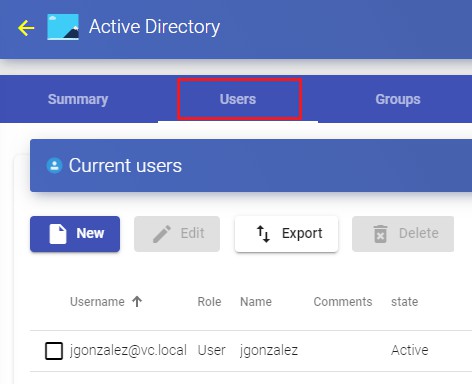
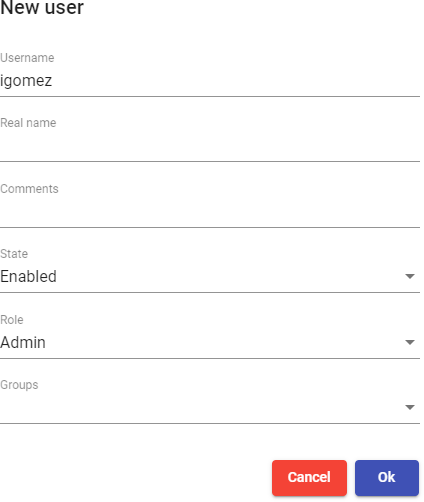
If you need to register users manually, to assign special permissions before they connect for the first time, you will click on "New" and you will select the user, their status (enabled or disabled) and the access level ("Role" field). In case of not using
the "Internal Database" authenricator, the "Groups" field will be left empty, since the system must automatically add the user to their membership group (once the user has been saved, you can edit it and check if it has been assigned correctly to the group).
NOTE:
Users of an "Internal Database" authenticator always have to be manually created.
The access leve "Admin" " makes a user an administrator of the environment. "Staff member" allows access to UDS Actor downloads and UDS administration in a limited
way, based on the permissions assigned. "User" will only allow access to the UDS services window (the latter is the default)
Once the user has been added, you can modify it using the"Edit" section.
To delete a user, group or metagroup, select it and click on the "Delete". button. If you have registered users in the system who belong to a group, and it is deleted, the users will be left without an assigned group and cannot be validated in the system.
Creation of groups and users "Internal Database"
In an authenticator of type "Internal Database" t wil be necessary to create manually groups of users that you will assign to a "Service Pool".
Access the "Internal Database" authenticator previously created and in the"Groups" tab click on"New - Group".
You indicate the name of the new group, its status (enabled or disabled) and you can also assign it directly to one or more "Service Pools".
Follow the same procedure if you need to create a metagroup.
Once you have created the group or groups of users, register the users and assign them to one or several groups.
Access the "Internal Database" authenticator previously created and in the "Users" tab click on "New".
Enter the name of the new user, its status (enabled or disabled), the access level ("Role" field) and a password. In the "Groups" field, indicate which groups he will
belong to (you can select one or more of the existing groups).
Creation of groups and users "IP Authenticator"
In an "IP Authenticator" it wil be necessary to create manually the groups of users. In this case, a group it will be a range of IPs, a complete subnet or a single IP address. In each case you will use the following format:
Unique IP: xxx.xxx.xxx.xxx (For example:192.168.11.33)
Complete subnet: xxx.xxx.xxx.xxx/xx (For example: 192.168.11.0/24)
IP addresses range: xxx.xxx.xxx.xxx-xxx.xxx.xxx.xxx (For example: 192.168.11.1- 192.168.11.155)
Access the "IP Authenticator authenticator previously created and in the"Groups" tab click on "New- Group".
Enter a range of IPs, a complete subnet or comma-separated IP addresses ("IP Range" field) and their status (enabled or disabled). You can also assign it directly to
one or more "Service Pools".

When a user selects this authenticator in the UDS login portal (that is, the default authenticator), the system will check the IP address of his connection client. If this address is within the range indicated in the group ( "IP Range" field), the user will be automatically validated.
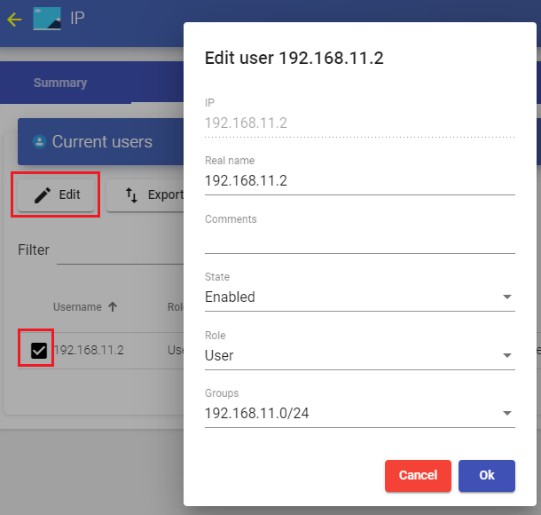
Once the user is validated in the UDS login portal, his IP address will be automatically registered in the "Users" tab.
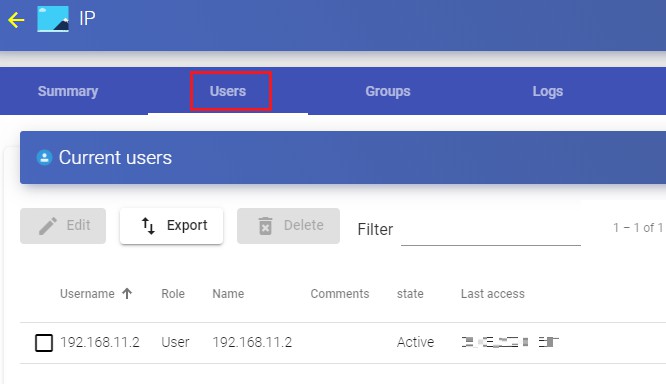
If you need to change its status (enabled or disabled) or the access level ("Role" field), select it and click on "Edit".
OpenUDS 3.6 Installation, Administration and User Guide
pagePág286ina of286436 436
OpenUDS 3.6 Installation, Administration and User Guide
OS Managers
An "OS Manager" runs a previously configured service type.
The UDS Actor, hosted on the virtual desktop or application server, is in charge of the interaction between the O.S. and the UDS Server based on the configurations or
type of "OS Manager" chosen.
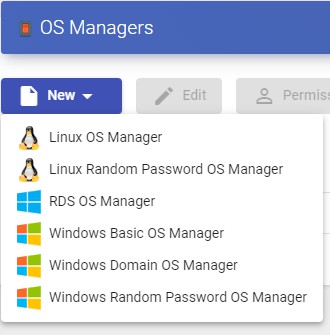
You can register as many "OS Managers" as you need in the UDS Enterprise platform. You can choose different types based on the needs of the services to be deployed.
NOTE:
Any type of service deployed in UDS will require an "OS Manager" except when you use the provide "Static IP Machines Provider".
Linux
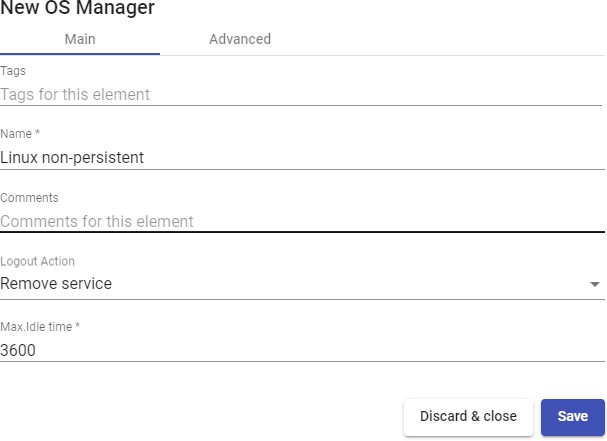
A "Linux OS Manager" is used for virtual desktops based on Linux systems. It performs the renaming tasks and session control of the virtual desktops.
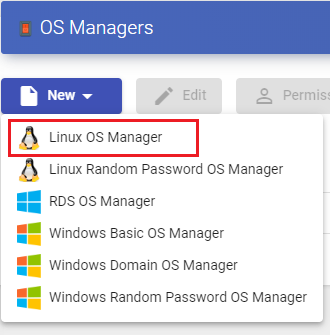
In a "Linux OS Manager" minimal parameters to be configured are:
- Main:
Name: Name of the "OS Manager".
Logout Action: You will indicate the action that UDS will perform on the virtual desktop when a user session is closed:
- Keep service assigned (Semi persistent virtual desktop): When a user logs out of the virtual desktop, the system will not take any action. When
reconnecting, you will be assigned the same desktop that you had previously
been working with. If a new publication of the "Service Pool", is made, when the user logs out his virtual desktop will be deleted, and he will connect to a new one generated in the new version.
Remove service (Non-persistent VM): When a user logs out, the system will destroy the desktop. If this same user requests a virtual machine to the system again, the system will provide a new virtual desktop.
Keep service assigned even on new publication (persistent virtual desktop): When a user logs out of the virtual desktop, the system will not take
any action. When reconnecting, he will be assigned the same desktop that he had previously been working with. If a new publication of the "Service Pool", is made, when the user logs out, his virtual desktop will remain assigned and will only be deleted when the administrator indicates it.
Max. Idle time: Maximun time (Indicated in seconds) of inactivity in the virtual desktop. After this time of inactivity, the UDS Actor will automatically close the session. Negative values and less than 300 second disable this option.
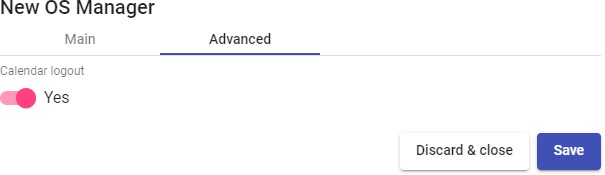
- Advanced:
Calendar logout: Allows you to select the behavior that the system will have with a user's session when the end date of a calendar is met. If it is to "Yes", When the end date of the calendar assigned to the service is fulfilled, the system will disconnect the user from said service, if he is "No", the system will not log the user out, but if the user logs out, or even drops the connection, they won't be able to log back in.
Linux Random Password
A "Linux Random Password OS Manager" is used for virtual desktops based on Linux systems and that require a higher level of security in user access. It performs the tasks of renaming, session control and changing the password of an existing local user on virtual desktops.
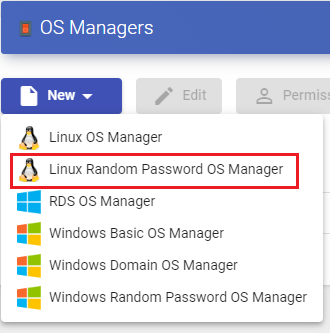
Through its use, a random password is assigned to an existing local user during the configuration of each new virtual desktop deployed, thus providing a higher level of access security.
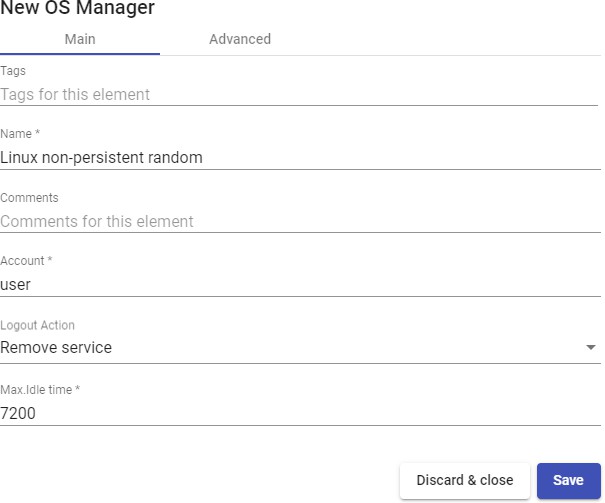
In a "Linux Random Password OS Manager" minimmal parameters to be configured are:
- Main:
Name: Name of the "OS Manager".
Account: Name of the existing local user in the virtual desktop to which UDS will change the password by a self-generated random one.
Logout Action: Here you can indicate the action that UDS will perform on the virtual desktop when a user session is closed:
- Keep service assigned (semi persistent virtual desktop): When a user logs out of the virtual desktop, the system will not take any action. When reconnecting, he will be assigned the same desktop he you had previously
been working with. If a new publication of the "Service Pool", is made, when the user logs out, his virtual desktop will be deleted, and he will connect to a new one generated in the new version.
Remove service (non-persistent VM): When a user logs out, the system will destroy the desktop. If this same user requests a virtual machine to the system again, the system will provide a new virtual desktop.
Keep service assigned even on new publication (persistent virtual desktop): When a user logs out of the virtual desktop, the system will not take any action. When reconnecting, he will be assigned the same desktop that he had previously been working with. If a new publication of the "Service Pool", is made, when the user logs out, his virtual desktop will remain assigned and will only be deleted when the administrator indicates it.
Max. Idle time: Maximun time (Indicated in seconds) of inactivity in the virtual desktop. After this time of inactivity, the UDS Actor will automatically close the session. Negative values and less than 300 second disable this option.
- Advanced:
Calendar logout: Allows you to select the behavior that the system will have with a user's session when the end date of a calendar is met. If it is set to "Yes", when the end date of the calendar assigned to the service is fulfilled, the system will disconnect the user from said service, if it is set to "No", the system will not disconnect the user, but if it is disconnected, it will log out or even the connection is cut off, you will no longer be able to reconnect.
Windows Basic
A "Windows Basic OS Manager" is used for virtual desktops based on Windows systems which aren't part of an AD domain. It performs the renaming tasks and the session control of the virtual desktops.
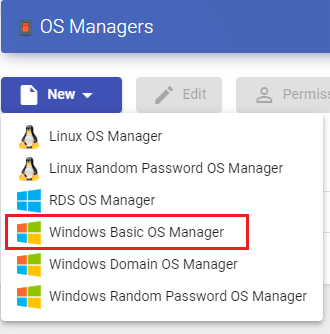
In a "Windows Basic OS Manager" minimal parameters to be configured are:
- Main:
Name: Name of the "OS Manager".
Logout Action: Here you can indicate the action that UDS will perform on the virtual desktop when a user session is closed:
- Keep service assigned (semi persistent virtual desktop): When a user logs out of the virtual desktop, the system will not take any action. When reconnecting, he will be assigned the same desktop that he had previously
been working with. If a new publication of the "Service Pool", is made, when the user logs out, his virtual desktop will be deleted, and he will connect to a new one generated in the new version.
Remove service (non-persistent VM): When a user logs out, the system will destroy the desktop. If this same user requests a virtual machine to the system again, the system will provide a new virtual desktop.
Keep service assigned even on new publication (persistent virtual desktop): When a user logs out of the virtual desktop, the system will not take any action. When reconnecting, he will be assigned the same desktop that he had previously been working with. If a new publication of the "Service Pool", is made, when the user logs out, his virtual desktop will remain assigned and will only be deleted when the administrator indicates it.
Max. Idle time: Maximun time (Indicated in seconds) of inactivity in the virtual desktop. After this time of inactivity, the UDS Actor will automatically close the session. Negative values and less than 300 second disable this option.

- Advanced:
Calendar logout: Allows you to select the behavior that the system will have with a user's session when the end date of a calendar is met. If it is set to "Yes", when the end date of the calendar assigned to the service is fulfilled, the system will disconnect the user from said service, if it is set to "No", the system will not disconnect the user, but if it is disconnected, it will log out or even the connection is cut off, you will no longer be able to reconnect.
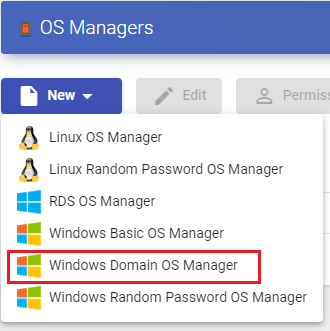
Windows Domain
A "Windows Domain OS Manager" is used for virtual desktops based on Windows systems that are part of an AD domain. It performs renaming, AD domain enrollment, and session control on virtual desktops.
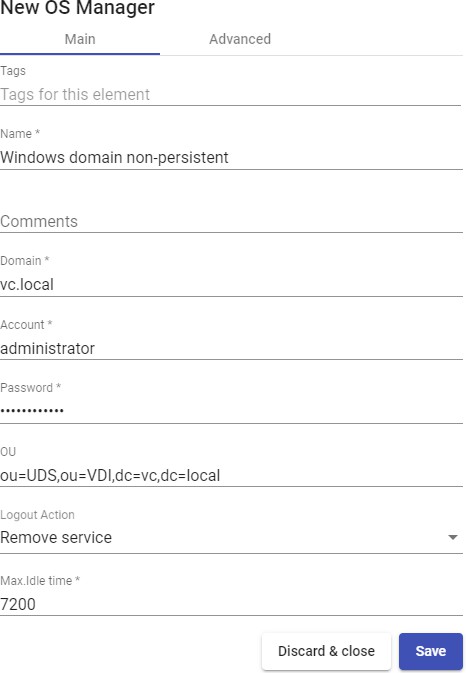
In a "Windows Domain OS Manager" minimal parameters to be configured are:
- Main:
Name: Name of the"OS Manager".
Domain: Name of the AD domain to which the virtual desktops will join. It is required to use the FQDN format (For example: vc.local), NetBIO is not supported.
Account: Username with rights to add machines to the domain.
Password: Password of the user in the field "Account".
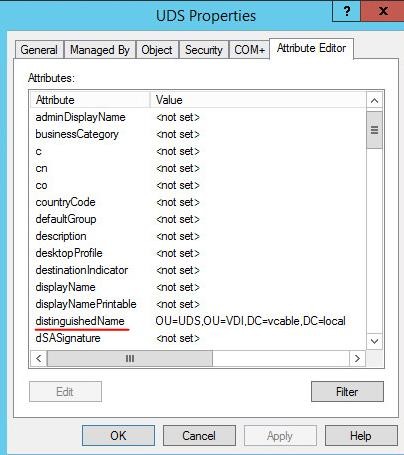
OU: Organizational unit where the virtual desktops will be registered (if none are indicated, the desktops will be registered in the default OU "ComputersThe format of the supported OU is:
OU=name_OU_last_level,...OU=name_OU_first_level,DC=name_domain,DC=extenstion_domain
To avoid errors in the introduction of the format, it is recommended to consult the "distinguishedName" field on the properties of the OU attribute.
Logout Action: Here you can indicate the action that UDS will perform on the virtual desktop when a user session is closed:
- Keep service assigned (semi persistent virtual desktop): When a user logs out of the virtual desktop, the system will not take any action. When reconnecting, he will be assigned the same desktop that he had previously
been working with. If a new publication of the "Service Pool", is made, when the user logs out, his virtual desktop will be deleted, and he will connect to a new one generated in the new version.
Remove service (non-persistent VM): When a user logs out, the system will destroy the desktop. If this same user requests a virtual machine to the system again, the system will provide a new virtual desktop.
Keep service assigned even on new publication (persistent virtual desktop): When a user logs out of the virtual desktop, the system will not take any action. When reconnecting, he will be assigned the same desktop that he had previously been working with. If a new publication of the "Service Pool", is made, when the user logs out, his virtual desktop will remain assigned and will only be deleted when the administrator indicates it.
Max. Idle time: Maximun time (Indicated in seconds) of inactivity in the virtual desktop. After this time of inactivity, the UDS Actor will automatically close the session. Negative values and less than 300 second disable this option.
- Advanced:
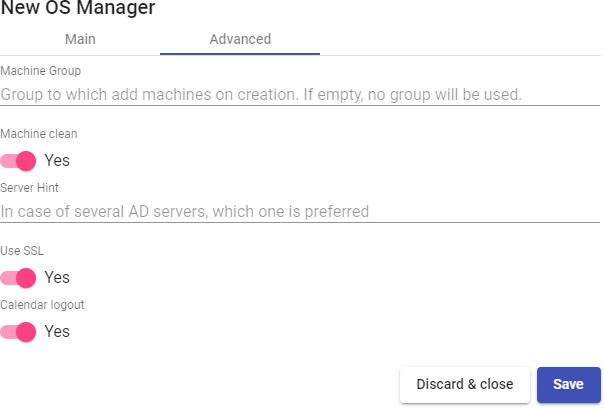
Machine Group: Indicates to which machine group of an AD the virtual desktops generated by UDS will be added.
Machine clean: If enabled, UDS will delete the records of the virtual desktops in the indicated OU once the desktop is deleted. It is necessary that the user indicated in the field "Account" have permissions to perform said action on the indicated OU.
Server Hint: In case there are several AD servers, an indication will be given on which one to use preferably.
Use SSL: If enabled, SSL connection will be used against the AD server.
Calendar logout: Allows you to select the behavior that the system will have with a user's session when the end date of a calendar is met. If it is set to "Yes", when the end date of the calendar assigned to the service is fulfilled, the system will disconnect the user from said service, if it is "No", the system will not log the user out, but if the user logs out, logs out, or even drops the connection, they will no longer be able to log in again.
Windows Random Password
A "Windows Random Password OS Manager" is used for virtual desktops based on Windows systems and that require a higher level of security in user access. It performs the tasks of renaming, session control and changing the password of an existing local user on virtual desktops.
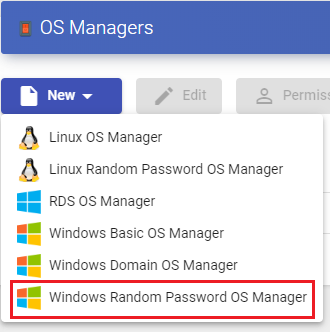
Throught its use, a random password is assigned to an existing local user during the configuration of each new deployed virtual desktop, thus providing a higher level of access security.
In a "Windows Random Password OS Manager" " minimal parameters to be configured are:
- Main:
Name: Name of the "OS Manager".
Account: Name of an existing local user on the virtual desktop to which UDS will change the password to a self-generated random one.
Password: Password of the user in the field "Account".
Logout Action: Here you can indicate the action that UDS will perform on the virtual desktop when a user session is closed:
- Keep service assigned (semi persistent virtual desktop): When a user logs out of the virtual desktop, the system will not take any action. When
reconnecting, he will be assigned the same desktop that he had previously
been working with. If a new publication of the "Service Pool", is made, when the user logs out, his virtual desktop will be deleted and he will connect to a new one generated in the new version
Remove service (non-persistent VM): When a user logs out, the system will destroy the desktop. If this same user requests a virtual machine to the system again, the system will provide a new virtual desktop.
Keep service assigned even on new publication ((persistent virtual desktop): When a user logs out of the virtual desktop, the system will not take any action. When reconnecting, he will be assigned the same desktop that he had previously been working with. If a new publication of the "Service Pool", is made, when the user logs out, his virtual desktop will remain assigned and will only be deleted when the administrator indicates it
Max. Idle time: Maximun time (indicated in seconds) of inactivity in the virtual desktop. After this time of inactivity, the UDS Actor will automatically close the session. Negative values and less than 300 second disable this option.

- Advanced:
Calendar logout: Allows you to select the behavior that the system will have with a user's session when the end date of a calendar is met. If it is set to "Yes", when the end date of the calendar assigned to the service is fulfilled, the system will disconnect the user from said service, if it is set to "No", the system will not disconnect the user, but if it is disconnected, it will log out or even the connection is cut off, you will no longer be able to reconnect.
Transports
To connect to virtual desktops and applications, it is necessary to create "Transports". They are applications that will be executed on the connection client and will be in
charge of providing access to the implemented service.
Depending on the type of virtual desktop that you configure, the location and the device used to connect to your virtual desktops, you will need to create different types of transports.
The connection client and the desktop/application server must have installed the connection protocol (client - server) used in the transport for the transport to work correctly.
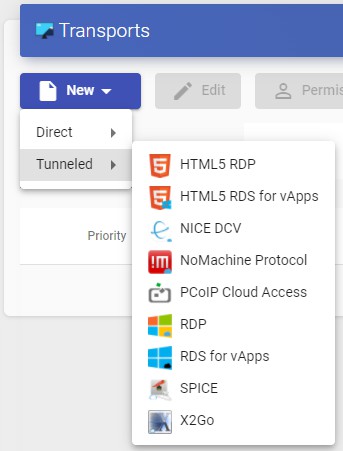
To access the "Transports", section, go to the "Conectivity" section and select "Transports". The following are currently available:
- Direct:
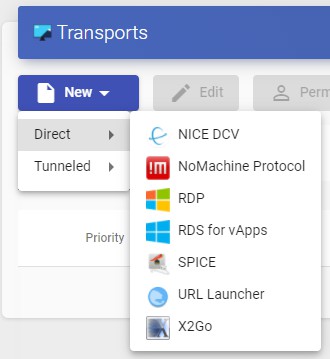
- Tunneled:
The "Transports" indicated as "direct" ill be used for user access to virtual desktops and applications from an internal LAN, VPN, LAN Extension, etc.....
The "Transports" indicated as "Tunneled" will be used for user access to virtual desktops and applications from a WAN. These"Transports" will be supported by the UDS Tunnel server to make the connection.
The "Transport" can be used for user access to virtual desktops from all types
of access (LAN, WAN, etc ...). This "Transport" uses the UDS Tunnel server to make the connection against the virtual desktop.
NOTE:
If you need to access from a network that is not your LAN, you will have to use tunnelled transports, which must have the public IP address of the UDS-Tunnel server. The Tunnel server will use two ports depending on the service to provide. When it is a connection via HTML5, you will use port 10443, and when it is any tunnelled connection (RDP, RDS, X2Go, etc...), port 443 will be used.
RDP (direct)
An "RDP" (direct) transport allows users to access Windows/Linux virtual desktops using the Remote Desktop Protocol (RDP). Both connection clients and virtual desktops must have RDP installed and enabled (for Linux virtual desktops, XRDP must be used).).
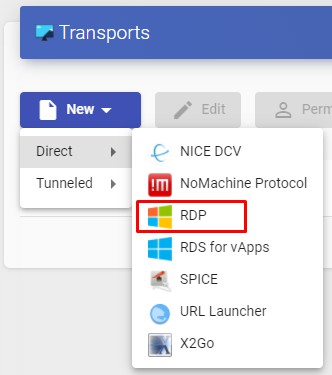
In A "RDP" (direct) transport, the minimum parameters to configure are:
- Main:
Name: Name of the transport.
Priority: Priority that the transport will have. The lower that priority, the higher it will appear in the list of available transports for a service. The transport with the lowest priority will be the one used by default when clicking on the image of service.
Networks Access: Allows or disables user access to a service based on the network from which he is accessing, and the network indicated in the "Networks" field.
Networks: Network ranges, subnets or IP addresses indicated in the "Networks" of the "Connectivity" section. It is used together with the "Network Access" field to allow or disable user access to a service based on his network location.
Allowed Devices: Enables access to the service only with selected devices. If none are selected, no filtering is performed.
Service Pools: Allows you to assign this transport directly to one or more "Service Pools" previously created.
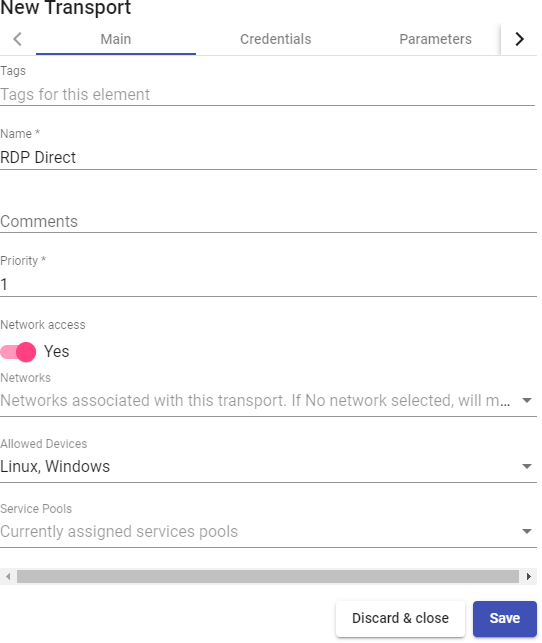
- Credentials:
Empty creds: If is set to "Yes", when you make the connection with the service, it will ask you for the credentials to access the virtual desktop. If it is set to "No", the credentials entered in the UDS login portal will be redirected.
Username: Username that will be used to log into the desktop (the user must exist in the desktop). If this field is empty, an attempt will be made to use the UDS portal login user if the "Empty creds" field is set to "No", or it will ask for credentials to indicate them manually if it is set to "Yes".
Password: Password of the user in the "Username" field.
Without Domain: Indicates if the domain name is redirected together with the user.
Domain: Name of the domain that will be sent with the user's credentials.
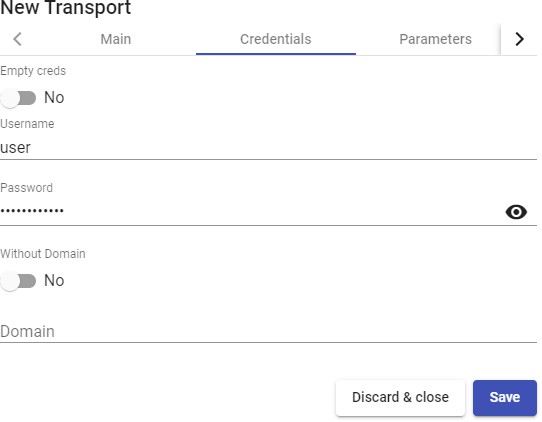
- Parameters:
Allow Smartcards: Enables the redirection of Smartcards.
Allow Printers: Enables printer redirection.
Local drives policy: Enables drive redirection:
Allow none: No drive is redirected.
Allow PnP drives: Only connected drives are redirected during an active session.
Allow any drive: All drives are redirected.
Force drives: Forces the redirection of specific drives. You can specify several separated by commas. (Ex: F:,G: ).
Allow Serials: Enable serial port redirection.
Enable clipboard: If it is activated, it will allow copy/paste between the connection client and the desktop
Enable Sound: If activated, it will allow the redirection of the audio from the desktop to the connection client.
Enable webcam: If enabled, it will allow the redirection of web cameras between the connection client and the desktop.
Credssp Support: If it is activated, it will use "Credential Security Support Provider".
RDP Port: Connection port against the RDP server

- Display
Screen Size: Determines the size of the desktop window.
Color depth: Indicates the colour depth. Wallpaper/theme: Displays the desktop background. Multiple monitors: Allows the use of multiple monitors. Allow Desk. Comp.: Enables "Desktop Composition". Font Smoothing: Activates font smoothing.
Connection Bar: Allows you to enable or disable the connection bar.
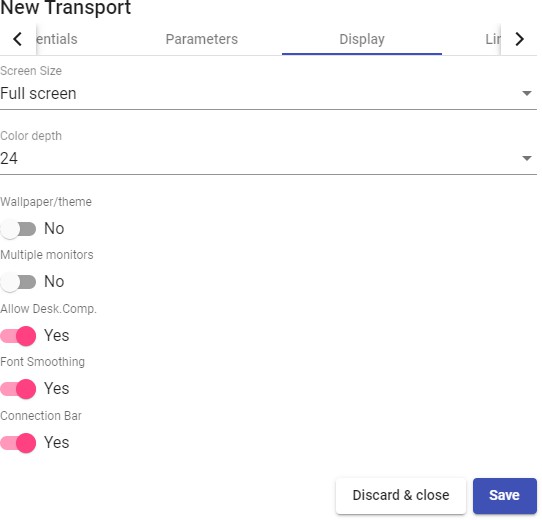
- Linux Client (only applies to Linux connection clients): Multimedia sync: Enables the multimedia parameter on the FreeRDP client. Use Alsa: Enables the use of audio through Alsa.
Printer string: Example: "Zebra","ZDesigner TM400 200 dpi (ZPL)"
("Zebra" is the name of the local printer, "ZDesigner TM400 200 dpi (ZPL)" is the exact name of the printer driver in Windows).
Smartcard string: Example: "Gemalto PC Twin Reader 00 00" ("Gemalto PC Twin Reader 00 00" is the name of the smartcard).
Custom parameters: Any parameter supported by the FreeRDP client can be indicated (if several are indicated, they must be separated by spaces). They will be applied when connecting to the virtual desktop.
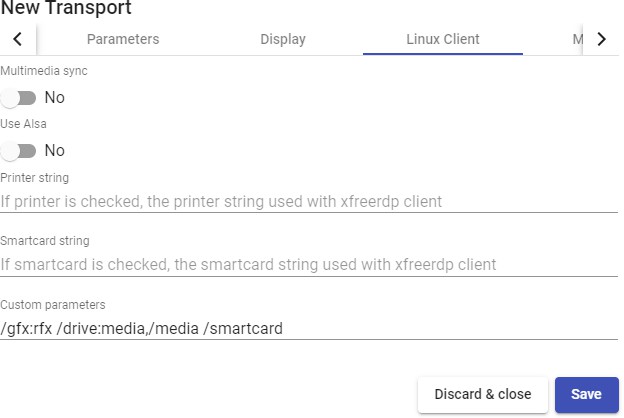
NOTE:
Some important parameters are indicated in the capture as an example: /gfx:rfx greatly improves the quality of video and audio, /drive:media,/media allows redirection of local drives connected to the connection client, /smartcard allows redirection of a smartcard...
- Mac OS X (only applies to MacOS connection clients):
Allow Microsoft Rdp Client: Allows you to use the Microsoft RDP client instead of the FreeRDP client. In order to use it, it must be enabled and the FreeRDP client must not be installed on the MacOS connection client computer.
Custom parameters: Any parameter supported by the FreeRDP client can be indicated (if several are indicated, they must be separated by spaces). They will be applied when connecting to the desktop.
- Advanced:
Label: It allows to group transports to be shown, through the name of a label, in a meta pool. By using these labels, we can indicate that a metapool has several transports.
SPICE (direct)
A "SPICE" (direct) allows users to access Windows/Linux virtual desktops
using the "SPICE". protocol. The connection clients must have the "SPICE" client (Virt-Manager).
The "SPICE" transport can only be used with a service provider such as oVirt/Red Hat Enterprise Virtualization (RHV) and OpenNebula.
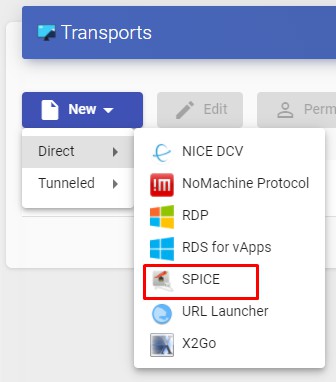
In a "SPICE" transport (direct), the minimum parameters to configure are:
- Main:
Name: Name of the transport.
Priority: Priority that the transport will have. The lower that priority, the higher it will appear in the list of available transports for a service. The transport with the lowest priority will be the one used by default when clicking on the image of the service.
Certificate: Certificate generated in ovirt-engine/RHV-manager or in OpenNebula. It is required to connect to virtual desktops (usually hosted at /etc/pki/ovirt-engine/certs/ca.cer ).
Networks Access: Allows or disables user access to a service based on the network from which it is being accessed and the network indicated in the "Networks" field.
Networks: Network ranges, subnets or IP addresses indicated in the "Networks" of the "Connectivity" section. It is used together with the "Network Access" field to allow or disable user access to a service based on his network location.
Allowed Devices: Enables access to the service only with selected devices. If none are selected, no filtering is performed.
Service Pools: Allows to assign this transport directly to one or more "Service Pools" previously created.
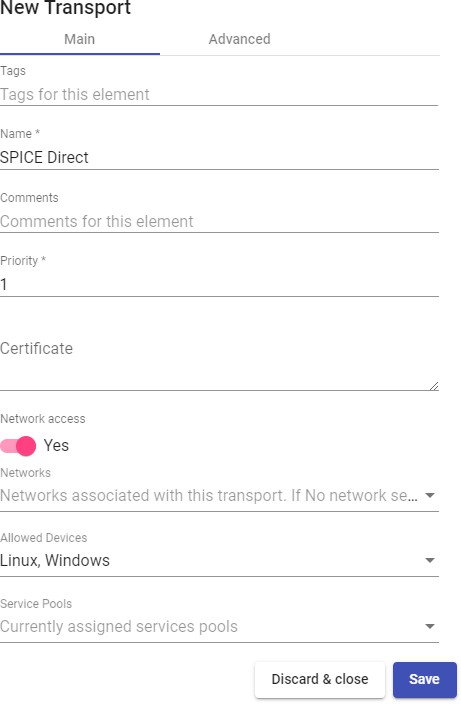
- Advanced:
Fullscreen Mode: Enables full screen in the virtual desktop.
Smartcard Redirect: Enables the redirection of smartcards on the virtual desktop.
Enable USB: Allows the redirection of devices connected to a USB port.
New USB Auto Sharing: Allows the redirection of PnP devices connected to a USB port.
Label: It allows to group transports to be shown, through the name of a label, in a meta pool. By using these labels, we can indicate that a metapool has several transports.
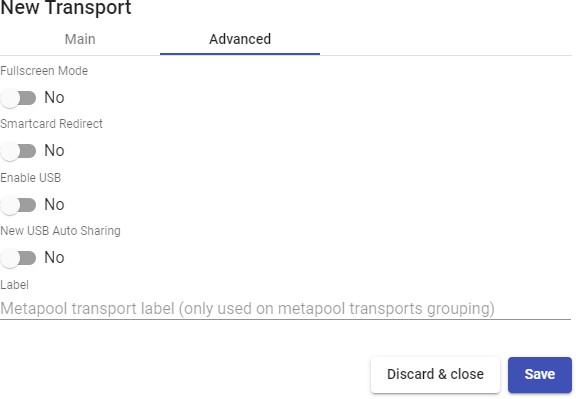
URL Launcher (direct)
A "URL Launcher" (direct) allows users to access a specific URL that will be executed in the browser (the default one) of their connection client computer.
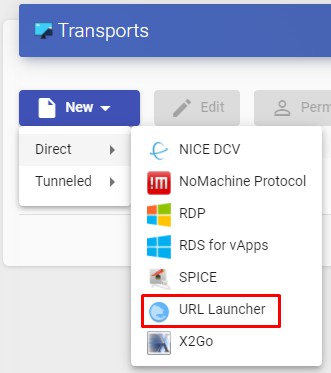
In a "URL Launcher" transport (direct), the minimum parameters to configure are:
- Main:
Name: Name of the transport.
Priority: Priority that the transport will have. The lower that priority, the higher it will appear in the list of available transports for a service. The transport with the lowest priority will be the one used by default when clicking on the image of the service
URL Pattern: URL that will launch the browser when the service is accessed. _IP_ can be used to send the IP address specified in the field "Machine IP" of type base service "Static Single IP" or you can also use _USER_ to send the name of the user that started the service.
Networks Access: Allows or disables user access to a service based on the network from which it is being accessed and the network indicated in the "Networks" field.
Networks: Network ranges, subnets or IP addresses indicated in the "Networks" of the "Connectivity". It is used together with the "Network Access" field to allow or disable user access to a service based on his network location.
Allowed Devices: Enables access to the service only with selected devices. If none are selected, no filtering is performed.
Service Pools: Allows you to assign this transport directly to one or more "Service Pools" previously created.

- Advanced:
Force new HTML Window: If enabled, the URL indicated in the field "URL Pattern" will launch in a new browser tab.
Label: It allows to group transports to be shown, through the name of a label, in a meta pool. By using these labels, we can indicate that a metapool has several transports.
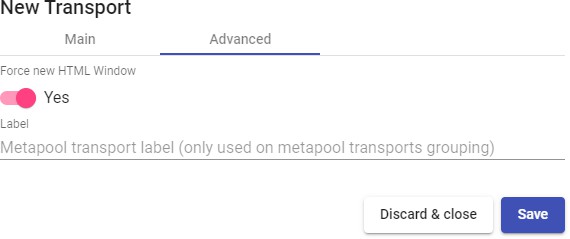
NOTE:
To publish a service pool and associate this transport, it is recommended to use the service provider type "Static IP Machine Provider" with a base service of type "Static Single IP".
X2Go (direct)
An "X2Go" tansport (direct) allows users to access Linux virtual desktops using "X2Go".
Both the connection clients (client) and the virtual desktops (server) must have "X2Go" installed and enabled.
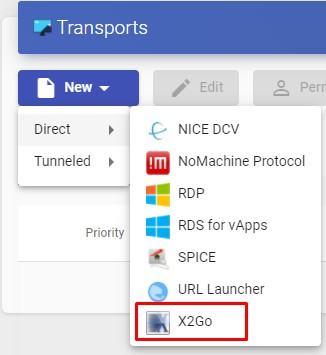
In an "X2Go" transport (direct), the minimum parameters to configure are:
- Main:
Name: Name of the transport.
Priority: Priority that the transport will have. The lower that priority, the higher it will appear in the list of available transports for a service. The transport with the lowest priority will be the one used by default when clicking on the image of the service.
Networks Access: Allows or disables user access to a service based on the network from which it is being accessed and the network indicated in the "Networks".
Networks: Network ranges, subnets or IP addresses indicated in the "Networks" of the "Connectivity". section. It is used together with the "Network Access" field to allow or disable user access to a service based on his network location.
Allowed Devices: Enables access to the service only with selected devices. If none are selected, no filtering is performed.
Service Pools: Allows you to assign this transport directly to one or more "Service Pools" previously created.
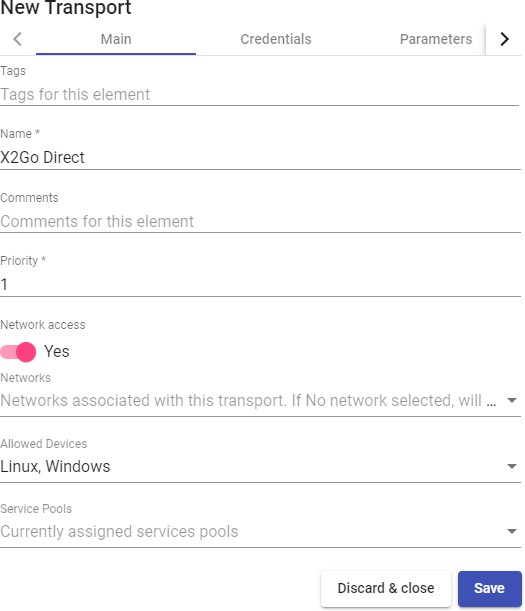
- Credentials:
Username: User name that will be used to log into the virtual desktop.
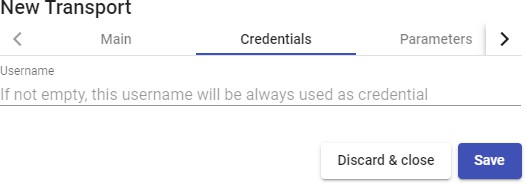
- Parameters:
Screen size: Resolution of the connection window.
Desktop: Selection of the desktop manager (xfce, Mate, Gnome, etc...) or virtualization of Linux applications (UDS vAPP)
vAPP: Execution path of the application to virtualize (only applies if the parameter "Desktop" is selected "UDS vAPP").
Enable sound: Enables sound in the connection. Redirect home folder: Redirects the user's /home. Speed: Connection optimization.
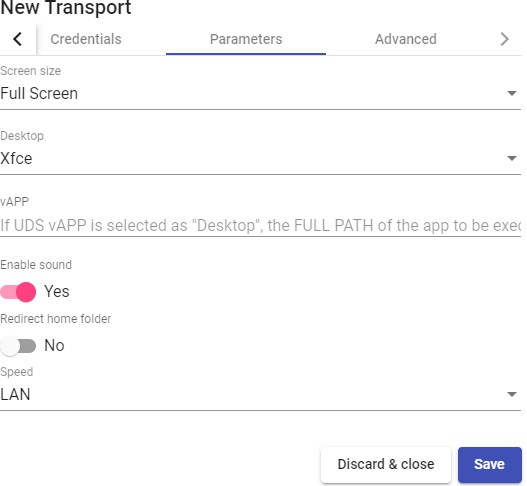
- Advanced:
Sound: Selection of the type of sound server.
Keyboard: Keyboard language.
Pack: Method used to compress images.
Quality: Image quality (0-9).
Label: It allows to group transports to be shown, through the name of a label, in a meta pool. By using these tags, we can indicate that a metapool has several transports.
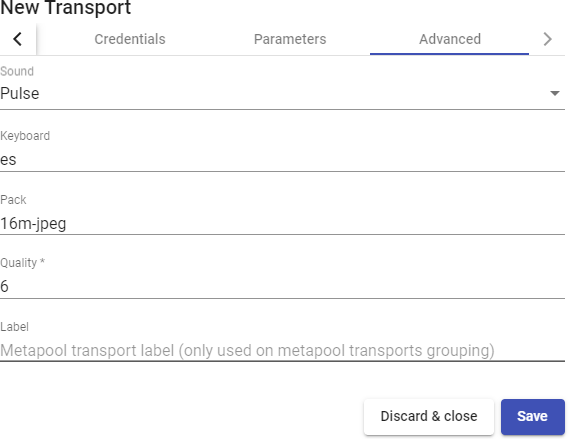
HTML5 RDP (tunneled)
An "HTML5 RDP" transport allows access to Windows and Linux virtual desktops using the RDP protocol through a web browser that supports HTML5 (for Linux desktops the machines must have the XRDP package installed. For Windows desktops, RDP access must be enabled)).
This transport uses the UDS Tunnel server to make the connection against the virtual desktops. It must be previously configured for its correct operation.
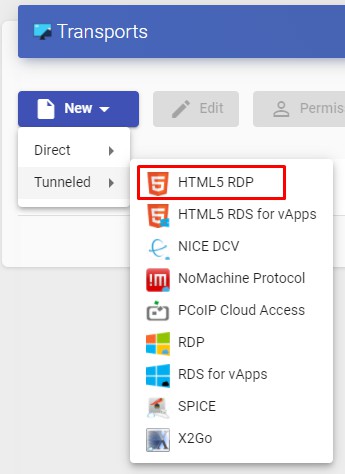
In an "HTML5 RDP" transport, the minimum parameters to configure are:
- Main:
Name: Name of the transport.
Priority: Priority that the transport will have. The lower that priority, the higher it will appear in the list of available transports for a service. The transport with the lowest priority will be the one used by default when clicking on the image of a service.
Networks Access: Allows or disables user access to a service based on the network from which it is being accessed and the network indicated in the "Networks" field.
Networks: Network ranges, subnets or IP addresses indicated in the "Networks" of the "Connectivity". section. It is used together with the "Network Access" field to allow or disable user access to a service based on his network location.
Allowed Devices: Enables access to the service only with selected devices. If none are selected, no filtering is performed.
Service Pools: Allows to assign this transport directly to one or more "Service Pools" previously created.
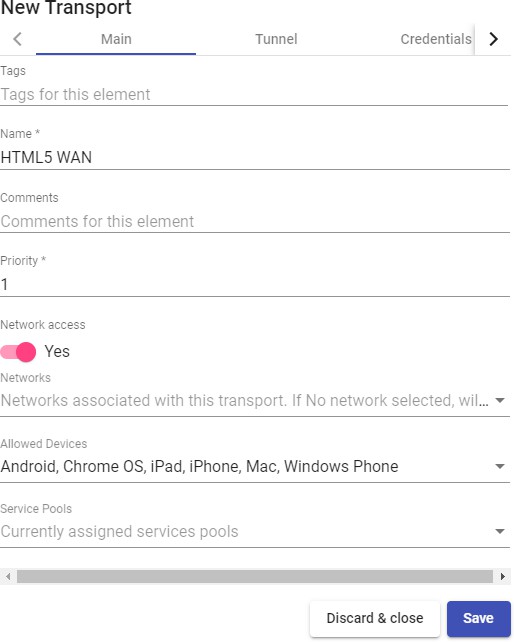
- Tunnel:
Tunnel Server: IP address or name with the connection port of the UDS Tunnel server. If access to the desktop is done from a WAN, the public IP address or name of the UDS Tunnel server must be entered. Format:
https://IP_Tunnel:10443
Use Glyptodon Enterprise tunnel: Allows to use the Glyptodon Enterprise server tunnel for HTML5 connections
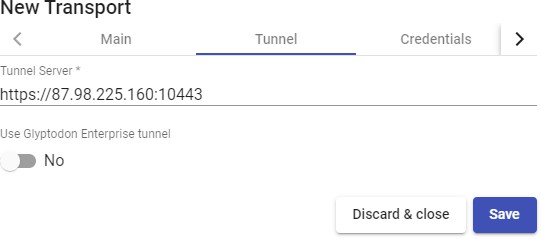
- Credentials:
Empty creds: If it is set to "Yes", when you make the connection with the service, it will ask you for the credentials to access the virtual desktop. If it is set to "No the credentials entered in the UDS login portal will be redirected.
Username: Username that will be used to log into the desktop (the user must exist in
the desktop). If this field is empty, it will try to use the UDS portal login user if the "Empty creds" field is "No", or it will ask for credentials to indicate them manually if it is "Yes".
Password: Password of the user in the "Username" field.
Without Domain: Indicates if the domain name is redirected together with the user.
Domain: A domain name that will be sent with the user's credentials.

- Parameters:
Show wallpaper: Shows the wallpaper.
Allow Desk.Comp.: Enables "Desktop Composition".
Font Smoothing: Activates font smoothing (improves display).
Enable Audio: Enables redirection of audio (speaker) in the virtual desktop.
Enable Microphone: Enable audio redirection (Microphone) on desktop.
Enable Printing: Enables printing in the virtual desktop. A printer will be automatically enabled to print documents in pdf format and download them to the connection client.
File Sharing: It enables a temporary repository (located on the UDS Tunnel server) to be able to upload or download files between the virtual desktop and the connection client.
Clipboard: Enables the ability to copy and paste text between the connection client and the desktop.
Layout: Keyboard language to be enabled on the desktop.
- Advanced:
Ticket Validity: Indicates the validity time (in seconds) of the ticket generated by UDS in the connection client for the HTML5 connection.
Force new HTML Window Forces each connection that is started to be in a new window.
Security: Indicates the security level of the connection. If you want to use NLA, it is necessary to redirect valid credentials (you will not be able to request credentials from the user by enabling the option "Empty creds"). If you want to use RDP security with O.S Windows, it will be necessary to disable NLA on the desktop, both at the remote desktop configuration level and at the registry level:
[https://www.udsenterprise.com/es/wiki/Troubleshooting/Windows/Windows10-HTML5/]{.underline}
It is recommended to use the option "Any", which provides greater flexibility.
RDP Port: Connection port against the RDP server
Glyptodon Enterprise context path: In case of using the Glyptodon Enterprise tunnel and it was not in the default route, we must indicate the new route.
Label: It allows to group transports to be shown, through the name of a label, in a meta pool. By using these labels, we can indicate that a metapool has several transports.
RDP (tunneled)
An "RDP (tunneled)" transport allows access to Windows/Linux virtual desktops by users located on a WAN using the Remote Desktop Protocol (RDP). Both the connection clients and the virtual desktops must have RDP installed and enabled (if connection clients with Linux OS are used, the "FreeRDP" client will be needed and if
the connection is made to Linux virtual desktops "XRDP" must be installed and configured).
This transport uses the UDS Tunnel server to make the connection against the virtual desktops. It must be previously configured for its correct operation.
In an "RDP (tunneled)" transport, the minimum parameters to configure are:
- Main:
Name: Name of the transport.
Priority: Priority that the transport will have. The lower that priority, the higher it will appear in the list of available transports for a service. The transport with the lowest priority will be the one used by default when clicking on the image of a service.
Networks Access: Allows or disables user access to a service based on the network from which it is being accessed and the network indicated in the "Networks" field.
Networks: Network ranges, subnets or IP addresses indicated in the "Networks" of the "Connectivity" field. It is used together with the "Network Access" field to allow or disable user access to a service based on his network location.
Allowed Devices: Enables access to the service only with selected devices. If none are selected, no filtering is performed.
Service Pools: Allows to assign this transport directly to one or more "Service Pools" previously created.
- Tunnel:
Tunnel Server: IP address or name with the connection port of the UDS Tunnel server. If access to the desktop is done from a WAN, the public IP address or name of the UDS Tunnel server must be entered. Formato:
IP_Tunnel:443
Tunnel wait time: UDS Tunnel server ticket validity time for the connection.
Force SSL certificate verification: Enables certificate verification. The UDS Tunnel server must have a valid certificate installed.
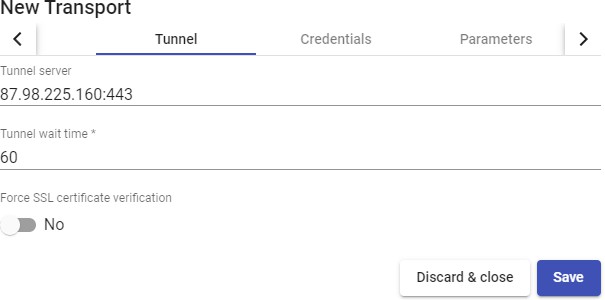
- Credentials:
Empty creds: If it is set to "Yes", when you make the connection with the service, it will ask you for the credentials to access the virtual desktop. If it is set to "No", the credentials entered in the UDS login portal will be redirected.
Username: Username that will be used to log into the desktop (the user must exist on
the desktop). If this field is empty, it will try to use the UDS portal login user if the "Empty creds" field is "No", or it will ask for credentials to indicate them manually if it is "Yes".
Password: Password of the user in the "Username" field.
Without Domain: Indicates if the domain name is redirected together with the user.
Domain: Name of the domain that will be sent with the user's credentials.
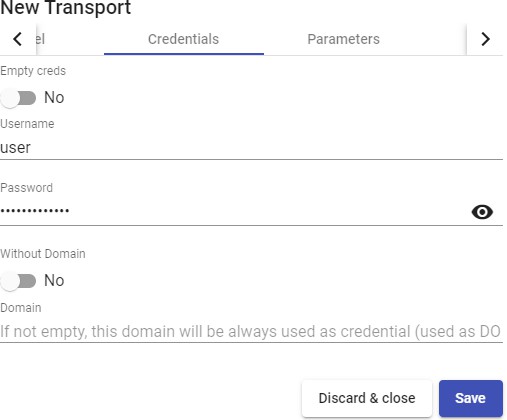
- Parameters:
Allow Smartcards: Enables the redirection of Smartcards.
Allow Printers: Enables printer redirection.
Local drives policy: Enables redirection of disk drives:
Allow none: No drive is redirected.
Allow PnP drives: Only connected drives are redirected during an active session.
Allow any drive: All drives are redirected.
Force drives: Forces the redirection of specific drives. You can enter several separated by commas. (Ex: F:,G: ).
Allow Serials: Enables serial port redirection.
Enable clipboard: If it is activated, it will allow copy/paste between the connection client and the desktop.
Enable Sound: If activated, it will allow the redirection of the audio from the desktop to the connection client.
Enable webcam: If it is activated, it will allow the redirection of web cameras between the connection client and the writer.
Credssp Support: If enabled, it will use "Credential Security Support Provider".
RDP Port: Connection port against the RDP server
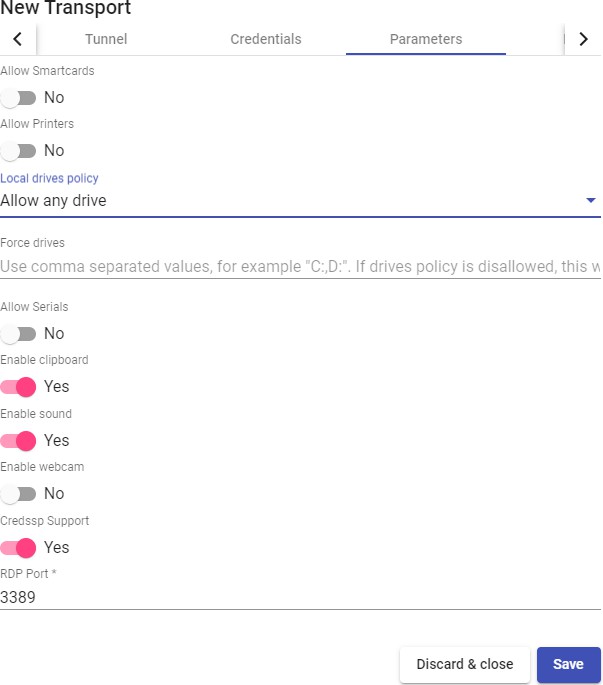
- Display:
Screen Size: Indicates the size of the desktop window.
Color depth: Indicates the depth of the colour. Wallpaper/theme: Displays the desktop background. Multiple monitors: Allows the use of multiple monitors. Allow Desk. Comp.: Enables "Desktop Composition". Font Smoothing: Activates font smoothing.
Connection Bar: Allows to enable or disable the connection bar.

- Linux Client (only applies to Linux connection clients): Multimedia sync: Enables the multimedia parameter on the FreeRDP client. Use Alsa: Enables the use of audio through Alsa.
Printer string: Example: "Zebra","ZDesigner TM400 200 dpi (ZPL)"
("Zebra" is the name of the local printer, "ZDesigner TM400 200 dpi (ZPL)" is the exact name of the printer driver in Windows).
Smartcard string: Example: "Gemalto PC Twin Reader 00 00" ("Gemalto PC Twin Reader 00 00" is the name of the smartcard).
Custom parameters: You can specify any parameter supported by the FreeRDP
client. (If several are indicated, they must be separated by spaces). They will be applied when connecting to the virtual desktop**.**
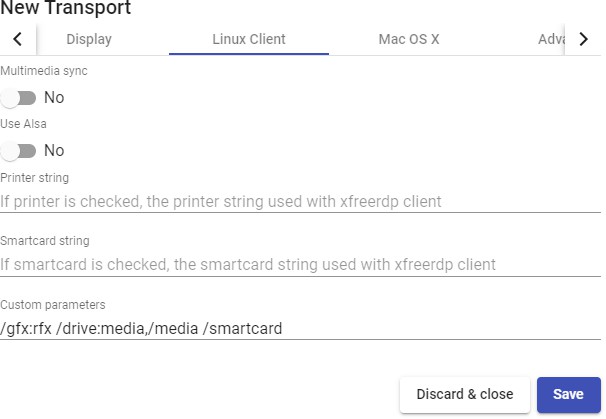
NOTE:
The screenshot shows some important parameters as an example: /gfx:rfx greatly improves video and audio quality, /drive:media,/media allows to redirect connected local drives in connection client,
/smartcard allows to redirect a smartcard ...
- Mac OS X (only applies to MacOS connection clients):
Allow Microsoft Rdp Client: Allows you to use the Microsoft RDP client instead of the FreeRDP client. In order to use it, it must be enabled and the FreeRDP client must not be installed on the MacOS connection client computer.
Custom parameters: Any parameter supported by the FreeRDP client can be indicated (if several are indicated, they must be separated by spaces). They will be applied when connecting to the desktop.
- Advanced:
Label: It allows to group transports to be shown, through the name of a label, in a meta pool. By using these labels, we can indicate that a metapool has several transports.
SPICE (tunneled)
An "SPICE (tunneled)" ransport allows access to Windows/Linux virtual desktops by users located on a WAN using the SPICE protocol. Connection clients must have the SPICE client (Virt-Manager) installed.
The SPICE transport can only be used with a service provider such as oVirt/Red Hat Enterprise Virtualization (RHV) and OpenNebula.
This transport uses the UDS Tunnel server to make the connection to the virtual applications. It must be previously configured for its correct operation.

In a "SPICE (tunneled)" transport the minimum parameters to configure are:
- Main:
Name: Name of the transport.
Priority: Priority that the transport will have. The lower that priority, the higher it will appear in the list of available transports for a service. The transport with the lowest priority will be the one used by default when clicking on the image of a service.
Certificate: Certificate generated in ovirt-engine / RHV-manager or OpenNebula
necessary to connect with virtual desktops (usually hosted at /etc/pki/ovirt-engine/certs/ca.cer ).
Networks Access: Allows or disables user access to a service based on the network from which he is accessing, and the network indicated in the "Networks" field.
Networks: Network ranges, subnets or IP addresses indicated in the "Networks" of the "Connectivity" field. It is used together with the "Network Access" field to allow or disable user access to a service based on their network location.
Allowed Devices: Enables access to the service only with selected devices. If none are selected, no filtering is performed.
Service Pools: Allows to assign this transport directly to one or more "Service Pools" previously created.
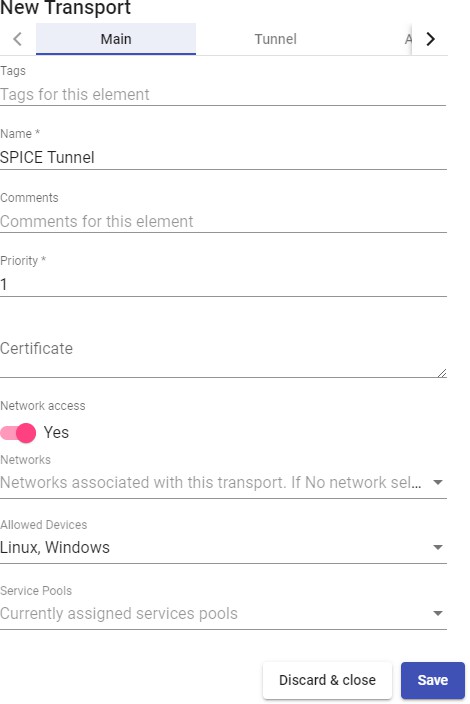
- Tunnel:
Tunnel Server: IP address or name with the connection port of the UDS Tunnel server. If access to the desktop is done from a WAN, the public IP address or name of the UDS Tunnel server must be entered. Format:
IP_Tunnel:443
Tunnel wait time: Validity time of the UDS Tunnel server ticket for the connection.
Force SSL certificate verification: Enables certificate verification. The UDS Tunnel server must have a valid certificate installed.
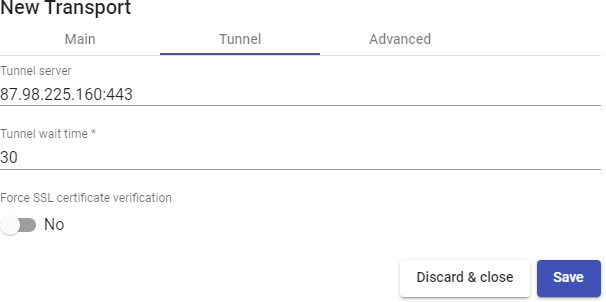
- Advanced:
Fullscreen Mode: Enables the full screen when connecting to the virtual desktop.
Smartcard Redirect: Enables the redirection of smartcards on the virtual desktop.
Enable USB: Allows the redirection of devices connected to a USB port.
New USB Auto Sharing: Allows the redirection of PnP devices connected to a USB port.
Label: It allows to group transports to be shown, through the name of a label, in a meta pool. By using these tags, we can indicate that a metapool has several transports.
X2Go (tunneled)
An "X2Go (tunneled)" transport allows access to Linux virtual desktops by users using the X2Go software.
Both connection clients (client) and virtual desktops (server) must have X2Go installed and enabled.
This transport uses the UDS Tunnel server to make the connection against the virtual desktops. It must be previously configured for its correct operation.
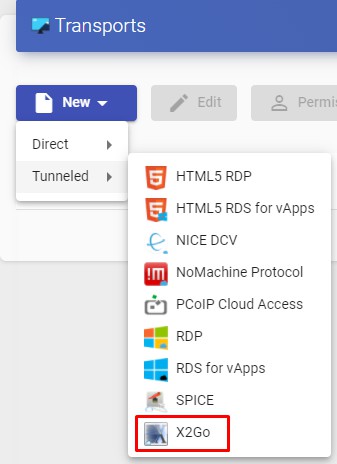
In an "X2Go (tunneled)" transport the minimum parameters to configure are:
- Main:
Name: Name of the transport.
Priority: Priority that the transport will have. The lower that priority, the higher it will appear in the list of available transports for a service. The transport with the lowest priority will be the one used by default when clicking on the image of a service.
Networks Access: Allows or disables user access to a service based on the network from which it is being accessed and the network indicated in the "Networks" field.
Networks: Network ranges, subnets or IP addresses indicated in the "Networks" of the "Connectivity" field. It is used together with the "Network Access" field to allow or disable user access to a service based on their network location.
Allowed Devices: Enables access to the service only with selected devices. If none is selected, no filtering is performed.
Service Pools: Allows to assign this transport directly to one or more "Service Pools" created previously.
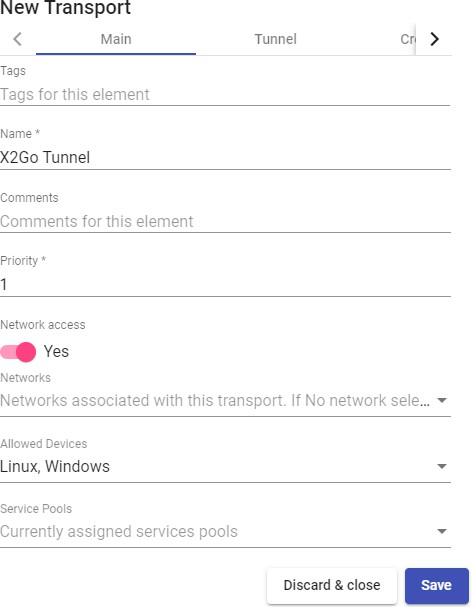
- Tunnel:
Tunnel Server: P address name with the connection port of the UDS Tunnel server. If access to the desktop is from a WAN, the public IP address or name of the UDS Tunnel server must be entered. Format:
IP_Tunnel:443
Tunnel wait time: Validity time of the UDS Tunnel server ticket for the connection.
Force SSL certificate verification: Enables certificate verification. The UDS Tunnel server must have a valid certificate installed.
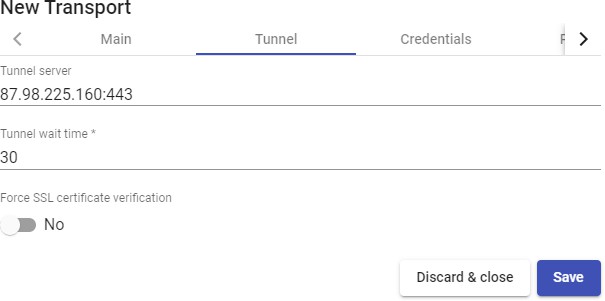
- Credentials:
Username: User name that will be used to log into the virtual desktop.
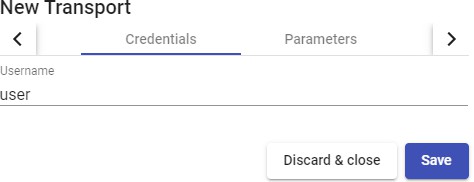
- Parameters:
Desktop: Selection of the desktop manager (xfce, Mate, Gnome, etc...) or virtualization of Linux applications (UDS vAPP).
vAPP: Execution path of the application to be virtualized (only applicable if the parameter "Desktop" is selected "UDS vAPP").
Enable sound: Enables sound.
Redirect home folder: Redirects the user's /home.
Speed: Optimization of the connection.
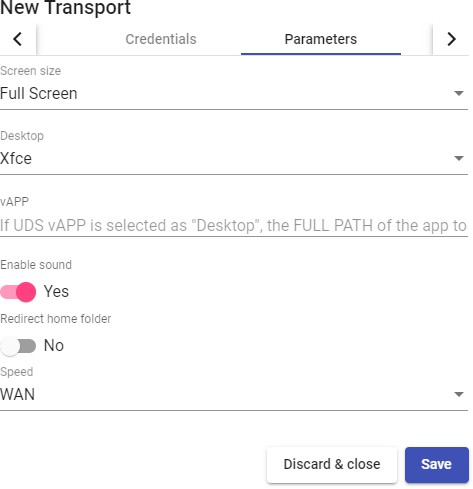
- Advanced:
Sound: Selection of the type of audio server.
Keyboard: Keyboard language.
Pack: Method used to compress images
Quality: Image quality (0-9)
Label: It allows to group transports to be shown, through the name of a label, in a meta pool. By using these tags, we can indicate that a metapool has several transports.
Networks
UDS allows you to register different networks to view or hide the access of connection clients to virtual desktops or applications (when accessing the UDS login portal, the IP address of the connection client is detected). These networks will be the ones that together with the "Transport" will define what type of access users will have to their virtual desktops or applications generated by UDS.
To add a network, go to the"Connectivity" section and select "Networks".
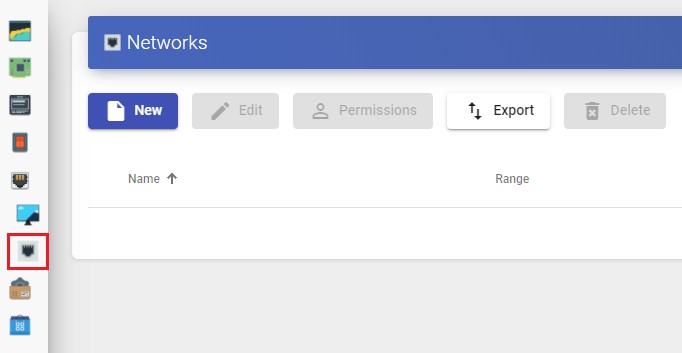
Indicate a descriptive name and a network range, complete subnet or IP address. The following formats are supported:
Unique IP address: xxx.xxx.xxx.xxx (For example: 192.168.11.33).
Entire subnet: xxx.xxx.xxx.xxx/x (For example: 192.168.11.0/24).
IP address range: xxx.xxx.xxx.xxx-xxx.xxx.xxx.xxx (For example: 192.168.11.1- 192.168.11.155).
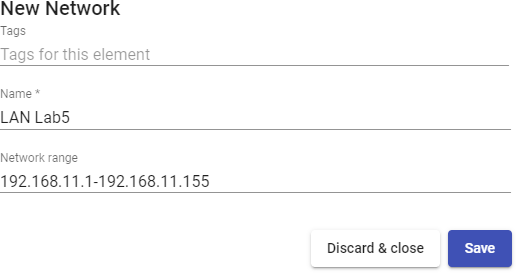
The defined networks will appear available in the transports. You can configure whether a connection client that is in that network displays the transport or not:
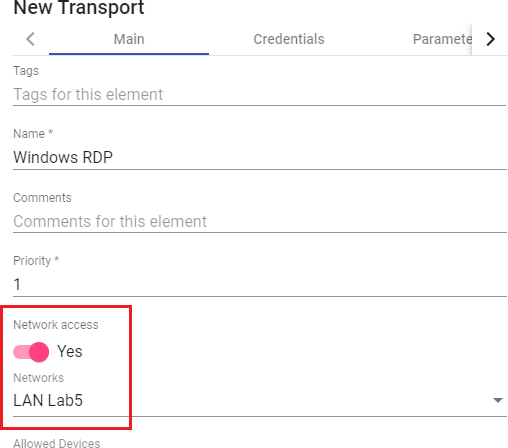
If a user has administration rights, he will see the IP address that UDS detects in the connection client in the user's services dashboard.
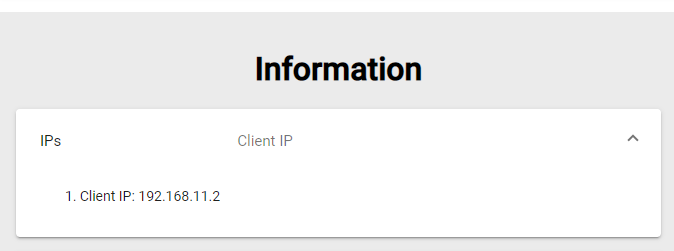
If no networks are defined on a transport, the system will not limit access to desktop services and virtual applications from any location
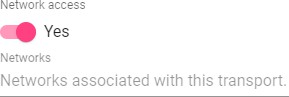
Service Pools
The creation of a "Service Pool" will allow the deployment of desktop services or virtual applications, which will be available for access by different groups of users.
The necessary elements to create a "Service Pools" are a "Base Service" (composed of a "Service Providers" + a service created in it) and an "OS Manager". Once created, you will have to assign one or several user groups and one or more transports to enable user access.
To create a"Service Pool" go to the"Pools" section and select"Service Pool".
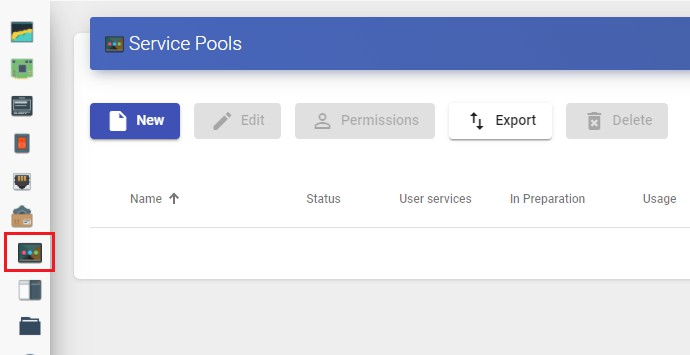
To configure a"Service Pool" it will be necessary to indicate:
- Main:
Name: Name of the "Service Pool" (this name will be the one shown to a user to access his desktop or virtual application).
In this section you can add variables to display information about the services:
{use}: Indicates the percentage of pool use (calculated based on the maximum services to be provided and the services assigned).
{total}: Total number of machines (data extracted from the maximum services to be provided from the service pool).
{usec}: Number of machines being used by users in the pool.
{left}: Number of machines available in the pool for user connection.
Short name: If indicated; it will be the name of the service that will be shown to the user. When hovering over it, the content of the "Name" field will appear.
Base Service: Base service to be used (virtual desktop or application). It is made up of a service provider and a base service previously configured in the "Services".
OS Manager: "OS Manager" previously created whose configuration will be applied to each of the generated virtual desktops. In the case of publishing a vAPP service, it will also be required. But if you use a "Static IP", type service, this field will not be used.
Publish on creation: If enabled, when we save the service pool, the system will automatically launch the first publication. If it is set to "No", it will be necessary to launch the publication of the service manually (from the "Publications" tab).
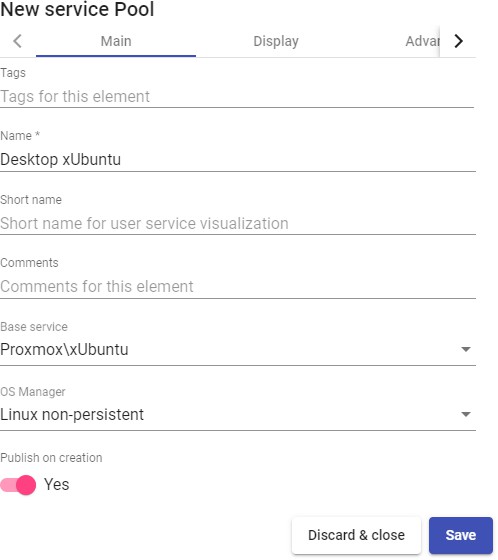
- Display:
Visible: If disabled, the"Service Pool" will not be shown as available to users on the UDS services page ("User mode").
Associated Image: Image associated to the service. It has to be previously added to the image repository, accessible from the "Tools" -- "Gallery" section.
Pool group: Allows to group different services. To assign a "Pool group", it must be previously created in the "Pools" -- "Groups" section.
Calendar Access denied text: Text that will be displayed when a service has access denied by the application of an access calendar.
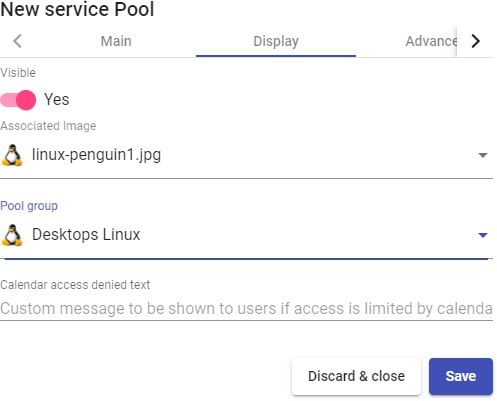
- Advanced:
Allow removal by users: If enabled, users can remove the services assigned to them. If the service is a virtual desktop auto-generated by UDS, it will be deleted and a new one will be assigned to it on the next connection. If it is another type of service (vAPP / Static IP), the assignment will only be removed and a new one will be assigned on the next connection.
Allow reset by users: If it is activated, the user will be able to restart or reset the services assigned to him (only applies to virtual desktops auto-generated by UDS).
Ignores unused: If enabled, non-persistent user services that are not in use will not be removed.
Show transports: With this option activated, all the transports assigned to the service will be displayed. If it is not activated, only the default transport with the highest priority (The lowest number in the "priority" field of transport) will be displayed.
Accounting: Assigning a service to a previously created "Accounts" ("Pools" -- "Accounts")
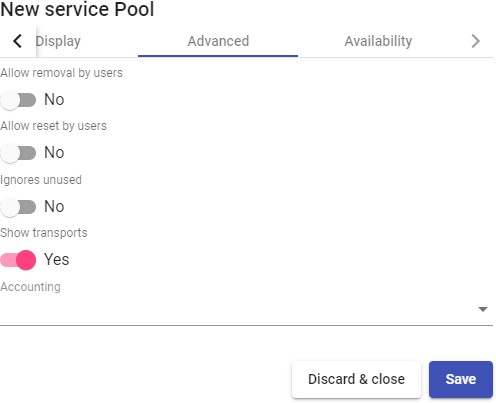
- Availability:
Initial available services: The minimum number of virtual desktops created, configured and assigned/available for the service.
Services to keep in cache: Number of virtual desktops available. These will always be configured and ready to be assigned to a user (they will be automatically generated
until the maximum number of machines indicated in the"Maximum number of services to provide" field is reached).
Services to keep in L2 cache: Number of virtual desktops in sleep or shutdown state. These desktops will be configured and ready for allocation when the system demands new cached desktops.
The virtual desktops generated at the L2 cache level will be cached as soon as the system demands them. They will never be directly assigned to users.
Maximum number of services to provide: Maximum number of virtual desktops created by the system in the"Service Pool" (desktops generated in L2 cache will not be counted).
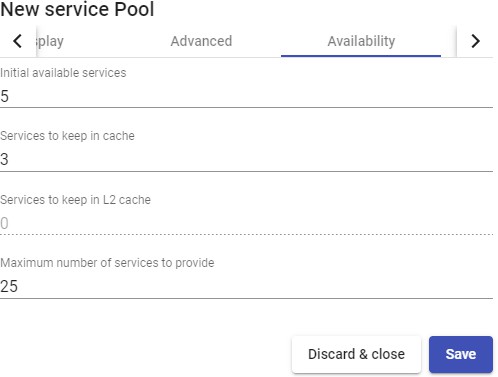
Save the "Service Pool" and the system will start to generate virtual desktops based on the configured cache (Availability tab).
Using the "Delete" button you can completely delete a"Service Pool" and with "Edit" you can modify it.
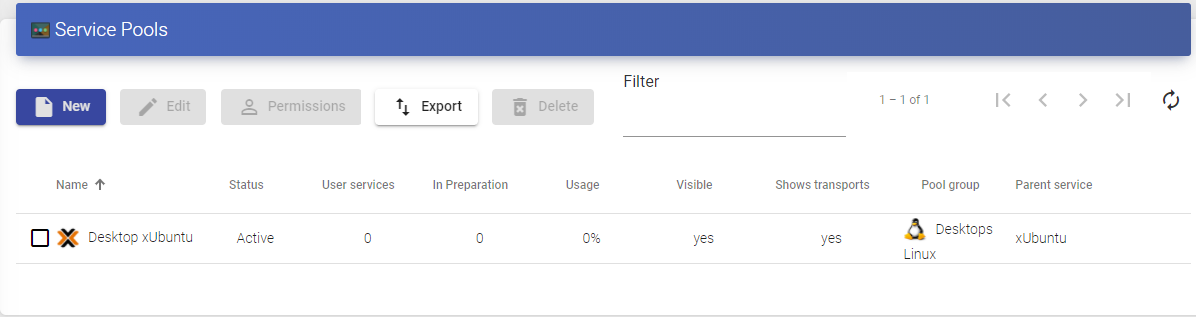
If you access the "Service Pool" created, in the "publications" section (if you have checked the "Publish on creation"), he system will start with the publication of
the service generating the base machine on which the virtual desktops will be based.
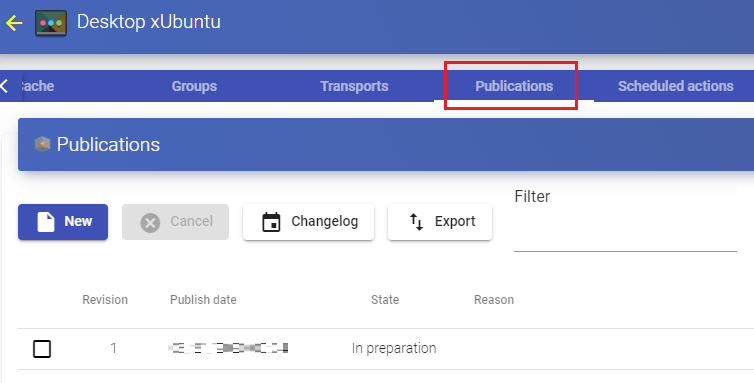
Once you have created a"Service Pool", if you access it, you will find the following control and configuration menus:
- Assigned Services: Virtual desktops that have been assigned to users. Displays information about the desktop creation date, the revision (or publication) number on which the desktop is generated, the MAC address of the VM's network card, the DNS and IP name of the virtual desktop, the status of the desktop, if it is in use, the name and IP of the connection client, the owner of the machine and the version of the UDS Actor installed on the template machine.
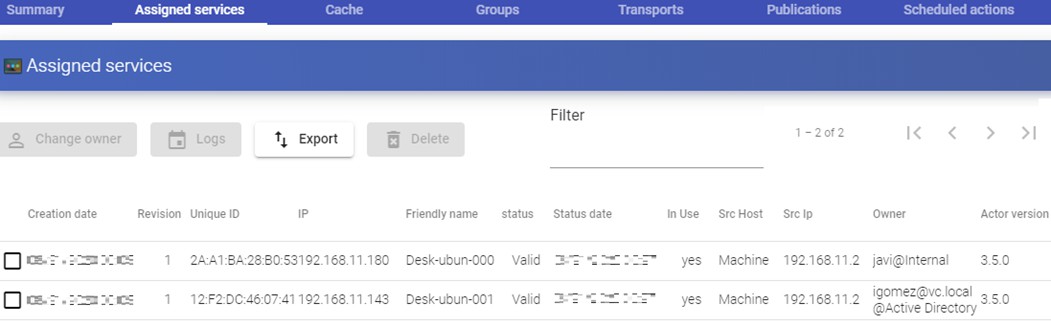
Selecting the virtual desktop and clicking on "Change owner", you can change the user assigned to the desktop
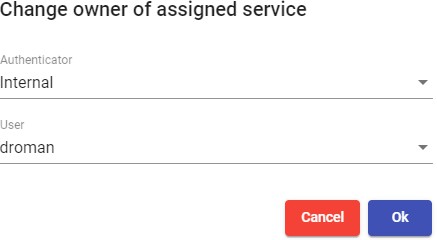
By clicking on "Delete" you can delete it manually and on "Logs" you will see all the information reported by the "Actor UDS" installed on the desktop.
Cache: Virtual desktops available for user connection, (including L2 cache machines). These desktops will go through different states:
In Preparation: In this state, the virtual desktops are being created on the virtualization platform.
Waiting OS: In this state, the virtual desktops are being configured with the parameters indicated in the "OS Manager" (name change, inclusion in the domain, etc ...)
Valid: When a virtual desktop is in this state, it will mean that it is available for user access.
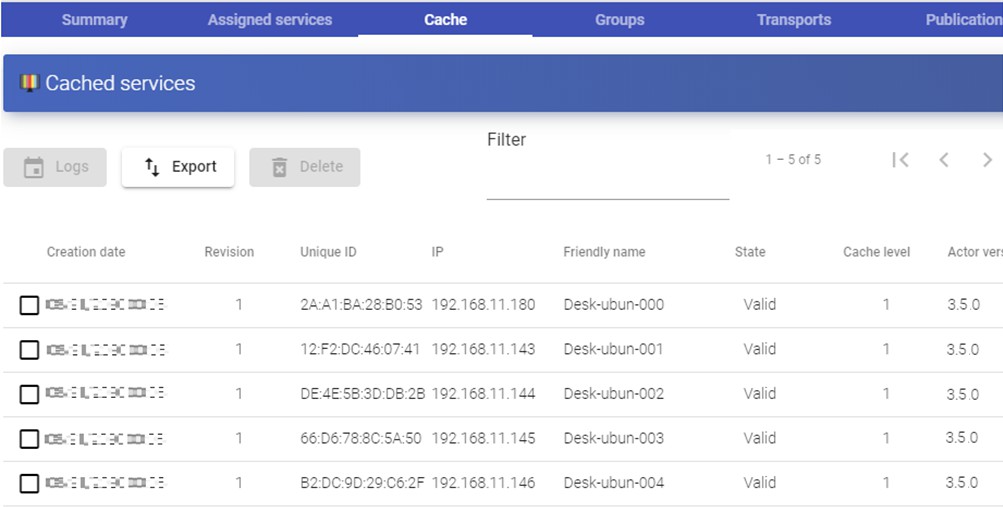
- Groups: To allow users to connect, it is necessary to assign access groups or metagroups. These groups or metagroups must be created in the "Authenticators" section and you can assign one or more access groups or metagroups to each "Service Pool".
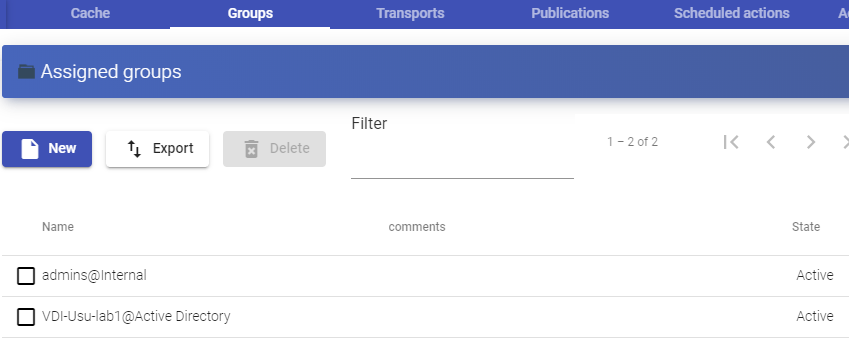
Select the "Authenticator" and based on your choice, choose the "Group Name".
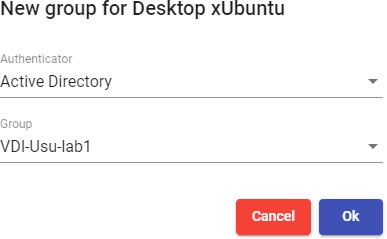
- Transports: The "Transports" to make the connection with the virtual desktop
(Previously added in the "Transports" section) will be indicated. The "Transports" with the lowest priority will be the ones configured by default by the system. To use the rest of the transports, the user will have to open the drop-down menu on the virtual desktop access screen and select the one that corresponds.
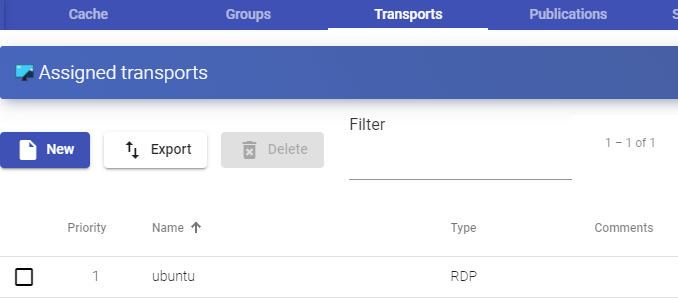
Select the "Transport" that you want to use in this "Service Pool" and save.
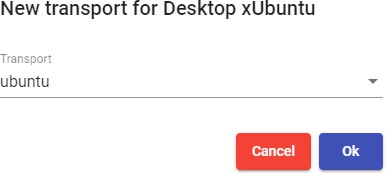
- Publications: From this menu, you can make a new publication of the service (for example, if you have updated your base machine with new applications or OS patches and you want all your virtual desktops to take these changes). Once the publishing process is finished, the entire system cache will be regenerated with the new desktops based on this latest publication.
If you make a new publication, a new base machine will be generated and, once available, the system will proceed to eliminate the virtual desktops of the previous version and generate new ones based on the new publication
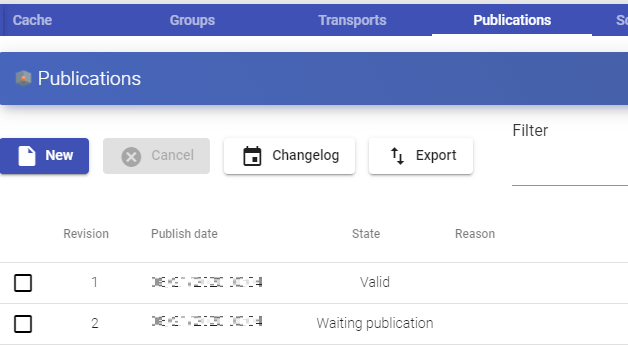
Meta Pools
The creation of a "Meta Pool" will allow access to desktop services or vApps made up of different "Services Pools". These Pools will work together providing different services in a completely transparent way for users.
The "Service Pools" that form a "Meta Pool" will work under a policy that will allow the provision of services according to the needs of the Pool. Currently, the supported policies will be defined by priorities, platform capacity and use.
To create a "Meta Pool", go to the "Pools" section and select "Meta Pools".
To configure a "Meta Pool" it will be necessary to indicate:
- Main:
Name: Name of the "Meta Pool" (this name will be the one that is shown to a user to access his service: virtual desktop or application)
Short name: If indicated, it will be the name of the service that will be shown to the user. When hovering over it, the content of the "Name" field will appear".
Policy: Policy that will be applied when generating services in the "Services Pools" that are part of the "Meta Pool".
Evenly distributed: The services will be created and consumed equally in all the "Services Pool" that make up the "Meta Pool".
Priority: The services with the highest priority will be created and consumed from the "Service Pool" (the priority is defined by the "priority" field. The lower the value of this field, the more priority the element will have). When the "Service Pool" reaches the maximum number of services, the services of the next one will be consumed.
Greater % available: The services will be created and consumed from the "Service Pool" that has the highest percentage of free use.
- Display:
Associated Image: Image associated to the "Meta Pool". It has to be previously added to the image repository and accessible from the "Tools" -- "Gallery" section.
.
Pool group: Enables the ability to group different "Meta Pools" in order to assign a "Pool group". It must be previously created in the "Pools" -- "Groups" section.
Visible: If disabled, the "Meta Pool" will not be shown as available to users on the UDS services page ("User mode").
Calendar Access denied text: Text that will be displayed when the "Meta Pool" has access denied by the application of an access calendar
Transport Selection: It will indicate how the transports will be assigned to the "meta pool":
Automatic selection: The transport available and with the lowest priority assigned to the "Service Pool" will be available in the "meta pool". Transport selection is not allowed.
Use only common transports: Those existing transports that are shared by all the "Service Pool" will be available in the "meta pool".
Group Transports by label: Those transports that have different and grouped "labels" will be available in the "meta pool" (this field is inside each "Transport" in the "advanced" tab).
Save the configuration and you will have a valid "Meta Pool" to start registering "Services Pools".
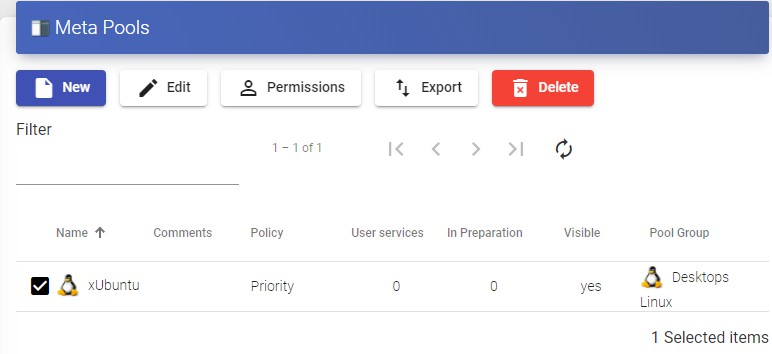
To modify any parameter in an existing "Meta Pool", select it and click on "Edit".
Once created, you must add "Services Pools". To do this, double click on the created "Meta Pool" or select "Detail" in the provider menu:
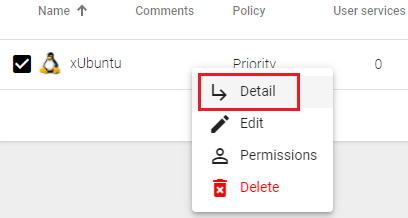
Click on "New" to add all the "Services Pools" that the "Meta Pool" will contain. You can add as many as you need, combining services hosted on different virtualization platforms (VMware, KVM, Azure, etc...), application servers and static devices.
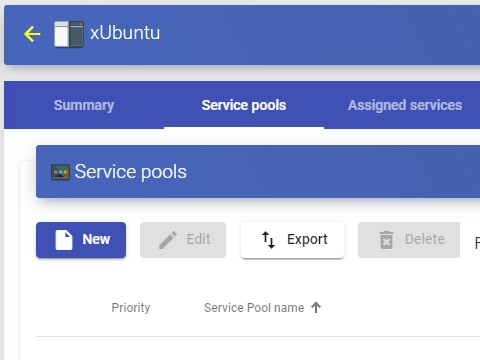
To add a "Service Pool" you must indicate the following parameters:
Priority: Priority that the "Service Pool" will have in the "Meta Pool". The lower the value, the more priority it has with respect to the rest of the elements.
Service pool: Name of the "Service Pool" that you want to add. It must be previously created
Enabled: Enables or disables the visibility of the "Meta Pool"
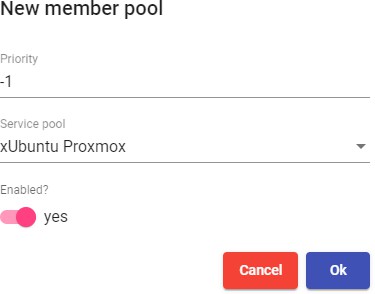
You can add as many as you need, combining services hosted on different virtualization platforms (VMware, KVM, Azure, etc...), application servers and static devices.
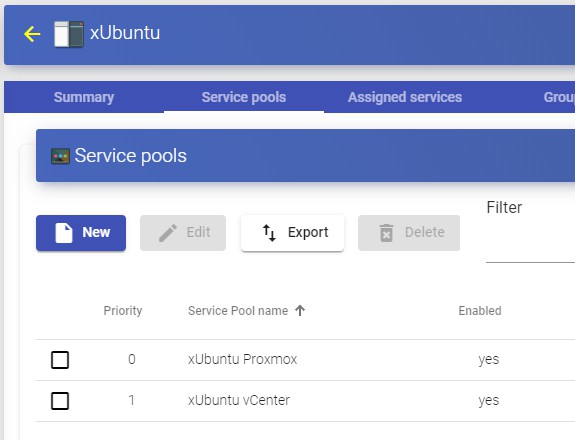
Like in a "Service Pool", here you will also have the following information and configuration tabs:
Assigned services: Shows the services assigned to users, allowing their manual removal and reassignment to another user.
Groups: Indicates which user groups of the different authenticators registered in the system will have access to the service.
Access calendars: Allows to apply a previously created access calendar.
Logs: Shows all the issues that occurred in the "Meta Pool".
Groups
UDS allows you to group services to facilitate their access and location. Additionally, each service grouping can be assigned a name and an image. If "Groups" are not defined, the services will be located in the default site, which is created by the system
To create "Groups", go to the "Pools" section and select "Groups":
Select "New" and indicate a descriptive name. Assign the priority of the pool group (the lower the value, the more priority it will have, concerning the rest of the elements.) and associate an image:
Once created, it will be available for assignment to a "Service Pool".
Access Calendars and scheduled tasks
OpenUDS incorporates a system to allow or deny access through calendars. They allow enabling or restricting user access to desktop services and virtual applications by dates and time slots.
With the use of calendars, it is also possible to schedule and automate certain tasks on a "Service Pool", such as making new publications, adjusting the system cache values, adding or removing groups and transports or changing the maximum number of services.
Calendars
To create "Calendars", go to the "Pools" section and select "Calendars".
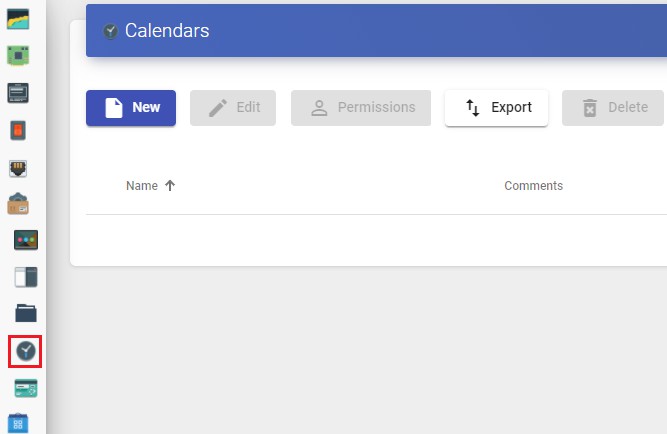
Indicate a descriptive name to identify the calendar.
Save and you will already have a valid calendar to start creating the rules that you will later apply to a service through the "Services Pool".
In a "Calendar", you can register various types of rules to schedule the availability of services at certain times.
To create a rule, access the calendar and click on "New".
The minimum parameters to configure in a "Rule" are:
Name: Name of the rule.
Event: Configuration of the execution periods. For this end, indicate the start time and the duration of the event (in minutes, hours, days and months.
Repetition: In this section, you can configure that the rule is repeated in days, weeks, months, years, and even allows to specify working days. Finally, you can indicate repetition intervals per day.
Summary: Shows a summary of all the configuration previously made.
Upon saving you will have a valid rule to be assigned to a "Service Pool" (virtual desktop and/or application).
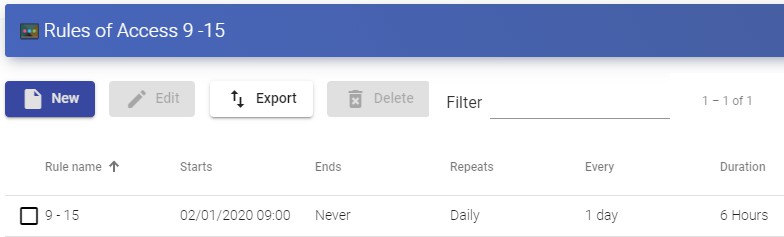
Enable or deny user access
Once the rules in the calendars are configured, you can use them to enable or deny user access to desktop services and virtual applications.
To apply these calendars with their rules, select a "Service Pool", go to the "Access Calendars" tab and click on "New":
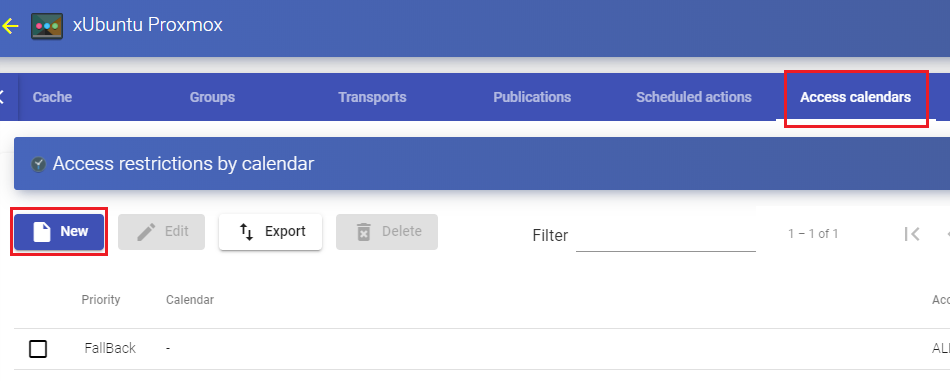
Indicate the priority of access, select an existing calendar and check the action to be applied when accessing the service
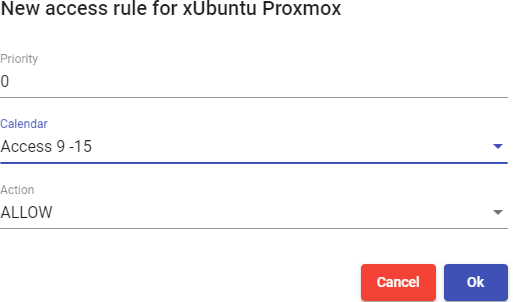
Upon saving you will have a "Service Pool" with a configured access calendar.
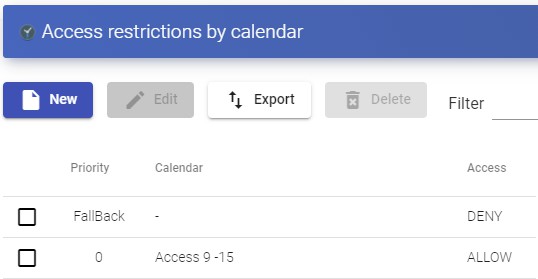
NOTE:
La You will have to adjust the default rule "FallBack" based on the needs of the service to allow or deny access to the service when the calendar does not apply.
Scheduled Actions:
Once the rules in the calendars have been configured, you can use them to schedule certain tasks on a "Service Pool".
To apply these calendars with their rules, select a "Service Pool", go to the "Scheduled actions" tab and click on "New".
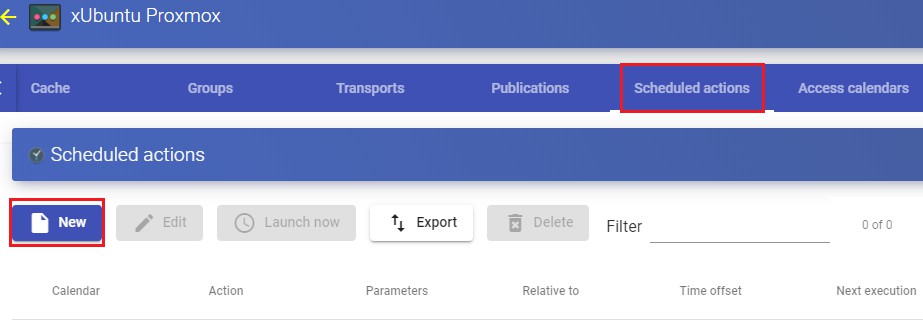
Indicate an existing calendar, the time during which the action will be executed and select the action to be carried out:
Set initial services: Resets the minimum virtual desktops created and configured.
Set cache size: Resets the virtual desktops available in the system cache. These desktops will be configured and ready for assignment to a user.
Set máximum number of services: Modifies the maximum number of virtual desktops in the "Service Pool".
Publish: Creation of a new publication in a "Service Pool".
Add a transport: Adds an existing transport in a "Service Pool".
Remove a transport: Removes transport from a "Service Pool".
Add a group: Adds existing group in a "Service Pool".
Remove a group: Removes group from a "Service Pool".
Sets the ignore unused: Sets the "Ignores unused" option.
Remove ALL assigned user service: Removes all the services assigned to users in a "Service Pool".
We save and we will have a scheduled task that performs a specific action on a "Service Pool".
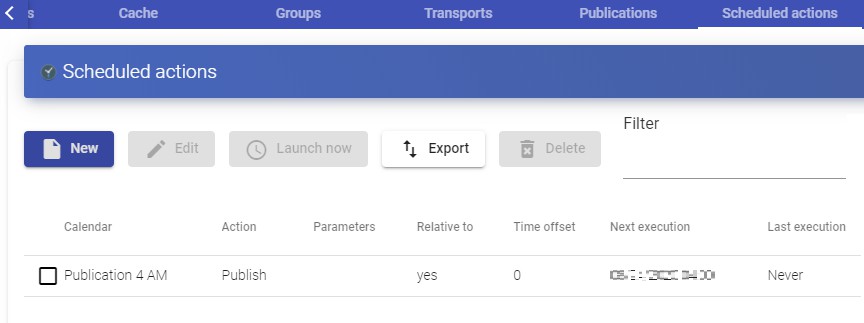
Configure Permisions
Within the OpenUDS administration, it is possible to assign access and management permissions to the different elements, to users and groups of users. The
permissions will be assigned directly on each element and will also apply to its subelements.
To allow a user to access the administration and apply for these permissions, the usermust have the "Staff member" option enabled:
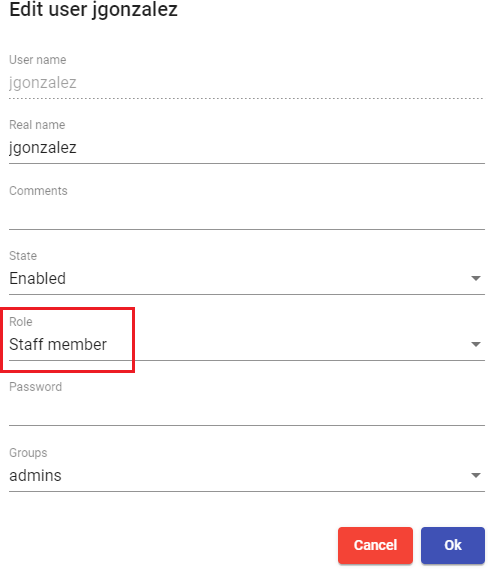
To enable permissions in the different elements of the administration, select the element and click on "Permissions". For example, in a "Service Provider".
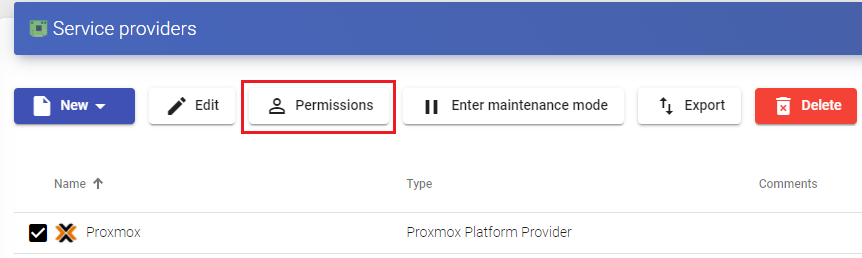
In the permissions window, click on "New permission..." for groups and users and select the authenticator and group/user to which the permission will be applied.
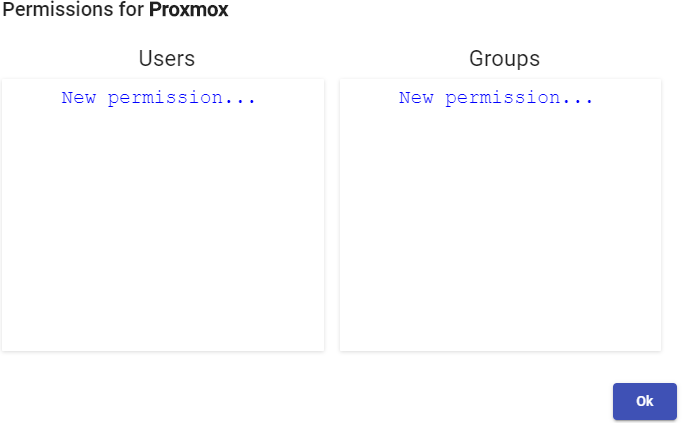
You will have to specify if this user or group will have reading access to the element ("Read Only") or full control ("Full Access").
Once applied, users who have the "Staff member" option enabled will be able to access this element of the administration with the permissions that have been assigned
To remove the permissions to a group or user, click on the "X".
Permissions of type "Full Access" ("Manage") may only be applied to elements that have a second leve ("Services", "Calendars", "Service Pools", etc...).
ACCESING VIRTUAL DESKTOPS WITH OpenUDS
Once you have available one or more "Service Pools" with published services on valid status, you can make a connection to a virtual desktop. You will access via a web browser the address or name of the UDS Server. Enter a valid user name and password and select the authenticator in the case of having more than one available.
In the available services screen, you will see the services to which the user with whom you have logged into the UDS system has access. Click on the one you want to start the connection with.
By default, if you click on the service image directly, you will make the connection with the "Transport" that has the lowest priority. If you have configured several ones, a drop-down menu will appear where you can select the "Transport" with which you will connect to the virtual desktop.
If necessary, or in case of having several types of services (applications, Linux desktops or Windows desktops), you can group the services to facilitate access to users:
To start the connection with the virtual machine, it is necessary to have the "UDS Client" installed on the connection client machine. It is necessary to start the connection with all transports except HTML5
To connect to the virtual desktop or application, it is necessary to have the clients of each protocol installed (RDP, NX, RGS, SPICE, etc...).
HTML5 connection example:
Tools
OpenUDS provides a series of tools that give the system greater flexibility, providing customization, usage reports, advanced parameters, etc...
Gallery
UDS has a repository of images that can be associated with a "Service Pool" or "Pool Group" to facilitate the identification of the virtual desktop. Accepted formats are PNG, JPEG and GIF. If the image size is larger than 128x128, it will be resized.
To access the UDS image gallery, access the "Tools" section and select "Gallery":
Select "New" to add a new image to the repository. It will be necessary to indicate a name and, using the "Select image" button, you will look for the image you want to upload.
Once the image is stored, it will be available for assignment to a "Service Pool" or "Pool Group"
Reports
UDS allows the automatic generation of reports on different elements of the platform To access the reports, enter the "Tools" section and select "Reports":
It is possible to generate different reports in UDS. Notable among them are:
- Users list: Generates a report with all the users that belong to an authenticator. Select the authenticator and click on "Save".
Once generated, you will have a list of all the users belonging to that authenticator:
Users access report by date: Generates a report with all user accesses to the system in a specific date range. You can indicate a range of dates and number of intervals:
Pools performance by date: Generates a report on the use of a services pool in a specific date range. You can indicate the pool on which you want to generate the report, date range and number of intervals
Configuration
OpenUDS provides a series of parameters that will define the operation of the system. These parameters will be responsible for defining aspects such as security, operating mode, connectivity, etc... both of the UDS system itself and of its communication with the virtual platforms registered in UDS.
In this manual, only some of the system variables are shown, which are considered the most useful for the management of virtual desktops.
In the rest of the variables, it is recommended not to modify the default values, since some of them indicate to the system how it should work (number of simultaneous tasks, task execution time, scheduled checks, etc ...) and an incorrect modification of a parameter may cause the system to stop completely or not work properly.
NOTE:
Once the values of any of the UDS advanced configuration variables have been modified, it will be necessary to restart the UDS Server to apply the changes
If you want to modify any value that is not documented in this section, it is recommended to contact the OpenUDS support team to verify said change and confirm that it does not negatively affect the operation of the UDS system
To access the parameters of the advanced configuration of UDS, access the "Tools" section and select "Configuration":
UDS
UDS ID: Identification of the OpenUDS installation
AutorunService = Performs direct access to the user's service if the user only has a single service assigned.
By activating this parameter, users who are assigned a single service will make a direct connection to it, hiding the service selection screen and using the "Transport" configured first.
Default: no.
DisallowGlobalLogin = If enabled, does not display the global list of authenticators.
If enabled, users will be validated on the authenticator "by default" or with higher priority. To validate with other authenticators and allow user access to the system, it will be necessary to use the "label" in the access URL (defined in the authenticator).
Default: no.
KeepInfoTime = Defines the time that the completed events of a "Service Pool" remain visible. Expressed in seconds
Default: 14401 seconds (4 hours)
RedirectToHttps = Automatically redirects access to OpenUDS from http to https. Default: no
SessionExpireTime = Indicates the maximum time that a user session will be open after having made a new publication. After that time, the system will close the user session and proceed to remove the service. If the service has an OS Manager with "Keep service assigned even on new publication "as the persistence policy on the virtual desktop, this won't apply.
Default: 24 hours.
StatsDuration = Time that the system will store the statistics. Default: 365 days.
Security
Parameters related to the security of the UDS system are described:
AllowRootWebAccess = Allows the superuser to login (user created in the UDS-Server configuration wizard) in the UDS login portal.
Modifying this variable will not affect the access of the root user through the Linux OS console
Default: yes.
Behind a proxy = Indicates to the system that the UDS servers are "behind" a proxy (For example, a UDS environment in high availability with a load balancer type HA Proxy).
Default: no.
Block ip on login failure: Enables that in addition to blocking a user who has failed several times in the login portal, the IP address of his connection client is also blocked.
Default: no.
LoginBlockTime: Time that a user will be blocked (in seconds) after entering his password incorrectly the times indicated in the variable "maxLoginTries".
Default: 300 seconds (5 minutes).
Master Key: Security code for the UDS Actor (only applies to versions prior to UDS 3.0)
MaxLoginTries: Number of attempts a user will have to enter his password before the system locks it.
RootPass = Password of the superuser created in the UDS-Server configuration wizard.
SuperUser = Name of the superuser created in the UDS-Server configuration wizard.
Session timeout for Admin = Time in seconds until an administration that does not perform any action is logged out.
Session timeout for User = Time in seconds until a user who performs no action is logged out.
Trusted Hosts = Hosts that UDS considers safe. These hosts can make "sensitive" requests to UDS, such as tunnels.
It allows completes subnets, range of ips and specific public ips By default: "*" (all allowed), admits address range values.
Admin
Enable VNC for user services = If enabled, a new option will appear in the assigned services of a "Service Pool" to allow connection via VNC.
Clicking on "VNC" will generate a file with all the information to connect to the service through a VNC client (the client must be previously installed and there must also be direct network connectivity with the service)
Default: no
List page size = Number of items to display. Applies to all sections of the administration. Default: 10
Trusted Hosts for Admin: Filter from which IP addresses it is possible to manage UDS (includes from web access to administration with the API) separated by comas.
It allows completes subnets, range of ips and specific public ips.
Custom
Parameters related to the graphical customization of UDS (login and user services portal) are described:
CSS = Supports code to modify UDS default style pages
Logo name = Text that is displayed next to the upper left image of the user menu bar.
Min. Services to show filter = Minimum number of services that must exist in a user's services window (user mode) for the filter option to be displayedr.
Show Filter on Top = Allows you to modify the location of the service search bar on the user services page (user mode).
Site copyright info = Text that will appear in the lower right part of the login and user services page.
Site copyright link = Web address in the text of the section "Site copyright info".
Site information = HTML code for partial customization of UDS login page. The code entered will appear below the user login box in the UDS login portal
Site name = Texto que aparecerá en la parte superior del cuadro de login de los usuarios en el portal de login de UDS.
SAML
Parameters related to the operation of the SAML authenticator are described:
Global logout on exit = Indicates the "logout" mode.
If enabled, when UDS is logged out, SAML is also performed. Default: no.
IDP Metadata Cache = Time the IDP's cached metadata is kept. Default: 86400 seconds (24 hours).
Organization Display Name = Organization name displayed.
Organization Name = Name of the organization.
Organization URL = Web address of the organization.
Flush Cache
To empty the cache of the UDS system, access the "Tools" section and select "Flush cache":
The most common reasons for clearing the system cache are:
- Blocking user: When a user enters his password incorrectly the times indicated in the variable "maxloginTries" (security section in the UDS
configuration), the system blocks said user. To unblock him immediately, it will be necessary to empty the system cache.
- Inventory update: It is possible that when a "Service" is edited, some elements such as datastores, networks, base machines, etc... recently added, are not available (since these have been cached to avoid unnecessary requests). To view them, you will have to empty the system cache. In this way, the broker will make the request to the hypervisor again and the data will be updated.
-END OF DOCUMENT-